L series Alternator upgrade How to.
Posted: 17 Jan 2009 10:58
I tried to quote as many peoples info as i could but dont kill me with copyright issues 
I personally just did this swap in a 620 truck, the only difference would be that you wont have the idler arm clearance issue in a 510. There are many ways to do this so check it out.
A quick list of what you need,
a turnbuckle or a couple heim joints to make your own turnbuckle these can be sourced form most hardware stores
An alternator I usednapa PN: 213-4591 94 saturn SL
Probably need a new belt shorter or longer... I used what Motion auto supply listed as stock belt
etc etc
So, your alternator sucks well yea WE KNOW! here are a few alternatives that have been found.
[QUOTE=Icehouse;808]I discovered that a ka24e alternator is 60amps but if you get a new on from Shucks it is a 90amp-105amp (or so they say, steve the engineer would now how to check ) for 180 bucks remanufactured in the US and it has a life time warranty (Job security for a few people ) Well after I brought it home I compared it to my spare SR alternator. They where the same except the pulley. The KA24e from the truck has a v belt style pulley all of the s13's have the wide belts, mini serpentine's I guess..... I also compared the bolt spacing, yep the same as the L and the SR. I'm not to surprised.
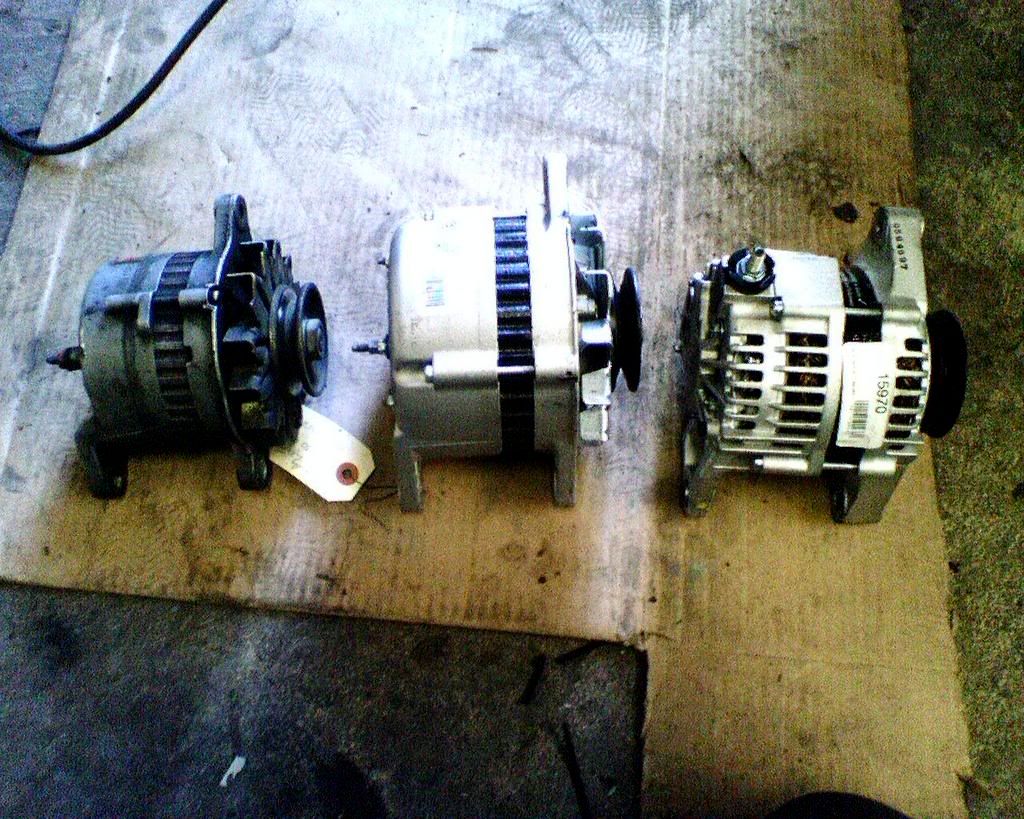
Starting from the left: 35amp 521 alt. 60amp z alt and a 90amp KA24e alt. Notice all the spacings are the same.
[/QUOTE]
Recently i put a saturn Alt in my 77 620, there are many different ways of doing this so i will try to include a multitude of pictures. I used an Alt out of a 94 saturn SL
napa PN: 213-4591
The price was about 50 bucks after I dishonestly gave them my Hitachi as a core:lol:
The belt you will need is a V belt just like what you have on your car or truck right now. You may need a longer belt or a shorter belt then what you currently run. Me personally i used a belt that is listed as a stock belt for an L20b in the 77 620.
You will need to swap the pulley on the saturn alternator from the one that comes with it to a V-belt pulley, At your local parts main store they probably have a box of misc alternator parts. I asked them if they had any extra pulleys laying around and they sure did, i grabbed one that was about the same diameter as the saturn alt and put it on.
original pulley seen on the right

Okay to get the alternator to bolt into your truck you will need to modify the lower mounting bracket.
So start with draining your radiator and getting the lower hose out of the way! next unhook your battery and remove the old alternator and lower mounting bracket (thing alternator is bolted to)
THANK YOU MIKE PHILIPS FOR THE GREAT PICS
Lets start here.

SECOND- cut shim! so that it doesnt over hang

Re-Insert shim

Next you will need to grind the lower mount, like so.

Basicly you are wanting to be able to attach the new alt and rotate the bracket around it in the largest range of motion available.
with out grinding the bracket would hit the Alt here.

personally i didnt have a problem with the stock bolt fitting through the eye of the new alternator but mike did so he had to drill out the eye to get the bolt through... no big deal!

So the point you should be at right now is... Your old alternator is out of the truck, your about 4 beers deep and thinking you dont know what your doing... okay lets show our selves some progress. put the freshly modified/fabricated alternator mount back in the truck and bolt it in. wheew okay we are on our way!
next bolt in the new alternator keeping the bolts loose so that you can move it around. check your clearances to see how much upwards and downward movement you have.
the next part is where there is alot of controversy, some people do it different ways... Oh well get over it there is several ways to skin a cat. Mike and myself did this the same why its cheap and easy.
Go to lowes and get one of these


the one i got was 3 bucks.
I ended up unscrewing one eye completely and cutting it down about a 1/4 inch to give maximum adjustment.
So i didnt take any pictures of this so ill do my best to describe it.
The original upper alternator bracket looks kind of like a bannana. lay it on a bench and stare at it for a second... okay keep reading, one end has a hole it it, and the other end has a slot for adjustment. there is a small wrinkle in it for where it bolts to the block. At the end of the adjustment slot left enough metal to keep the strength and i drilled a hole for where im going to mount the turnbuckle then cut the rest off. Mike did the same thing here are his pictures.
on the left is the slot going to the top eye of the new alt, and on the right is the hole that you are going to drill.


basically all you are doing is making an anchor point for the turn buckle.
so now you bolt in your turn buckle, i screwed in the turn buckle and bolted it up with the alt as close to the block as i could go so that all of my adjustment was away from the engine hence tightening the belt. after it was all said and done I had about 3/8 of an inch between the top of the Alt and the radiator hose and about 1/2 inch before i would hit the idler arm. I did not have to modify anything else mechanicly.
here is mine installed

okay now that the alternator is installed and your out of beer go ahead and sleep it off and finish the wiring in the morning...
okay good moring kids!
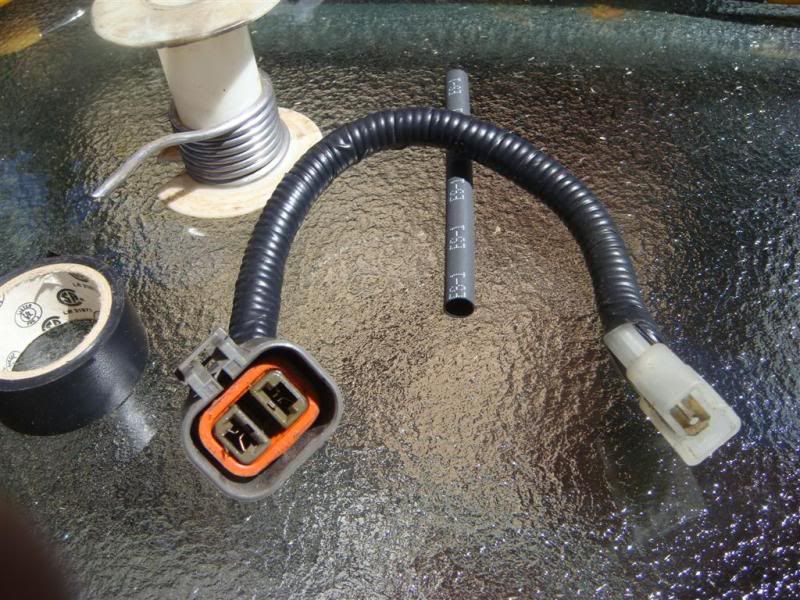
so you need to go to a junkyard and get a plug for the back of your alternator, i got mine off of a 96 and it works just fine. the plug looks like this

Slodat hooked me up with pretty much all of my wiring info... take the t connector that was hooked to the stock alternator and hook it up as follows
the L on the saturn plug goes to the black and white wire off the T connector, and the F on the saturn plug goes to the yellow wire. now plug it in that part is done.
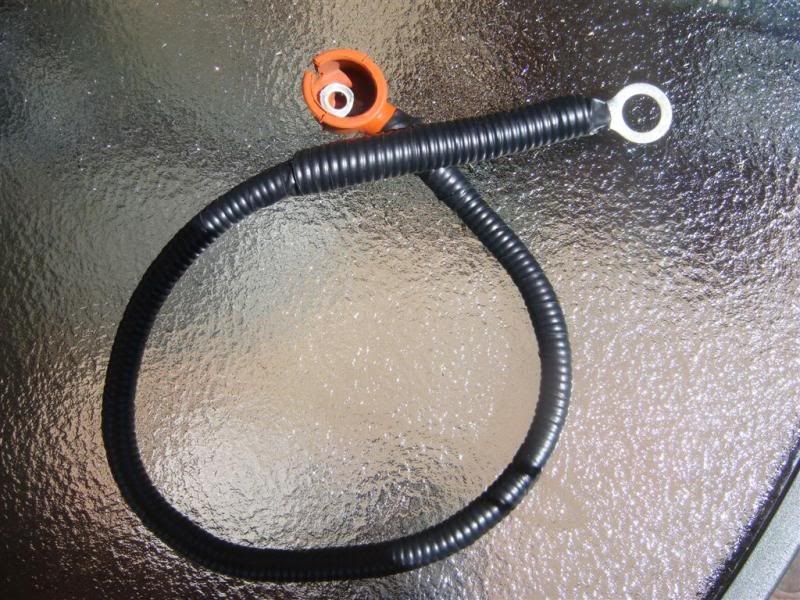
you should have a larger gauge White and red wire that should be your positive wire, if you noticed on the back of the saturn alt there is a post, it says positive next to it. Hook the large white and red wire to that. There is also a threaded hole back there some where. I found a matching bolt and hooked the black ground there.
Okay now get another beer and your almost through! find the voltage regulator, i took the regulator off the fender well and i cut the 4 wires that i was spliceing as close to the back of the regulator that i could. I spliced them and then tucked them back up there. It all looks stock from the outside.
So you are going to be splicing the yellow to the white wire and the White and black wire with White and red wire. just jumper them together.

okay thats it kids, double check all your connections hook your rad back up and your battery. now when you turn your key on your CHG light should come fire it up and check it with a volt meter.
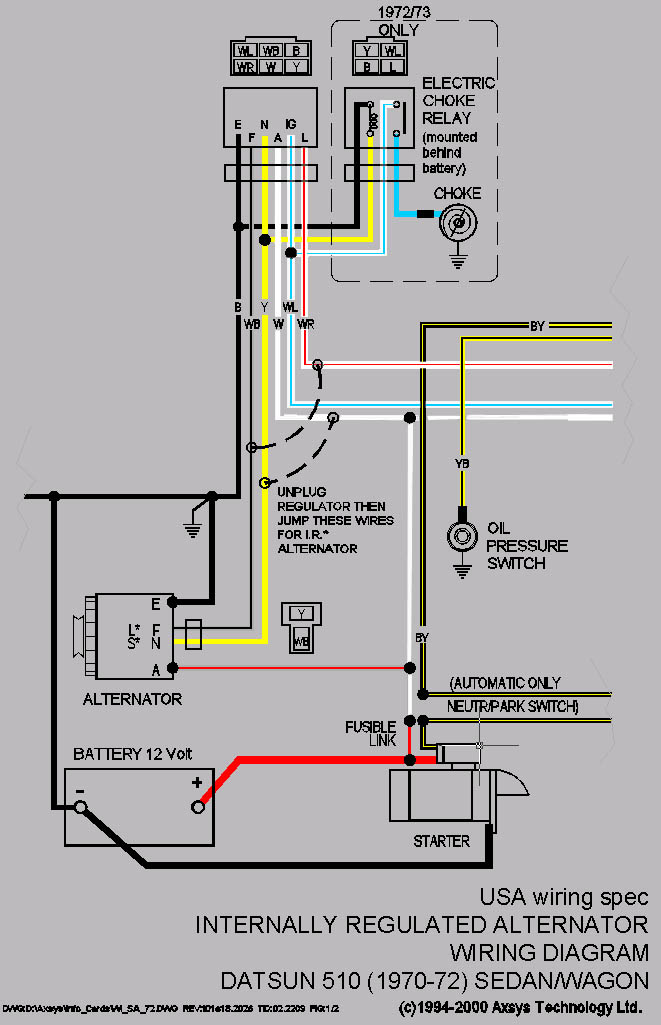
for those of you that like wiring diagrams... here you go
thank you everyone for all the help with my install and I hope this thread did a decent job condensing the information about this swap
I personally just did this swap in a 620 truck, the only difference would be that you wont have the idler arm clearance issue in a 510. There are many ways to do this so check it out.
A quick list of what you need,
a turnbuckle or a couple heim joints to make your own turnbuckle these can be sourced form most hardware stores
An alternator I usednapa PN: 213-4591 94 saturn SL
Probably need a new belt shorter or longer... I used what Motion auto supply listed as stock belt
etc etc
So, your alternator sucks well yea WE KNOW! here are a few alternatives that have been found.
[QUOTE=Icehouse;808]I discovered that a ka24e alternator is 60amps but if you get a new on from Shucks it is a 90amp-105amp (or so they say, steve the engineer would now how to check
Starting from the left: 35amp 521 alt. 60amp z alt and a 90amp KA24e alt. Notice all the spacings are the same.
[/QUOTE]
Recently i put a saturn Alt in my 77 620, there are many different ways of doing this so i will try to include a multitude of pictures. I used an Alt out of a 94 saturn SL
napa PN: 213-4591
The price was about 50 bucks after I dishonestly gave them my Hitachi as a core
The belt you will need is a V belt just like what you have on your car or truck right now. You may need a longer belt or a shorter belt then what you currently run. Me personally i used a belt that is listed as a stock belt for an L20b in the 77 620.
You will need to swap the pulley on the saturn alternator from the one that comes with it to a V-belt pulley, At your local parts main store they probably have a box of misc alternator parts. I asked them if they had any extra pulleys laying around and they sure did, i grabbed one that was about the same diameter as the saturn alt and put it on.
original pulley seen on the right
Okay to get the alternator to bolt into your truck you will need to modify the lower mounting bracket.
So start with draining your radiator and getting the lower hose out of the way! next unhook your battery and remove the old alternator and lower mounting bracket (thing alternator is bolted to)
THANK YOU MIKE PHILIPS FOR THE GREAT PICS
Lets start here.
SECOND- cut shim! so that it doesnt over hang
Re-Insert shim
Next you will need to grind the lower mount, like so.
Basicly you are wanting to be able to attach the new alt and rotate the bracket around it in the largest range of motion available.
with out grinding the bracket would hit the Alt here.
personally i didnt have a problem with the stock bolt fitting through the eye of the new alternator but mike did so he had to drill out the eye to get the bolt through... no big deal!
So the point you should be at right now is... Your old alternator is out of the truck, your about 4 beers deep and thinking you dont know what your doing... okay lets show our selves some progress. put the freshly modified/fabricated alternator mount back in the truck and bolt it in. wheew okay we are on our way!
next bolt in the new alternator keeping the bolts loose so that you can move it around. check your clearances to see how much upwards and downward movement you have.
the next part is where there is alot of controversy, some people do it different ways... Oh well get over it there is several ways to skin a cat. Mike and myself did this the same why its cheap and easy.
Go to lowes and get one of these
the one i got was 3 bucks.
I ended up unscrewing one eye completely and cutting it down about a 1/4 inch to give maximum adjustment.
So i didnt take any pictures of this so ill do my best to describe it.
The original upper alternator bracket looks kind of like a bannana. lay it on a bench and stare at it for a second... okay keep reading, one end has a hole it it, and the other end has a slot for adjustment. there is a small wrinkle in it for where it bolts to the block. At the end of the adjustment slot left enough metal to keep the strength and i drilled a hole for where im going to mount the turnbuckle then cut the rest off. Mike did the same thing here are his pictures.
on the left is the slot going to the top eye of the new alt, and on the right is the hole that you are going to drill.
basically all you are doing is making an anchor point for the turn buckle.
so now you bolt in your turn buckle, i screwed in the turn buckle and bolted it up with the alt as close to the block as i could go so that all of my adjustment was away from the engine hence tightening the belt. after it was all said and done I had about 3/8 of an inch between the top of the Alt and the radiator hose and about 1/2 inch before i would hit the idler arm. I did not have to modify anything else mechanicly.
here is mine installed
okay now that the alternator is installed and your out of beer go ahead and sleep it off and finish the wiring in the morning...
okay good moring kids!
so you need to go to a junkyard and get a plug for the back of your alternator, i got mine off of a 96 and it works just fine. the plug looks like this
Slodat hooked me up with pretty much all of my wiring info... take the t connector that was hooked to the stock alternator and hook it up as follows
the L on the saturn plug goes to the black and white wire off the T connector, and the F on the saturn plug goes to the yellow wire. now plug it in that part is done.
you should have a larger gauge White and red wire that should be your positive wire, if you noticed on the back of the saturn alt there is a post, it says positive next to it. Hook the large white and red wire to that. There is also a threaded hole back there some where. I found a matching bolt and hooked the black ground there.
Okay now get another beer and your almost through! find the voltage regulator, i took the regulator off the fender well and i cut the 4 wires that i was spliceing as close to the back of the regulator that i could. I spliced them and then tucked them back up there. It all looks stock from the outside.
So you are going to be splicing the yellow to the white wire and the White and black wire with White and red wire. just jumper them together.
okay thats it kids, double check all your connections hook your rad back up and your battery. now when you turn your key on your CHG light should come fire it up and check it with a volt meter.
for those of you that like wiring diagrams... here you go
thank you everyone for all the help with my install and I hope this thread did a decent job condensing the information about this swap