I am intrigued by the Evans stuff, let us know how that works out.
My engine is also clean and dry, a perfect candidate for that stuff!
'69 510 - Lysholm Twin-Screw Project
-
two_68_510s

- Supporter
- Posts: 3894
- Joined: 18 Apr 2010 11:20
- Location: Ben Lomond California
Re: '69 510 - Lysholm Twin-Screw Project
Joel
2 '68 510 2 door sedans
'95 240SX
“We will either find a way, or make one.” – Hannibal
2 '68 510 2 door sedans
'95 240SX
“We will either find a way, or make one.” – Hannibal
-
VelvetHammer

- Supporter
- Posts: 246
- Joined: 31 Oct 2008 20:34
- Location: Marina del Rey, CA
Re: '69 510 - Lysholm Twin-Screw Project
So picking up where I left off:
We had installed the engine, trans and driveshaft. I high-fived my buddy and he leaves feeling as though we got one step closer to firing the car up after collecting dust for the last 6 years. I was picking up tools and putting things away and found this thing under a pile of notes...
Oh lord...
I sat there, alone, silently, for about 5 minutes and then started laughing as I pulled out all the stuff I had just put away. With a combination of anger, laughter, and tears I had the entire thing apart again in less than 20 minutes
ummm, yep, this would have been bad
As I remember it took me a while to figure out how to get those flywheel bolts torqued to spec without turning the engine. Does anyone make a tool that bolts to the block and engages to the teeth of the flywheel thus preventing rotation? Would be a handy thing to have!
We had installed the engine, trans and driveshaft. I high-fived my buddy and he leaves feeling as though we got one step closer to firing the car up after collecting dust for the last 6 years. I was picking up tools and putting things away and found this thing under a pile of notes...
- IMG_4283.jpg (202.72 KiB) Viewed 4986 times
I sat there, alone, silently, for about 5 minutes and then started laughing as I pulled out all the stuff I had just put away. With a combination of anger, laughter, and tears I had the entire thing apart again in less than 20 minutes
- IMG_4286.jpg (201.45 KiB) Viewed 4986 times
- IMG_4284.jpg (214.51 KiB) Viewed 4986 times
- IMG_4285.jpg (212 KiB) Viewed 4986 times
-
VelvetHammer
- Supporter
- Posts: 246
- Joined: 31 Oct 2008 20:34
- Location: Marina del Rey, CA
Re: '69 510 - Lysholm Twin-Screw Project
Let's see, what else...
Ah, yes, I polished up the horns for the throttle bodies
I also had to adapt the intake runner to accept our homemade MAP log. For those who don't know, EFI systems generally rely on a signal from a MAP sensor to adjust fuel and spark delivery (Volumetric Efficiency Table and Spark Advance Table). Since the map sensor has a single opening where a reference tube is attached and I'm running individual throttle bodies, you need to create a "log" that will combine and essentially average all the atmospheric pulses across all intake runners. The diameter and length of the log will determine how smooth the resulting signal will be. Too small and the signal will be jerky, too big and the signal response will be weak. The kPa values should be/ need to be distinguishable within 5 kPa. I'm happy to say our napkin math got it right the first time. Our resolution is within about +/- 2 kPa.
We drilled out the hole that is typically used for throttle linkage and ran our log through that. It works out to be a very clean looking install.
As you can see in the photo we had also gotten our header ceramic coated inside and out by Specialized Coating in Huntington Beach, who were very knowledgeable, priced fairly and got it done ahead of their estimated deadline.
On a side note, I can't say enough good things about vendors that hit their deadlines. In my original restoration of the car I think we used over 30 something different vendors (zinc plating, chroming, metal polishing, media blasting, paint, body, interior, steering wheel resto, license plate resto, seat belt resto, dash resto, power coating, ceramic coating, radiator testing, fabricators, various parts houses, etc, etc, etc) and I can say only a small handful actually hit the dates they set for themselves. When vendors are holding up other vendors to get your project finished this is can be very frustrating. That said, this time around, I've had pretty good luck!
Ah, yes, I polished up the horns for the throttle bodies
- IMG_4294.jpg (241.47 KiB) Viewed 4984 times
We drilled out the hole that is typically used for throttle linkage and ran our log through that. It works out to be a very clean looking install.
- IMG_4307.jpg (198.42 KiB) Viewed 4984 times
- IMG_4310.jpg (195.71 KiB) Viewed 4984 times
- IMG_5754.jpg (328.08 KiB) Viewed 4984 times
On a side note, I can't say enough good things about vendors that hit their deadlines. In my original restoration of the car I think we used over 30 something different vendors (zinc plating, chroming, metal polishing, media blasting, paint, body, interior, steering wheel resto, license plate resto, seat belt resto, dash resto, power coating, ceramic coating, radiator testing, fabricators, various parts houses, etc, etc, etc) and I can say only a small handful actually hit the dates they set for themselves. When vendors are holding up other vendors to get your project finished this is can be very frustrating. That said, this time around, I've had pretty good luck!
Last edited by VelvetHammer on 18 Oct 2014 11:23, edited 1 time in total.
-
VelvetHammer
- Supporter
- Posts: 246
- Joined: 31 Oct 2008 20:34
- Location: Marina del Rey, CA
Re: '69 510 - Lysholm Twin-Screw Project
Will do!two_68_510s wrote:I am intrigued by the Evans stuff, let us know how that works out.
My engine is also clean and dry, a perfect candidate for that stuff!
Re: '69 510 - Lysholm Twin-Screw Project
I've never made one for sale, but my "tool" is simply a triangular piece of 3/8" plate with a 10mm holiday in one end and a single tooth at the other end which engages into the flywheel. I used a number of washers to space the tool over the flywheel ring gear and snug the bolt in place. If I need to tighten the bolts, the tool is installed in one direction, for removal I flip the tool over.VelvetHammer wrote:So picking up where I left off:
Does anyone make a tool that bolts to the block and engages to the teeth of the flywheel thus preventing rotation? Would be a handy thing to have!
It's a crude little tool, but works like a hot damn!
Next time I'm in the shop, I'll take a photo and post the dimensions.
Byron
Love people and use things,
because the opposite never works.
because the opposite never works.
-
VelvetHammer
- Supporter
- Posts: 246
- Joined: 31 Oct 2008 20:34
- Location: Marina del Rey, CA
Re: '69 510 - Lysholm Twin-Screw Project
I tried to google but no luck, what's a "holiday"? Like a stand-off?Byron510 wrote:..but my "tool" is simply a triangular piece of 3/8" plate with a 10mm holiday in one end...
-
Great_Escape

- Supporter
- Posts: 63
- Joined: 14 Jun 2013 21:18
- Location: Soquel, Ca
Re: '69 510 - Lysholm Twin-Screw Project
Not to steer you away from this stuff, but we choose to use it in some of our heavy duty/Industrial diesel applications as it not only boils at a higher temp it also causes them to run hotter making the equipment run a bit more efficiently. These engines love the heat. Running it strait vs a water/coolant mix makes them run hotter, I don't know why I'm not an engineer. I believe Evens is 100% Propylene Glycol. It comes standard in a lot of the diesels.VelvetHammer wrote: I've decided to run Evans (http://www.evanscooling.com)l this time around so I'll report back as to how it works out!
Here is something I read and from my experience with it it rings true. "Evans coolant is 100% propylene glycol...no water added. Cool thing is it doesn't boil until 360F. Thats great when you think about localized boiling around the cylinders causing hotspots with conventional...with Evans there's no way you're going to get hotspots in the combustion chamber that can possibly cause knock. Bad thing is propylene glycol's specific heat isn't all that great. That effectively makes your radiator act like its smaller than it really is. That also means that when your engine makes a fixed amount of heat the Evans coolant temps will rise more than water will. That's all fine and dandy when you remember that it won't boil until 360F...it has plenty of overhead. The bad thing is the fans run more often than they should since the stock computer thinks you're getting hotter than you should be. The other bad thing is your oil temps go up from the extra heat in the block so you need a nice big oil cooler to manage things. Granted Mobil 1 says its good for 400F but I know most road racers shut things down at 300F. Other negatives to the Evans coolant are the cost and the large expansion rate range of the fluid with temperature swings."
Hope this helps.

Re: '69 510 - Lysholm Twin-Screw Project
+1 on Evans. I would not run it in my car for those reasons stated above.
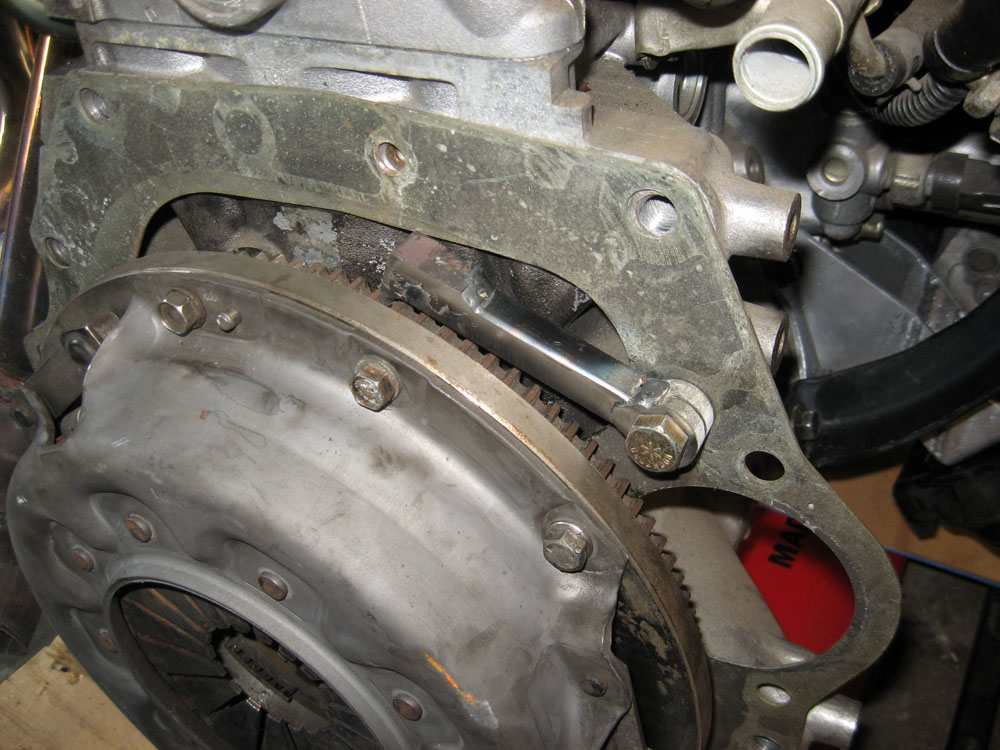
I think that was autocorrected from hole. I'd assume it was something like Okayfines's shown below but a simple triangle with offset hole instead of a bar.VelvetHammer wrote:I tried to google but no luck, what's a "holiday"? Like a stand-off?Byron510 wrote:..but my "tool" is simply a triangular piece of 3/8" plate with a 10mm holiday in one end...
'72 2 door KA project | S14 Silvia RB25DET | S14 RB26DETT (sold) | '90 Audi 90Q20V (sold)
-
VelvetHammer
- Supporter
- Posts: 246
- Joined: 31 Oct 2008 20:34
- Location: Marina del Rey, CA
Re: '69 510 - Lysholm Twin-Screw Project
Thanks for the insight! I've actually done quite a bit of research on this product (including calling Evans and talking with their lead tech for about an hour), and there are lot's of personal factors to consider when using this product.Great_Escape wrote:Not to steer you away from this stuff, but we choose to use it in some of our heavy duty/Industrial diesel applications as it not only boils at a higher temp it also causes them to run hotter making the equipment run a bit more efficiently. These engines love the heat. Running it strait vs a water/coolant mix makes them run hotter, I don't know why I'm not an engineer. I believe Evens is 100% Propylene Glycol. It comes standard in a lot of the diesels.VelvetHammer wrote: I've decided to run Evans (http://www.evanscooling.com)l this time around so I'll report back as to how it works out!
Here is something I read and from my experience with it it rings true. "Evans coolant is 100% propylene glycol...no water added. Cool thing is it doesn't boil until 360F. Thats great when you think about localized boiling around the cylinders causing hotspots with conventional...with Evans there's no way you're going to get hotspots in the combustion chamber that can possibly cause knock. Bad thing is propylene glycol's specific heat isn't all that great. That effectively makes your radiator act like its smaller than it really is. That also means that when your engine makes a fixed amount of heat the Evans coolant temps will rise more than water will. That's all fine and dandy when you remember that it won't boil until 360F...it has plenty of overhead. The bad thing is the fans run more often than they should since the stock computer thinks you're getting hotter than you should be. The other bad thing is your oil temps go up from the extra heat in the block so you need a nice big oil cooler to manage things. Granted Mobil 1 says its good for 400F but I know most road racers shut things down at 300F. Other negatives to the Evans coolant are the cost and the large expansion rate range of the fluid with temperature swings."
Hope this helps.
I was interested in it primarily for it's non-corrosive properties as seen and discussed on Leno's garage:
http://www.youtube.com/watch?v=t7PykrgzWPQ
and
http://www.youtube.com/watch?v=KRLXKW2ph0w
Here are my own thoughts on the topic:
Cost: Not to sound too flippant but I literally spent more on beer this weekend (got stuck with the tab) than what it costs to fill up my cooling system, so if I don't drink next weekend I've paid for the product (could be worse trade offs). Unfortunately cylinder heads can have a significant amount of cash invested into them and since my car ins't a daily driver I wanted something that could maintain that investment over the long term.
Increased heat: I was told by the Evan's tech I could expect around a 10° increase in temps. I live near the coast and most of my driving is in 60-80° weather so I'm not too worried about it. If I lived in the desert I may think twice. I will need to watch my fan-on-time in traffic and see if I need to make adjustments to the radiator size. My understanding of a well designed system is that once the thermostat is open, cruising above 20mph any system should be able to maintain the 160°-190° necessary (or wherever you like you engine to run). With aluminum radiators sometimes there is too much cooling and there is an over reliance on the thermostat to throttle the temperature, which creates pressure/ temperature surging as the thermo lags behind the temp swings as it opens and closes. It would be interesting to remove the thermostat entirely (like on many race cars) and see where the cooling system natively wants to control temps. If the fan is having trouble keeping up with the heat in traffic, then a larger fan (or one that pulls a higher CFM) or larger radiator may be needed. Edit: If the fan is ever kicking on while driving/ cruising, then the system is not designed correctly.
This is a long winded way of saying that it may be necessary to develop the correct system for the Evans product, and not expect Evans to work with a system that was designed for a different type of coolant.
I believe you are right that I will no doubt experience more fan-on-time while sitting traffic. Unless i'm missing something (100% likely), it seems like I should be able engineer the proper system to where I'll be able to dial in my desired temp at both low (traffic) and high speed. As long as I'm able to control the base temp of the engine I shouldn't need to worry about increased oil temps, they will follow in line. Once I supercharge the engine I'll need to think about remote cooling the oil a bit more closely (and perhaps a larger cooling system), BUT then again if I use water or meth injection I may be able to manage temps and not have to worry about any of it. In supercharging you have to figure out what your average time-on-boost will be (1/4 mile runs or stoplight to stoplight) and design the best system from there. This is why many supercharged production cars don't have intercoolers (they bolt directly to the intake), they are designing the supplemental power to be used for short/ infrequent durations (passing, hills, etc) and can moderate the effects of increased intake temps by retarding the ignition timing. On cars that are built for more sustained performance you'll find a higher use of intercooling. In the end you need to pick a design objective (street, track, strip, 1/8th, 1/4) and build specifically to that.
Of course I say all this with the caveat that I don't know what the hell I'm talking about most of the time. So if there are giant holes in my logic please let me know!
Last edited by VelvetHammer on 19 Oct 2014 19:14, edited 6 times in total.
-
VelvetHammer
- Supporter
- Posts: 246
- Joined: 31 Oct 2008 20:34
- Location: Marina del Rey, CA
Re: '69 510 - Lysholm Twin-Screw Project
Ah, thanks for the pic! that's great. I'll let everyone know how the Evan's works out!JordanTr wrote:+1 on Evans. I would not run it in my car for those reasons stated above.
I think that was autocorrected from hole. I'd assume it was something like Okayfines's shown below but a simple triangle with offset hole instead of a bar.VelvetHammer wrote:I tried to google but no luck, what's a "holiday"? Like a stand-off?Byron510 wrote:..but my "tool" is simply a triangular piece of 3/8" plate with a 10mm holiday in one end...
Re: '69 510 - Lysholm Twin-Screw Project
JordanTr wrote:+1 on Evans. I would not run it in my car for those reasons stated above.
I think that was autocorrected from hole. I'd assume it was something like Okayfines's shown below but a simple triangle with offset hole instead of a bar.VelvetHammer wrote:I tried to google but no luck, what's a "holiday"? Like a stand-off?Byron510 wrote:..but my "tool" is simply a triangular piece of 3/8" plate with a 10mm holiday in one end...
Jordan was correct - autocorrectd incorrectly.
My locking tool is qite a bit shorter than Okfine's, but works exactly the same way.
Byron
Love people and use things,
because the opposite never works.
because the opposite never works.
-
VelvetHammer
- Supporter
- Posts: 246
- Joined: 31 Oct 2008 20:34
- Location: Marina del Rey, CA
Re: '69 510 - Lysholm Twin-Screw Project
Alright so let's see, I left off with the rear main seal getting installed
I started tackling some rewiring and focused on just getting the car up and running. I'll make everything look nice later.
(this crimping tool is awesome)
Unfortunately years ago I had sold off my ceramic coated 2 1/4" exhaust system, because the supercharger would need a bigger pipe. Now that I'm running NA for a bit I could have used the old stuff. I decided to go with a 2.5" system for now to get the best performance out of this engine. I'll probably install a few pressure sensors to see what my actual back pressure is and compare that to the SC engine when I get to it.
I loved the sound of my old system, so I knew i was going go with Borla again (nice meaty tone). i found the outlet to the last muffler ran closer to the rear tire than I liked so I experimented with straight through vs offset.
See the tire through the hole on the left side?
pretty darn close
I wanted to avoid sharp bends and I also had to think about where the pipe would run under my CV kit (keep heat away from the boot). And yes, that's a floor jack hold up a cardboard box.
note CV shaft in foreground
I ended up going going with a offset/ offset and towed the car out to Renown Racing to build the system.
- IMG_4311.jpg (208.34 KiB) Viewed 4880 times
- IMG_4657.jpg (190.9 KiB) Viewed 4880 times
- IMG_4655.jpg (164.29 KiB) Viewed 4880 times
- IMG_4718.jpg (238.29 KiB) Viewed 4880 times
I loved the sound of my old system, so I knew i was going go with Borla again (nice meaty tone). i found the outlet to the last muffler ran closer to the rear tire than I liked so I experimented with straight through vs offset.
See the tire through the hole on the left side?
- IMG_4774.jpg (171.3 KiB) Viewed 4880 times
- IMG_4760.jpg (126.68 KiB) Viewed 4880 times
- IMG_4776.jpg (204.68 KiB) Viewed 4880 times
- IMG_4795.jpg (137.93 KiB) Viewed 4880 times
- IMG_5581.jpg (272.2 KiB) Viewed 4880 times
- IMG_5587.jpg (165.7 KiB) Viewed 4880 times
-
VelvetHammer
- Supporter
- Posts: 246
- Joined: 31 Oct 2008 20:34
- Location: Marina del Rey, CA
Re: '69 510 - Lysholm Twin-Screw Project
- IMG_5610.jpg (208.73 KiB) Viewed 4880 times
- IMG_5621.jpg (204.05 KiB) Viewed 4880 times
- IMG_5626.jpg (150.78 KiB) Viewed 4880 times
-
VelvetHammer
- Supporter
- Posts: 246
- Joined: 31 Oct 2008 20:34
- Location: Marina del Rey, CA
Re: '69 510 - Lysholm Twin-Screw Project
The u-joint on my steering shaft is on it's way out (for the last 20 years) and I found a few spares. Notice the length and joint difference? Can you run either lengths of these?
Has anyone figured out a replacement u-joint?
I've searched high and low and haven't been able to find a direct replacement.
It would require fabrication but these guys sell some decent looking u-joints: http://www.flamingriver.com/index.php/products/c0005
I was able to wire power to my ECU and after 5 days of trying to figure out a communication issue my laptop was finally able to upload new files.
While that was going on I had bled the brake system and found a leak in the rear fitting of the master cylinder. I never did find a new replacement fitting so I just bought a new master. I'll keep it on the shelf for back up parts.
Right before I was going to install it I noticed a giant pool of brake fluid at the left rear tire. I took off the drum and found that the brake cylinder decided to let loose. I took it apart and found corrosion/ rust so I bought (2) new ones and was going to replace both rears at the same time (the other cylinder also showed some very slight signs of corrosion, although not as bad).
What was as strange is that I ordered 2 of the same Beck Arnley part numbers, but they showed up in two different style of boxes (one was just a small plain white box, the other was large and blue and white). When I took them out of their boxes I noticed one cylinder was green-ish looking and stamped Tokico (looked OEM), the other one was silver with no markings. I didn't think much of it (they look exactly the same shape) and installed both, as well as the new master. We bled the system and as I was doing some last checks I noticed a pool of fluid collecting below the silver cylinder. I check the fitting and everything was tight, but it was still leaking out of the center of the fitting. Long story short, it took me a few re-installations to find out the flare on the cylinder was at a different angle (it looked too wide). I fished out the original cylinder out of the trash and installed it without any leaking problems.
My non-car-guy buddy was helping me with the bleeding process and I don't think he really knew how the pedal should correctly feel because after we bleed the entire system (no bubbles anywhere) I put my foot on the brake and it almost hit the floor. The rear pads were adjusted property. The master cylinder and each corner of the car do not produce any bubbles when bleeding them.
This is the way we were bleeding everything:
1. Apply brake pressure
2. Open bleed screw while pedal falls.
3. Hold pedal down and tighten bleed screw
4. Release deal and repeat
A friend is suggest using a vacuum bleeder and lightly tap on the cylinders/ junction blocks with a hammer to dislodge air bubbles.
On first press the pedal will now go to the floor and then 2nd and 3rd press it gets more firm, but never feels quite right even after the 10th or so pump.
I'm guessing my firmed is correct and there is air in the system somewhere?
Any suggestions on the easiest way to fix this?
- IMG_4314.jpg (236.31 KiB) Viewed 4875 times
- IMG_4315.jpg (199.99 KiB) Viewed 4875 times
I've searched high and low and haven't been able to find a direct replacement.
It would require fabrication but these guys sell some decent looking u-joints: http://www.flamingriver.com/index.php/products/c0005
I was able to wire power to my ECU and after 5 days of trying to figure out a communication issue my laptop was finally able to upload new files.
- IMG_4824.jpg (285.9 KiB) Viewed 4875 times
Right before I was going to install it I noticed a giant pool of brake fluid at the left rear tire. I took off the drum and found that the brake cylinder decided to let loose. I took it apart and found corrosion/ rust so I bought (2) new ones and was going to replace both rears at the same time (the other cylinder also showed some very slight signs of corrosion, although not as bad).
What was as strange is that I ordered 2 of the same Beck Arnley part numbers, but they showed up in two different style of boxes (one was just a small plain white box, the other was large and blue and white). When I took them out of their boxes I noticed one cylinder was green-ish looking and stamped Tokico (looked OEM), the other one was silver with no markings. I didn't think much of it (they look exactly the same shape) and installed both, as well as the new master. We bled the system and as I was doing some last checks I noticed a pool of fluid collecting below the silver cylinder. I check the fitting and everything was tight, but it was still leaking out of the center of the fitting. Long story short, it took me a few re-installations to find out the flare on the cylinder was at a different angle (it looked too wide). I fished out the original cylinder out of the trash and installed it without any leaking problems.
My non-car-guy buddy was helping me with the bleeding process and I don't think he really knew how the pedal should correctly feel because after we bleed the entire system (no bubbles anywhere) I put my foot on the brake and it almost hit the floor. The rear pads were adjusted property. The master cylinder and each corner of the car do not produce any bubbles when bleeding them.
This is the way we were bleeding everything:
1. Apply brake pressure
2. Open bleed screw while pedal falls.
3. Hold pedal down and tighten bleed screw
4. Release deal and repeat
A friend is suggest using a vacuum bleeder and lightly tap on the cylinders/ junction blocks with a hammer to dislodge air bubbles.
On first press the pedal will now go to the floor and then 2nd and 3rd press it gets more firm, but never feels quite right even after the 10th or so pump.
I'm guessing my firmed is correct and there is air in the system somewhere?
Any suggestions on the easiest way to fix this?

Re: '69 510 - Lysholm Twin-Screw Project
Good news about the steering u-joint replacements. Just went through the search for Z steering ujoints and the 510 stuff looks the same to me. In your picture of the two types you posted, Z's have the same options. The unstaked one has 16mm caps and the staked one has15mm caps. I have purchased both types and installed them successfully. I promise to dig up the specific web sites (two different companies...) tomorrow and pass on the part numbers and all the details. They are ATV drive shaft u-joints believe it or not.
Actually we discussed this in detail here:
http://www.classiczcars.com/forums/susp ... -play.html
The part numbers and suppliers are in there.
Another option if you want new stuff is to use Woodward steering components. They even have a custom spline connection for the Z rack which is the same as the spline on the shaft on the 510 box if my memory serves.
Hopes this helps. Let me know if I can supply any details.