GAS 1600

Re: GAS 1600
This is great to see! Your 510 is rusted in a couple of the same places mine is. Should come in handy to see how someone else repaired an area. Great build! Keep up the good work!
Re: GAS 1600
Decided I wanted the output of the gearbox parallel with the diff input. So I had to lift the gearbox about another 3.5deg. To do this I had to cut out a fair bit of the tunnel, so I had um'd and ah'd for a few days before I decided stuff it. Once the gearbox was raised I realised I wasn't happy with where the engine sat. It was too far forward and the sump was starting to hit the crossmember. So tonight I had another "stuff it" moment and decided I would just make a new crossmember and slot the engine back as far as I could. In the mean time I took the sump off, cut more tunnel out and drilled new holes ~40mm further back in my mounts. (I knew there was a reason I put plenty of meat in the mounts).
This is where the engine sat with the original mounting point and with gearbox raised. It was about 45mm from the firewall to the water outlets on the back of the engine. It also meant I only had about 80mm from the crank pulley to the bottom radiator support.
 GAS1600_031_01 by Garvice, on Flickr
This is how close it now sits, about a 5mm gap.
 GAS1600_031_09 by Garvice, on Flickr
 GAS1600_031_08 by Garvice, on Flickr
It also means that my steering linkage now connects, though I only get about 50mm of movement either way. Though I'm now confident that the maddat linkage will work.
 GAS1600_031_07 by Garvice, on Flickr
I also have a good 20mm between the top of the engine and any section of the bonnet.
 GAS1600_031_06 by Garvice, on Flickr
 GAS1600_031_05 by Garvice, on Flickr
And this is how much tunnel I had to cut. HA.
 GAS1600_031_02 by Garvice, on Flickr
Quite happy with where the shifter sits.
 GAS1600_031_03 by Garvice, on Flickr
Going to have a lot more tunnel to cut though, as the gearbox output shaft now sits half way into the cabin. So pretty much a new tunnel section all the way to the diff.
 GAS1600_031_04 by Garvice, on Flickr
This is where the engine sat with the original mounting point and with gearbox raised. It was about 45mm from the firewall to the water outlets on the back of the engine. It also meant I only had about 80mm from the crank pulley to the bottom radiator support.
GAS1600_031_01 by Garvice, on FlickrThis is how close it now sits, about a 5mm gap.
GAS1600_031_09 by Garvice, on FlickrGAS1600_031_08 by Garvice, on FlickrIt also means that my steering linkage now connects, though I only get about 50mm of movement either way. Though I'm now confident that the maddat linkage will work.
GAS1600_031_07 by Garvice, on FlickrI also have a good 20mm between the top of the engine and any section of the bonnet.
GAS1600_031_06 by Garvice, on FlickrGAS1600_031_05 by Garvice, on FlickrAnd this is how much tunnel I had to cut. HA.
GAS1600_031_02 by Garvice, on FlickrQuite happy with where the shifter sits.
GAS1600_031_03 by Garvice, on FlickrGoing to have a lot more tunnel to cut though, as the gearbox output shaft now sits half way into the cabin. So pretty much a new tunnel section all the way to the diff.
GAS1600_031_04 by Garvice, on Flickr
Last edited by Garvice on 30 Jul 2017 02:59, edited 2 times in total.
Re: GAS 1600
The engine location looks much better all around. And not having to modify the steering linkage more than makes up for the tunnel modification coming up. And the fact that to hood now clears is great. All around it looks like a win win situation.
Support the car well when you breaks it's back by cutting the tunnel the full length. Being in the roll cage fabrication myself, I've heard of some really interesting stories about things going bad when you break a cars back like that. Just a fore warning, support the car well both at the front at rear axels and carefully amid ship at the B pillar – make sure this point takes some structural weight until you get it all welded back together. Otherwise you may permanently loose your door gaps. Not that they are great on a PL510 in the first place, but it can go horribly wrong for you as well.
Great progress, keep it coming.
Byron
Love people and use things,
because the opposite never works.
because the opposite never works.
Re: GAS 1600
Thanks Byron. That sort of advice is greatly appreciated. I was very concerned about the chassis falling in on itself, especially as it was supported by the sills at the time. I think the plan of attack will be to drop engine/transmission, weld in some temporary supports under the car to tie floors together, drop whole car on it's belly and then make a new front section. Once I have the front section in, I'll replace the drivers floor. Then I will make a new tunnel section over the rear half, weld it in, then cut existing tunnel out from under it and weld remaining section to the new tunnel. If I do it right, it should be sturdier then original. Also thinking I might do a cross brace between b pillars.
Re: GAS 1600
Thanks to my understanding wife I spent some more time in the shed today.
After lots of measuring, thinking, drawing, I finally started on the transmission tunnel. First job was to get the car well supported. I have it supported at A, B and C pillar locations on the sills, at the front radiator support and at the diff. Decided against doing any bracing as I think it will hinder me getting in and out and me replacing the floors.
 GAS1600_032_01 by Garvice, on Flickr
 GAS1600_032_02 by Garvice, on Flickr
 GAS1600_032_03 by Garvice, on Flickr
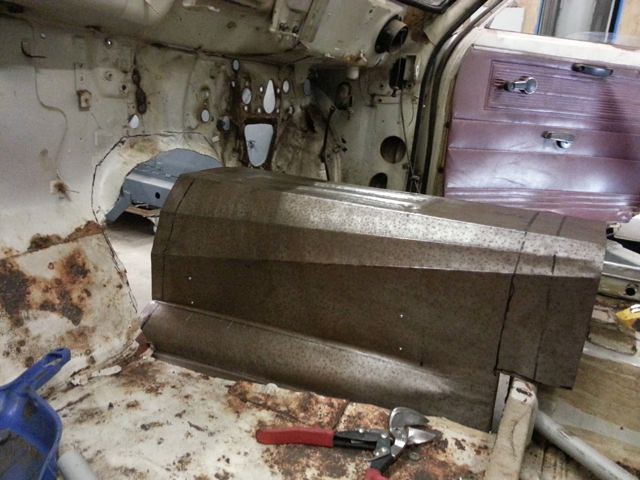
Bent up the tunnel using my hammers/scrap metal anvil/clamps etc.
 GAS1600_032_04 by Garvice, on Flickr
Decided I wanted some detail/shape in the top of the tunnel, not that it will ever get seen, but thought it couldn't hurt with the strength. Was thinking of also doing something similar in the sides, but didn't get around to it. So made a simple form.
 GAS1600_032_06 by Garvice, on Flickr
And chased around it.
 GAS1600_032_05 by Garvice, on Flickr
This is from underneath.
 GAS1600_032_07 by Garvice, on Flickr
Tunnel in progress, it's a big one.
 GAS1600_032_08 by Garvice, on Flickr
Bit more shape.
 GAS1600_032_09 by Garvice, on Flickr
Added a bit of a relief for the exhaust.
 GAS1600_032_10 by Garvice, on Flickr
Had to cut some more metal out of the car, thank goodness for plasma cutters.
 GAS1600_032_11 by Garvice, on Flickr
This is just pop riveted in place at the moment (floors need replacing).
 GAS1600_032_12 by Garvice, on Flickr
 GAS1600_032_13 by Garvice, on Flickr
Then I only had time to start on the firewall connection. Made the plan using thin card and masking tape.
 GAS1600_032_14 by Garvice, on Flickr
Transfered to metal using a sharp punch and got it cut out, but that is where I left it.
 GAS1600_032_15 by Garvice, on Flickr
After lots of measuring, thinking, drawing, I finally started on the transmission tunnel. First job was to get the car well supported. I have it supported at A, B and C pillar locations on the sills, at the front radiator support and at the diff. Decided against doing any bracing as I think it will hinder me getting in and out and me replacing the floors.
GAS1600_032_01 by Garvice, on FlickrGAS1600_032_02 by Garvice, on FlickrGAS1600_032_03 by Garvice, on FlickrBent up the tunnel using my hammers/scrap metal anvil/clamps etc.
GAS1600_032_04 by Garvice, on FlickrDecided I wanted some detail/shape in the top of the tunnel, not that it will ever get seen, but thought it couldn't hurt with the strength. Was thinking of also doing something similar in the sides, but didn't get around to it. So made a simple form.
GAS1600_032_06 by Garvice, on FlickrAnd chased around it.
GAS1600_032_05 by Garvice, on FlickrThis is from underneath.
GAS1600_032_07 by Garvice, on FlickrTunnel in progress, it's a big one.
GAS1600_032_08 by Garvice, on FlickrBit more shape.
GAS1600_032_09 by Garvice, on FlickrAdded a bit of a relief for the exhaust.
GAS1600_032_10 by Garvice, on FlickrHad to cut some more metal out of the car, thank goodness for plasma cutters.
GAS1600_032_11 by Garvice, on FlickrThis is just pop riveted in place at the moment (floors need replacing).
GAS1600_032_12 by Garvice, on FlickrGAS1600_032_13 by Garvice, on FlickrThen I only had time to start on the firewall connection. Made the plan using thin card and masking tape.
GAS1600_032_14 by Garvice, on FlickrTransfered to metal using a sharp punch and got it cut out, but that is where I left it.
GAS1600_032_15 by Garvice, on Flickr
Last edited by Garvice on 30 Jul 2017 03:03, edited 1 time in total.
Re: GAS 1600
way to go ! cant wait to hear that engine 
Re: GAS 1600
Cheers mate.
Got out to the shed for a few minutes tonight. It is just pop-riveted in at the moment. Going to make a thicker flange in the shape of the felt pen around the engine bay.
 GAS1600_033_01 by Garvice, on Flickr
 GAS1600_033_02 by Garvice, on Flickr
 GAS1600_033_03 by Garvice, on Flickr
 GAS1600_033_04 by Garvice, on Flickr
Got out to the shed for a few minutes tonight. It is just pop-riveted in at the moment. Going to make a thicker flange in the shape of the felt pen around the engine bay.
GAS1600_033_01 by Garvice, on FlickrGAS1600_033_02 by Garvice, on FlickrGAS1600_033_03 by Garvice, on FlickrGAS1600_033_04 by Garvice, on Flickr
Last edited by Garvice on 30 Jul 2017 03:06, edited 1 time in total.
Re: GAS 1600
Thought I would get some new floors in, however just didn't quite get there. Removing the old floors took a lot longer then I was expecting. I found that the drivers support rail was full of greasy crap, which seems to have kept it in pretty good nick. I was able to just hammer it back into shape. The passenger side though dry/clean inside and had subsequently rusted through. So I will probably need to replace that now too.
Flinstone's powered car.
 GAS1600_034_01 by Garvice, on Flickr
Added some ribbing to the drivers side, front section welded onto tunnel, rear section of tunnel thinned down and tunnel welded to firewall.
 GAS1600_034_02 by Garvice, on Flickr
 GAS1600_034_03 by Garvice, on Flickr
 GAS1600_034_04 by Garvice, on Flickr
 GAS1600_034_05 by Garvice, on Flickr
Was getting a bit late so didn't get around to grinding the welds back.
Flinstone's powered car.
GAS1600_034_01 by Garvice, on FlickrAdded some ribbing to the drivers side, front section welded onto tunnel, rear section of tunnel thinned down and tunnel welded to firewall.
GAS1600_034_02 by Garvice, on FlickrGAS1600_034_03 by Garvice, on FlickrGAS1600_034_04 by Garvice, on FlickrGAS1600_034_05 by Garvice, on FlickrWas getting a bit late so didn't get around to grinding the welds back.
Last edited by Garvice on 30 Jul 2017 03:08, edited 1 time in total.
Re: GAS 1600
Holy Hanna, that tunnel is serious tall!.
Datsun's L motor's were famous for leaking oil from the fuel pump vent. The seal usually failed internally after a few years, and although it never affected operation of the pump itself, you'd get a nice fine and continuous spray of oil down that side of the engine and consequently under the car. This likely preserved you RH frame rail under you car.
Your earlier shot of the transmission output views from the rear indicates you'll next need to cut further down the car, likely to the kick up in the back seat area.
You've got some serious surgery going on there.
I look forward to your continued updates.
Byron
Love people and use things,
because the opposite never works.
because the opposite never works.
Re: GAS 1600
Thanks for the info Byron.
Yep, original plan was to drop from this height down to the diff at a straight angle. Might put a kick up in it here, but not sure. Will do front floors first though to get some strength back.
Yep, original plan was to drop from this height down to the diff at a straight angle. Might put a kick up in it here, but not sure. Will do front floors first though to get some strength back.
Re: GAS 1600
I started on the floors. Got the drivers floor welded in, passenger floor just pop riveted in at the moment.
Drivers side, basic shape.
 GAS1600_035_01 by Garvice, on Flickr
Bit more shape and ready to weld in.
 GAS1600_035_02 by Garvice, on Flickr
 GAS1600_035_03 by Garvice, on Flickr
Started welding.
 GAS1600_035_04 by Garvice, on Flickr
Welded in, got a bit of distortion to beat out though.
 GAS1600_035_05 by Garvice, on Flickr
Passenger side started.
 GAS1600_035_06 by Garvice, on Flickr
 GAS1600_035_07 by Garvice, on Flickr
Drivers side, basic shape.
GAS1600_035_01 by Garvice, on FlickrBit more shape and ready to weld in.
GAS1600_035_02 by Garvice, on FlickrGAS1600_035_03 by Garvice, on FlickrStarted welding.
GAS1600_035_04 by Garvice, on FlickrWelded in, got a bit of distortion to beat out though.
GAS1600_035_05 by Garvice, on FlickrPassenger side started.
GAS1600_035_06 by Garvice, on FlickrGAS1600_035_07 by Garvice, on Flickr
Last edited by Garvice on 30 Jul 2017 03:10, edited 1 time in total.

Re: GAS 1600
no need for a console eh, cut a couple holes in the top for cup holder good to go. this is going to look bad ass when its done. 
ding ding dong dong all night long long.
Re: GAS 1600
Cheers mate, I have thought about what I could do there, but I think I'll just carpet it.
Re: GAS 1600
I spent some more time in the shed this week.
Fixed the passenger side rail (no photos) and welded the passenger side floor in.
 GAS1600_036_01 by Garvice, on Flickr
 GAS1600_036_02 by Garvice, on Flickr
Then I procrastinated due to indecision. My first thought with the tunnel was to take it from it's current height at a direct angle down to where the diff front is. Few issues, the 510 has a nice solid looking section of floor pan under the rear seats, where the floor rises and meets the tunnel. I would rather like to keep that connection, however if I take the the tunnel from current height to the front of the rear seats it looks incredibly dicky.
 GAS1600_036_03 by Garvice, on Flickr
So I thought maybe i would put a step in the tunnel and drop it from a lower height. Little less dicky, but still not right.
 GAS1600_036_04 by Garvice, on Flickr
So I installed the rear seat to see what the heights were. Pretty much the top of the rear seat is where the top of the new tunnel is. Best looking option would be to tapper from the rear tunnel to the rear firewall so that most of the height is retained, ala 260z 2+2 tunnel/seating (gees wonder why i thought of that). Problem is, I'll end up with a 2+2, which I don't really like the idea of. I wanted to retain the rear seat in this car, the more I cut out/change the more I think I should have just pulled the whole floor out and built a tube chassis for it.
This is how the heights look with the rear seat.
 GAS1600_036_05 by Garvice, on Flickr
Thinking I might end up with something like this, a bit of a step and a bit above the existing rear seat connection.
 GAS1600_036_06 by Garvice, on Flickr
In too many minds to make a decision right now, so thought the best option was to put the plasma away and think about it some more.
Also thinking I might cut the new tunnel at the point where it tappers in (just in front of the gear stick) and build a better connection between the wide front tunnel section and what will be the skinny rear section.
Most importantly though, my indecision led me to put one of the 260z seats (rx7 FD) in, the 1600 pedals and pretend to drive, all whilst making car noises and pretending to be sliding sideways. Not too old/ashamed to admit that it was incredibly satisfying, understand why my 3 year old likes it so much.
Fixed the passenger side rail (no photos) and welded the passenger side floor in.
GAS1600_036_01 by Garvice, on FlickrGAS1600_036_02 by Garvice, on FlickrThen I procrastinated due to indecision. My first thought with the tunnel was to take it from it's current height at a direct angle down to where the diff front is. Few issues, the 510 has a nice solid looking section of floor pan under the rear seats, where the floor rises and meets the tunnel. I would rather like to keep that connection, however if I take the the tunnel from current height to the front of the rear seats it looks incredibly dicky.
GAS1600_036_03 by Garvice, on FlickrSo I thought maybe i would put a step in the tunnel and drop it from a lower height. Little less dicky, but still not right.
GAS1600_036_04 by Garvice, on FlickrSo I installed the rear seat to see what the heights were. Pretty much the top of the rear seat is where the top of the new tunnel is. Best looking option would be to tapper from the rear tunnel to the rear firewall so that most of the height is retained, ala 260z 2+2 tunnel/seating (gees wonder why i thought of that). Problem is, I'll end up with a 2+2, which I don't really like the idea of. I wanted to retain the rear seat in this car, the more I cut out/change the more I think I should have just pulled the whole floor out and built a tube chassis for it.
This is how the heights look with the rear seat.
GAS1600_036_05 by Garvice, on FlickrThinking I might end up with something like this, a bit of a step and a bit above the existing rear seat connection.
GAS1600_036_06 by Garvice, on FlickrIn too many minds to make a decision right now, so thought the best option was to put the plasma away and think about it some more.
Also thinking I might cut the new tunnel at the point where it tappers in (just in front of the gear stick) and build a better connection between the wide front tunnel section and what will be the skinny rear section.
Most importantly though, my indecision led me to put one of the 260z seats (rx7 FD) in, the 1600 pedals and pretend to drive, all whilst making car noises and pretending to be sliding sideways. Not too old/ashamed to admit that it was incredibly satisfying, understand why my 3 year old likes it so much.
Last edited by Garvice on 30 Jul 2017 03:13, edited 1 time in total.
Re: GAS 1600
if you dropped in an s14 rear seat like in this pic, you can see the center part is up a tad. may help with the back part of the tunnel. 
- P1120364Small.jpg (32.38 KiB) Viewed 4071 times
ding ding dong dong all night long long.