Back to my roots

View and post your 510 project(s)
2DoorJim
Supporter
Posts: 283
Joined: 15 Jun 2013 21:43
Location: Calgary

Re: Back to my roots

Post by 2DoorJim »

Wizard, thanks for the compliment on my project. Lots more to do... Here is the grinder tree. The two middle ones are most used, top and bottom ones not so much so height is not that big a deal. It gets better though....

Image


The grinder tree above was built when I was young and as I accumulated more tools space became a greater issue so grinder tree 2.0 was created. Rotary style, incorporates a small metal eating bandsaw for hand held and contour work, belt grinder, chop saw for "precision" wood work. It's sparsely populated compared to the next one though.

Image


At work I built a larger rotary tree with two belt grinders, tool grinder, utility grinder, and upright metal eating bandsaw. Foot print is 3.5 feet dia where if all this equipment was mounted on benches or stands it would use about 10 linear feet. This thing is in motion most every day.

Image


Here is a busy area at work, grinder tree, grinder bench, disk/ belt sander, drill press, couple welders

Image
User avatar
gooned
Posts: 1050
Joined: 07 Jul 2003 23:19
Location: Langley

Re: Back to my roots

Post by gooned »

Holly :shock:

awesome grider/tool trees!

I'm totally stealing that :mrgreen:
Ash510
Posts: 499
Joined: 21 Jun 2004 20:31
Location: Surrey,B.C.

Re: Back to my roots

Post by Ash510 »

That is a very interesting way to do it. Just a question does it lock in place some how.
2DoorJim
Supporter
Posts: 283
Joined: 15 Jun 2013 21:43
Location: Calgary

Re: Back to my roots

Post by 2DoorJim »

Thought about a foot pedal lock for the smaller tree in my home shop because I mounted the bandsaw with the blade slightly offset from the center of the column so it does have a tendency to want to rotate when you're cutting heavy stock, but it's minor. The larger tree at work has the saw blade in line with the column and it hasn't been as issue. The rotating column tube is beveled on the bottom end and rides on a short piece of similar tube with a mating bevel. The short tube is welded onto the center post. There's a small bit of friction from the bevel which seems sufficient to stop it from rotating when working but you can easily rotate the stand with your hand. Been using this one for eight years and only revised the height of one belt grinder.
User avatar
510wizard
Supporter
Posts: 1031
Joined: 12 Sep 2005 09:50
Location: Reno, Nevada

Re: Back to my roots

Post by 510wizard »

[quote=

At work I built a larger rotary tree with two belt grinders, tool grinder, utility grinder, and upright metal eating bandsaw. Foot print is 3.5 feet dia where if all this equipment was mounted on benches or stands it would use about 10 linear feet. This thing is in motion most every day.

Image


Here is a busy area at work, grinder tree, grinder bench, disk/ belt sander, drill press, couple welders

Image[/quote]

Man, that's a lot of metal removal equipment going on there. Love the newer grinding tree though. I might steal the basic idea and build it on a cabinet, to store the grinding consumables. I want to be able to move the thing outside to keep the grinding dust off of the clean area of the shop.
goichi1
Supporter
Posts: 4064
Joined: 22 Jan 2008 21:57
Location: Fayetteville, GA

Re: Back to my roots

Post by goichi1 »

I like that too, I had seen a few different models but that by far is the best.....I want to build one too now, but have too many projects ahead of that. Very nice!
User avatar
Mattndew76
Supporter
Posts: 1609
Joined: 23 Jul 2006 18:26
Location: Creswell, Oregon.

Re: Back to my roots

Post by Mattndew76 »

The Talent on this web forum is very impressive!
An Idea doesn't work unless you do.
2DoorJim
Supporter
Posts: 283
Joined: 15 Jun 2013 21:43
Location: Calgary

Re: Back to my roots

Post by 2DoorJim »

Mattndew76 wrote:The Talent on this web forum is very impressive!
I'm a hack, but your the guy turning out CNC works of art!

I've got some super basic machine tools and though I can get the job done, I always feel like a hack while doing it. I constantly envy you guys with CNC equipment.
User avatar
Mattndew76
Supporter
Posts: 1609
Joined: 23 Jul 2006 18:26
Location: Creswell, Oregon.

Re: Back to my roots

Post by Mattndew76 »

ahem.... A Hack defined by myself :) is a person who only does enough to get by and never puts any heart into the work. Half assed hack by definition. You sir do not display the works of half ass.

Keep up the good work. More OIC's please. :)
An Idea doesn't work unless you do.
2DoorJim
Supporter
Posts: 283
Joined: 15 Jun 2013 21:43
Location: Calgary

Re: Back to my roots

Post by 2DoorJim »

I haven't updated this build in a while but then my progress is painfully slow. I wanted to have this thing running a few months ago so I could start the bodywork this year, estimate I'm six months behind where I thought I'd be. Seems like each and every part to be installed needs some sort of attention, mix this with all the other interruptions in life and a project easily gets drawn out.

I moved the 510 from work to my house in early spring thinking I'd get more time to work on it. Nice to casually throw a few hours at it when convenient but this thing needs more than "a few hours", more like a few thousand hours!

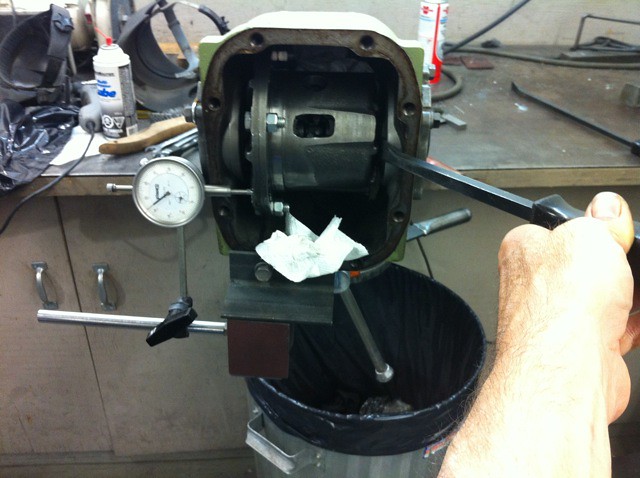
I picked up an R180 lsd which I swapped into my 240 housing, had a limited array of shims which I hawked from three diffs and got just what I needed. Couple new bearings, establish zero then set some preload on the bearings. Installed the crown and set the backlash/contact. Didn't have to touch the pinion.

Image[/url]


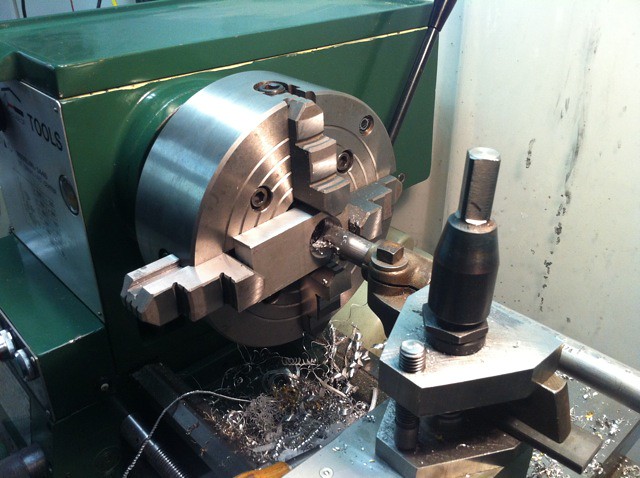
Earlier I posted a couple pictures where I installed a speedo head from a Porsche in the dash(there's got to be some porsche bits in this car!) with the intention of also using the pick-up from the differential. Here I took a block of aluminum and bored a hole for the pick-up which will be installed on the diff.

Image[/url]

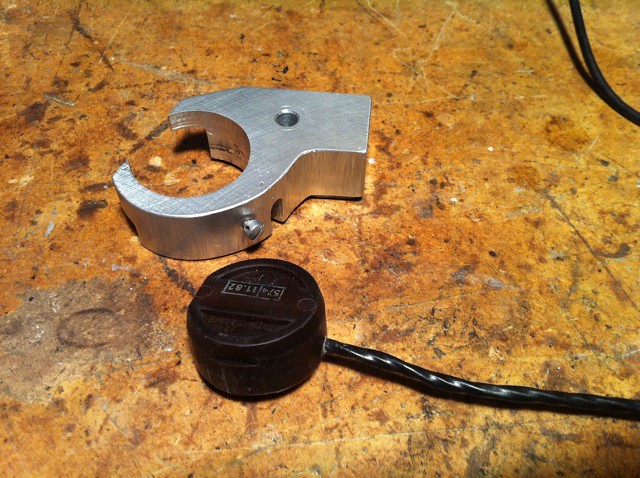
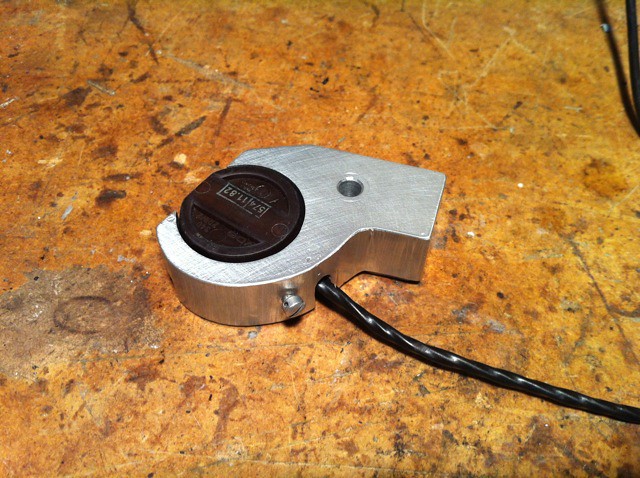
the pick up completed.

Image[/url]

Image[/url]


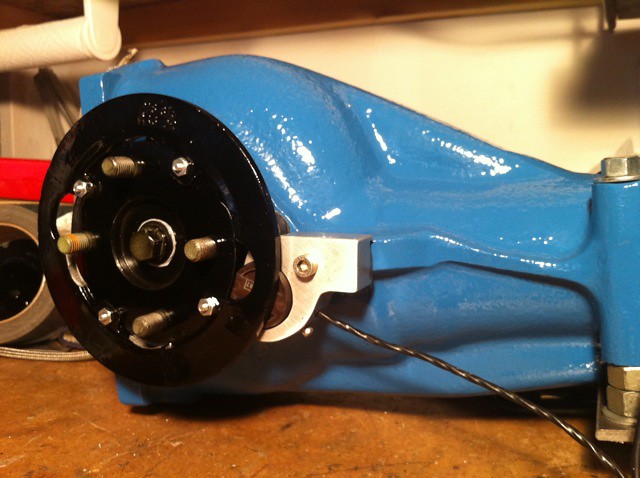
Here is the pick up mounted to the diff. The back of the bracket indexes on the diff lug and is held in place with a single bolt. The speedo ring is painted black though it's normally bare cast aluminum and lives inside the Porsche transaxle housing, sandwiched between the diff carrier and a side plate bearing, then the pick lives on the outside of the case. I made up a really thin .032 sandwich plate bolted to the ring which now will get sandwiched between the right halfshaft and the diff flange. Note the blue paint was a sample of my alternate choice color for the car but as you can see elsewhere I decided on red.

Image[/url]


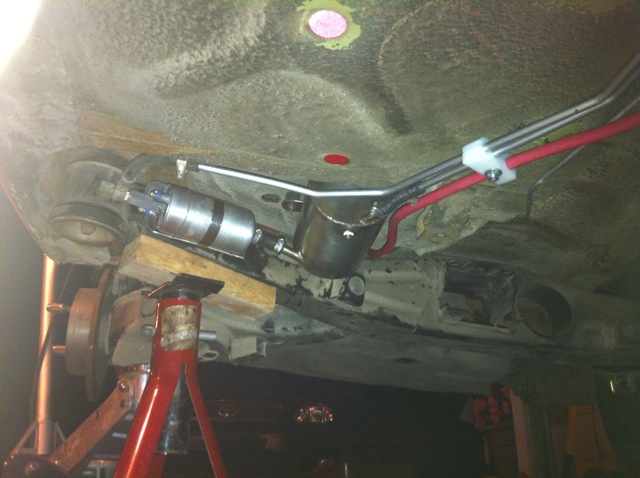
I'm a little ashamed to show this shot. From the mid point of the floor pan rearwards I didn't bother sandblasting but in retrospect I should have taken the time and done the entire car at once. My original objective was only to pretty up the engine bay and not worry about aesthetics of the rest of the pan, just look after corrosion. I did blast the inside of the pan and seeing the nice results once it's painted makes me realize what I should have done. Anyhow you can see I decided to build a fuel header tank which is mounted on isolators, about quart and half in size then a (Porsche!) fuel pump I had sitting around is mounted on isolators in turn mounted to the rear crossmember. Hope this minimizes pump noise. The gas tank has been cleaned and installed and thankfully wasn't rusted at all. I welded in a large bung where the tank drain is located which now is the feed to the header tank but goes through a filter first.

Image[/url]


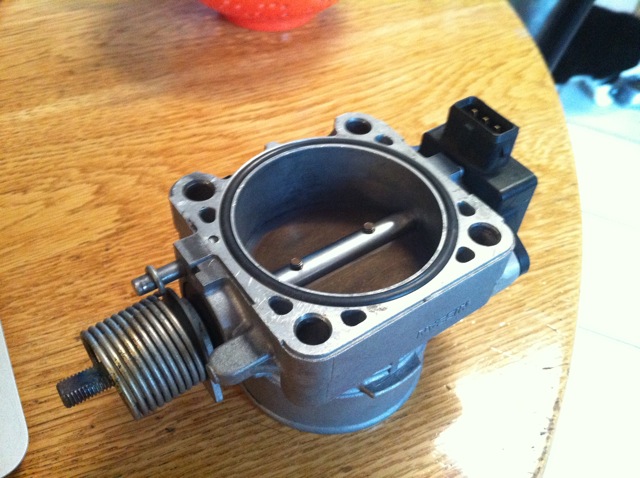
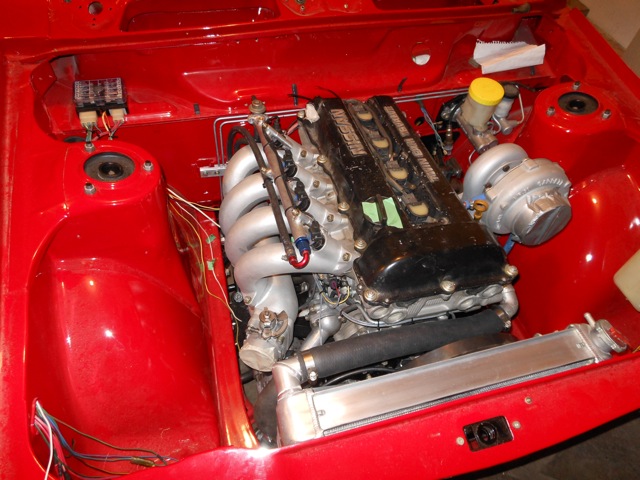
Next topic... I paired down the SR20 throttle body and rotated the mounting flange on the intake manifold for better routing of inlet ducting but ran into interference between the TPS and the alternator. I ended up converted the butterfly shaft to 8mm D so it would accept a normal TPS flush up against the throttle body. While I had the throttle body in my hand I put an O-ring groove into it.


Image[/url]

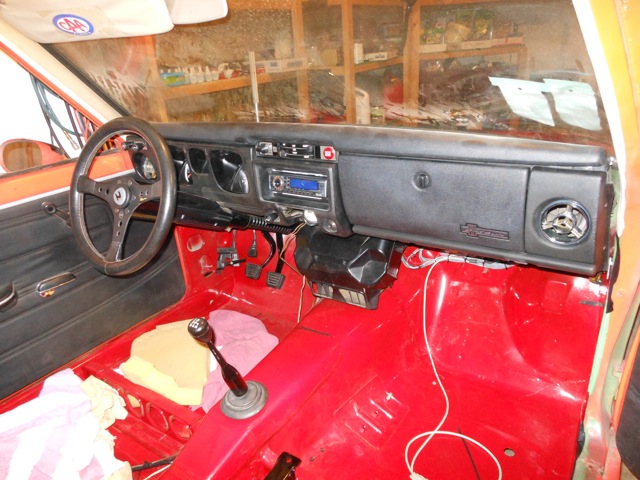
Completed the dash install after wiring the tach, speedo, stereo, and injection ecu. I got a good used dash pad but noticed the ends are warped, not what I was expecting but I guess it will do. Also installed the shifter which sports a stock 510 black plastic 4 spd knob. I wanted to convert the shaft to a chrome shaft from a stock 510 but got thinking that nissan might have put the rubber isolator in the shifter for a reason so I decided to leave it in place. I actually extended the shifter a couple inches for personal driving preference.

Image[/url]


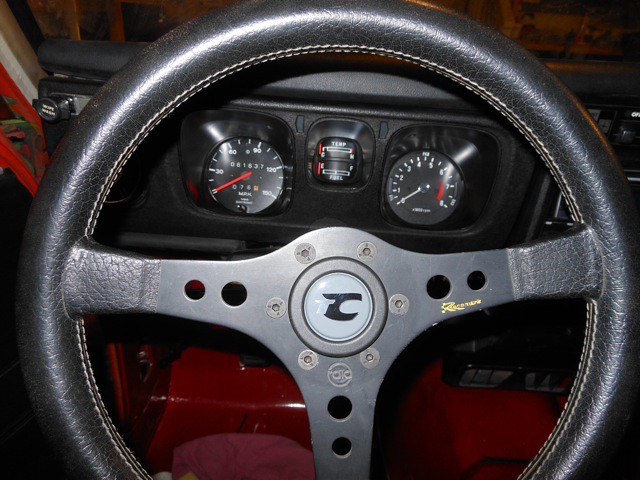
Here is a shot of the Porsche/Datsun instrument cluster. 150 mph 930 turbo speedo. 1976 vintage racemark wheel from......... wait for it....
a 911

Image[/url]


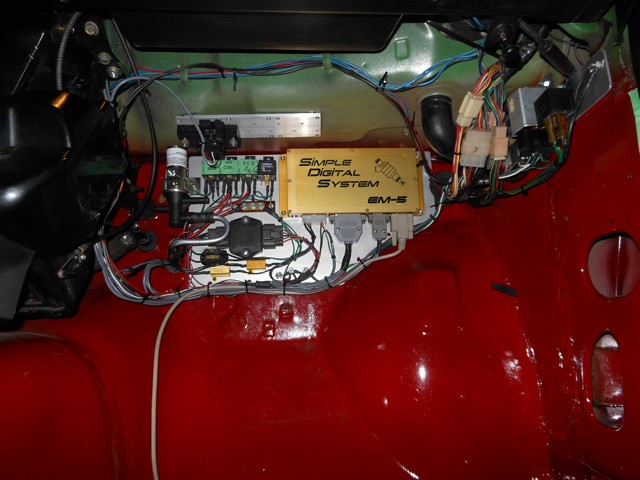
Here's the panel for the ECU and all the related electrical bits and relays. Mostly complete at this point short of a few more zip ties then a custom rubber gromet where the wiring passes through the firewall. I'm a little apprehensive about all these wires together because wires for crank position sensor and pulsing stuff like injectors and plug coil signal wires are close enough interference noise might crop up. I put another mini panel on the right of the picture which has the headlight, horn and one power filter relay for the ecu. Only one relay will remain in the engine bay for the radiator fan. Someone looking at the car asked if I was going to move the fuse panel inside but I decided to leave it in the factory location.

Image[/url]


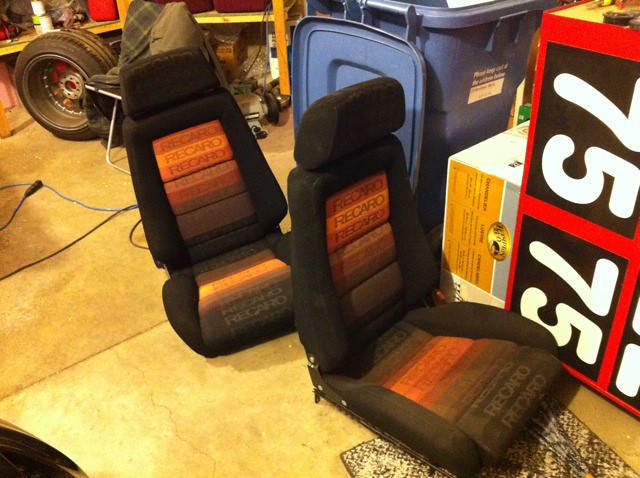
Here are the seats going in. Original 1976 vintage from the same car as the steering wheel.

Image[/url]


Tonight I finally installed my rad. Earlier I wanted to find a better fitting rad since the fan on this one rubbed against the water pump pulley. I cut the mounts off the rad and welded on four bosses which used the factory holes in the rad support and moved the rad forward so it nearly touches the rad support. The fan (and rad) came from a donor race car I bought and the fan was installed with plastic fasteners pushed through the core, functional I suppose but I decided to fab up some mounts instead. The fan is rigid to the rad with a small bit of space so it doesn't rub the core tubes. I also replaced the inlet and outlet necks since they were totally mutilated. Not sure what went on there.

Image[/url]


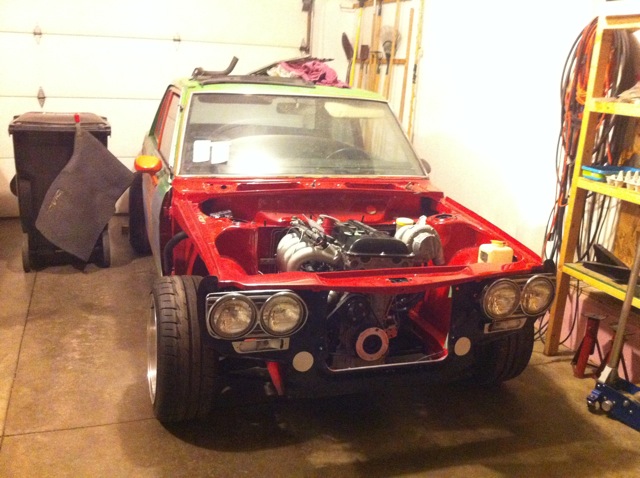
Engine bay is getting close to being done. I ran the wires inside the frame rail and trimmed all to length. They just need some ties, likewise for the few wires near the starter. I think you can see the altered throttle body position here where the stock SR has the TB point up at about 45 degrees. Also some work on a custom fuel rail which I built so I could sink the injectors into the manifold and create some clearance for the factory hood prop. When I bought the race car for it's donor drivetrain it had a short Greddy intake. I reverted back to a factory intake in order to improve bottom and mid range torque, something I place a high value on for street cars. The short intake might have made a little more up top but the sacrifice down low can't be recovered, whereas the long intake may not be optimum at high revs, but boost will prevail.

Image[/url]


95% done and 95% left to go! Hope to be running in a couple weeks, then the body work begins. This will take a while.

I'm envious of the other projects going on in different threads on the Realm, lots of progress not to mention ingenuity and talent between all the members.

Image[/url]
User avatar
Byron510
Moderator
Posts: 12658
Joined: 01 Jul 2003 23:06
Location: Maple Ridge, BC

Re: Back to my roots

Post by Byron510 »

Very nice work Jim, the car is really coming along.

I to used SDS in the Bronze car, and mounted the ECU in the same place. I also mounted the coil pack directly on the other side of the firewall with the complete ECU harness going through firewall just above the starter (L-Series) in behind the cylinder head. I've had no issues with noise being picked up and affecting operation.

I did however move the fuse box to the kick panel on the RH side adjacent to the ECU and drivers, the routed the kick panel, across the top of the inner fender area and wrapped it under the rad support to hid as much of the wiring as possible. The is showcased somewhere in my Bronze build thread and made a super clean installation.

Keep the pics coming, great work.

Byron
Love people and use things,
because the opposite never works.
2DoorJim
Supporter
Posts: 283
Joined: 15 Jun 2013 21:43
Location: Calgary

Re: Back to my roots

Post by 2DoorJim »

Thanks for the feedback about the wiring Byron, good to know. I was a little worried I may have a re-do on my hands and I'm trying to minimize the number of added holes in the firewall.

I decided to leave my fuse box in place since it really only operates lights and maybe a couple other things. I cleaned all the fuse holder terminals so it should have a new lease on life now, especially for the small amount of driving this hot rod will see. My SDS and all related hardware is wired completely separate from the factory fuse box with clean source power, fuses, etc so the critical stuff which keeps the machine in motion has solid integrity. Lights, horn... who needs 'em!
User avatar
defdes
Supporter
Posts: 5050
Joined: 12 May 2005 14:45
Location: Vermont

Re: Back to my roots

Post by defdes »

Love the car and those seats are terrific. I have the same style in pleather from a period bmw 2002.
User avatar
510wizard
Supporter
Posts: 1031
Joined: 12 Sep 2005 09:50
Location: Reno, Nevada

Re: Back to my roots

Post by 510wizard »

Now you just have to get the matching rear seat to complete it.
Image
2DoorJim
Supporter
Posts: 283
Joined: 15 Jun 2013 21:43
Location: Calgary

Re: Back to my roots

Post by 2DoorJim »

Not sure if anyone else "gets it" besides us (Wizard, defdes, and myself) but these old Recaros are burned into my memory having seen them back when I was young. I recall a built up 911 that even had the fabric on the door panels. Also in a 2002 like you mention defdes and a celica too.

Those back seats are wild Wizard. Question, no shoulder belts in your car?
Post Reply