
- IMG_5248.jpg (220.81 KiB) Viewed 2860 times
Lets see some welding and fabrication pics!
Re: Lets see some welding pics!
Watched enough weldingtipsandtricks.com videos, finally went out and made a third hand:
Haven't used it yet, but it should come in handy.
Haven't used it yet, but it should come in handy.
Because when you spend a silly amount of money on a silly, trivial thing that will help you not one jot, you are demonstrating that you have a soul and a heart and that you are the sort of person who has no time for Which? magazine. – Jeremy Clarkson
Re: Lets see some welding pics!
What exactly are we looking at? Third hand used for....?
Re: Lets see some welding pics!
Used for propping metal straight up, or holding something against something else that might roll, etc. The piece is the three prongs with the weight in the middle, shown holding the square to the flat bar.
http://www.youtube.com/watch?v=UdSJrXY5yLw
http://www.youtube.com/watch?v=UdSJrXY5yLw
Because when you spend a silly amount of money on a silly, trivial thing that will help you not one jot, you are demonstrating that you have a soul and a heart and that you are the sort of person who has no time for Which? magazine. – Jeremy Clarkson

Re: Lets see some welding pics!
Been working on furniture and design details for a hotel in NYC for the past 6 months, the last big piece is this canopy for the dining patio. It bolts to the wall and projects out 6'3'' x 25'. I bought an aluminum spool gun to handle all of the tight inside corners of the 1/4" x 4" and 1/4" x 8" bar. What an awesome tool. They have come a long way with this process since welding school 30 years ago. I would HIGHLY recommend one for anyone doing thick material production work. It paid for itself in about 2 days ($900).
The other are some steel powder coated cafe chairs that I made (40 of them total).
The other are some steel powder coated cafe chairs that I made (40 of them total).
- FX-07-1.jpg (134.02 KiB) Viewed 2828 times
- FX-07-2.jpg (134.81 KiB) Viewed 2828 times
- CS-04.jpg (142.37 KiB) Viewed 2828 times
Re: Lets see some welding pics!
Monte, Rich, Rob, everyone,
So I'm practicing welding on aluminum. Clearly I need the practice. I followed conventional wisdom in cleaning the pieces - stainless wire brush used only on aluminum. Scuffed up all sides, even the edges. So, where did all this contamination come from?
120 amps, 1/8th red tungsten, 3/32nd filler rod. Metal is 1/8" aluminum.
So I'm practicing welding on aluminum. Clearly I need the practice. I followed conventional wisdom in cleaning the pieces - stainless wire brush used only on aluminum. Scuffed up all sides, even the edges. So, where did all this contamination come from?
- IMG_5567.jpg (167.08 KiB) Viewed 2778 times
Because when you spend a silly amount of money on a silly, trivial thing that will help you not one jot, you are demonstrating that you have a soul and a heart and that you are the sort of person who has no time for Which? magazine. – Jeremy Clarkson
Re: Lets see some welding pics!
Not clean enough (obviously). Try what you are doing, then wipe with acetone. Straight Argon? Enough flow? What about the tungsten, balled end, also clean?
Wiping the filler rod with acetone also helps.
Wiping the filler rod with acetone also helps.
Last edited by defdes on 17 Jan 2014 16:41, edited 1 time in total.

Re: Lets see some welding pics!
Change to a green tungsten (properly balled on the end-- not a point), and make sure you are not dipping your tungsten into the puddle-- also, turn up your shielding gas a bit.
Lots of amperage to get the puddle going, and then move the puddle quickly, varying the amperage to keep the puddle size consistent.
http://www.youtube.com/watch?v=BVR7a9kUKJE
Michael
Lots of amperage to get the puddle going, and then move the puddle quickly, varying the amperage to keep the puddle size consistent.
http://www.youtube.com/watch?v=BVR7a9kUKJE
Michael
Michael Spreadbury
Spriso Motorsports
www.spriso.com
Spriso Motorsports
www.spriso.com
Re: Lets see some welding pics!
This is the above project installed, I did the planter boxes above the canopy as well:
- FX-07-3.jpg (89.95 KiB) Viewed 2766 times
- FX-07-4.jpg (123.04 KiB) Viewed 2766 times
- FX-07-5.jpg (90.08 KiB) Viewed 2766 times

Re: Lets see some welding pics!
Okayfine- What kind of aluminum is that? Some aluminum just won't weld, any ebay Chinese aluminum is really tough, sparks fly out sometimes too. Ask Rob he was down here before Christmas after I got my new tig machine and I challenged him to a welding competition on Chinese IC pipe. Fun times.
Defdes- Your an artist dude that is awesome looking!
Defdes- Your an artist dude that is awesome looking!
"People don't like it when shit doesn't match their rule of thumb." Sam
Re: Lets see some welding pics!
Were you welding on AC? It looks like there was no cleaning action (or at least not enough) from the electrode positive portion of the AC welding cycle. What kind of machine do you have?
When practicing, I think it is better to just run straight beads before you concern yourself with sticking things together. Once you get a good feel for arc length, travel angle, travel speed, etc, then try some lap joints and fillet welds. Also, I'm not a fan of thoriated tungsten for aluminum welding, I find that it doesn't form a clean ball at the end of the tungsten. 1.5% or 2% lanthanated is what I prefer.
When practicing, I think it is better to just run straight beads before you concern yourself with sticking things together. Once you get a good feel for arc length, travel angle, travel speed, etc, then try some lap joints and fillet welds. Also, I'm not a fan of thoriated tungsten for aluminum welding, I find that it doesn't form a clean ball at the end of the tungsten. 1.5% or 2% lanthanated is what I prefer.
Duke Schimmer
'72 2-Door 510
"Simplify and add lightness."
'72 2-Door 510
"Simplify and add lightness."
Re: Lets see some welding pics!
Okayfine, if you are learning try to ensure that your stock is virgin alum. As icehouse mentions your stock appears to have a zinc or magnese component, which will not weld, or not weld well. Anodized stock should also be avoided unless you uniformly remove about 10 thou of the anodized surface.
You might go down to a 3/32 tungsten but 1/8 will work. Though red will work, zirconia or green is preferred for alum. ~#6 or #7 cup (pink ceramic part) on your torch (#6 3/8" or #7 7/16" orifice) Tungsten should only protrude about 1/4" from the end of the cup unless you have a gas lens. Flow rate about 15 CFH.
Hold your torch somewhat upright so as to flood the puddle with argon, if you lay the torch down you can get air infusion messing with the puddle.
Grab some other unrelated stock and try again to see if you get different results.
I seem to recall a thread where you mention you purchased a syncrowave 200. Is this correct?
Re: Lets see some welding pics!
Hello all, thanks for the replies. I'll try to answer all the questions here.
Straight argon, 15cfh per the gauge. Argon bottle was basically empty, but there was flow as I could push dust/dirt off the workbench with preflow.
I know red isn't the best for aluminum, but I haven't gotten into aluminum and red's all I have at the moment. Green is on the order sheet. I point the tip and let the welding process ball the tip. Seems to work most of the time and I can get an accurate start with the arc.
I tried the pulse on my machine (Lincoln Precision TIG 185). Some sections it worked, some it didn't at all. Which is the same result as when I turned the pulse off and pedaled it.
Aluminum stock is rems from a friend's project. He welded up bigger lengths of this material for TV frames, so the material is weldable cleanly.
Definitely welding on AC. AC balance is adjustable on my machine, but I currently have it set in the auto zone. Can bias it to cleaning or penetration, says the dial.
#7 cup, no gas lens, but probably had greater than 1/4" stickout on the tungsten. Will adjust that.
------------
I need to exchange my gas bottle tomorrow, then I can try the advice above. In the mean time, in keeping with the actual subject of this thread, a (MIGed) yard chicken:
- Attachments
-
- IMG_5547.jpg (220.18 KiB) Viewed 2749 times
Because when you spend a silly amount of money on a silly, trivial thing that will help you not one jot, you are demonstrating that you have a soul and a heart and that you are the sort of person who has no time for Which? magazine. – Jeremy Clarkson

Re: Lets see some welding pics!
Defdes - thats a very nice piece you constructed. It really works well with the frontage.
Finished is better than perfect......
Re: Lets see some welding pics!
Thanks James...and all 32 mounting holes lined up with their corresponding threaded rods on the first try too!James wrote:Defdes - thats a very nice piece you constructed. It really works well with the frontage.
To Julian, the tungsten should not be the issue, the welds can be "better" with the green, but one can make perfectly nice welds with the red. Try turning up the cleaning knob, heats not your issue your cooking the aluminum which can add to the release of the nasties. Try moving more quickly once the puddle is established and as mentioned, practice just on a flat at first.
Oh.... and have fun at Air Gas tomorrow!
Super tangent, chicken!
- chickens3.jpg (85.21 KiB) Viewed 2742 times
-
510-Trevor

- Supporter
- Posts: 1373
- Joined: 03 Mar 2007 18:34
- Location: Calgary, Alberta
Re: Lets see some welding pics!
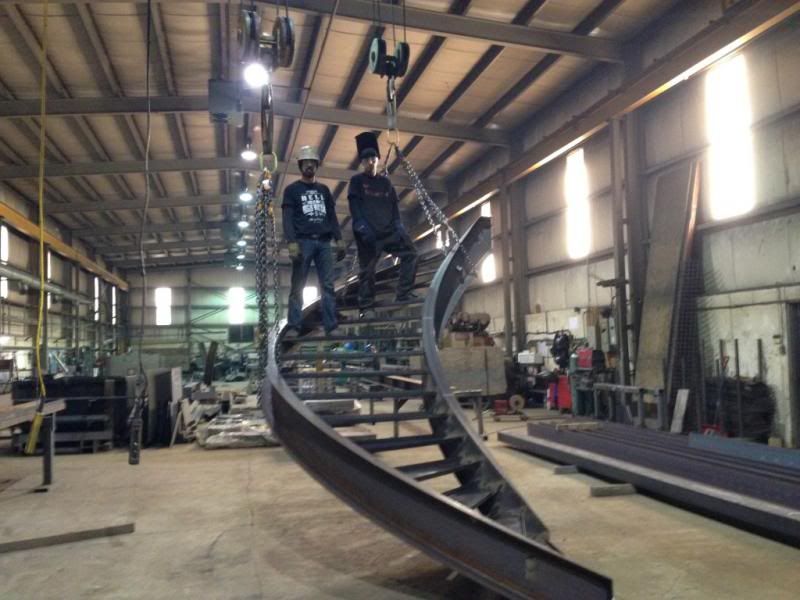
Spent the day in the shop holding tools for professional fabricators:
Built this:
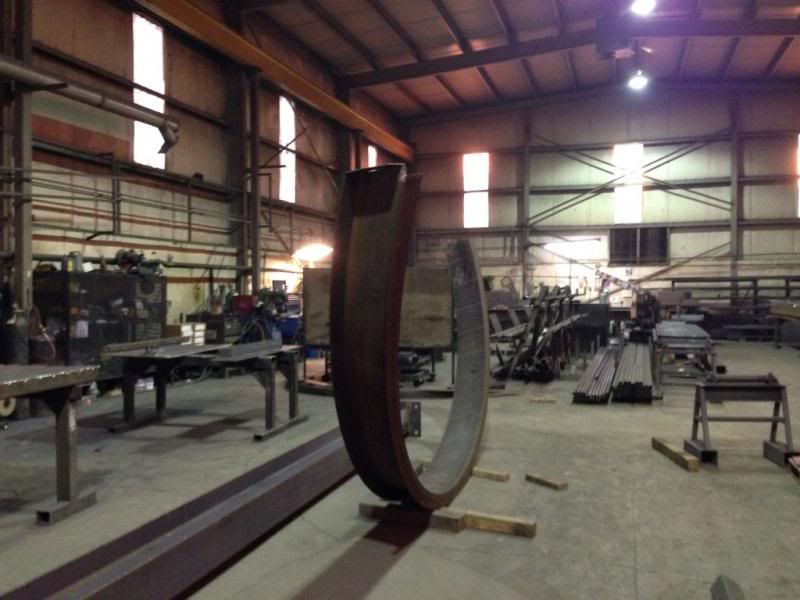
From this:
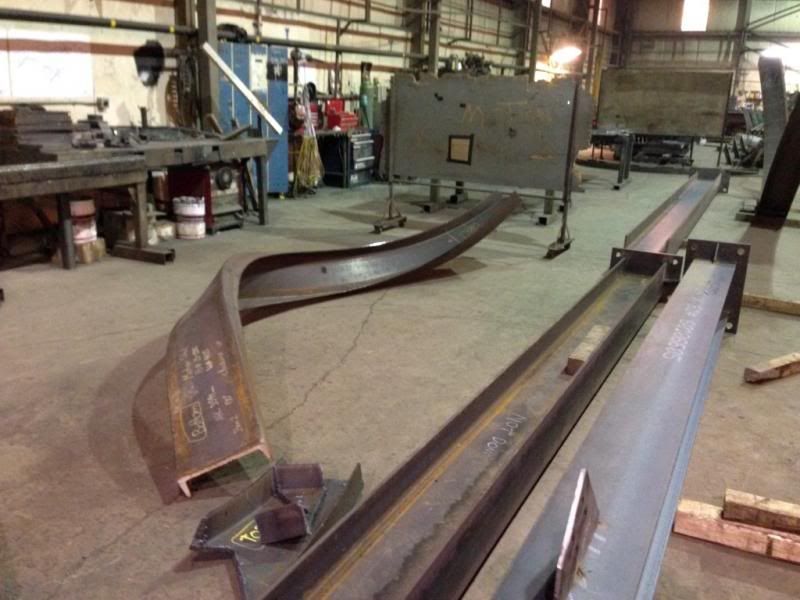
And this:
Halfway complete:
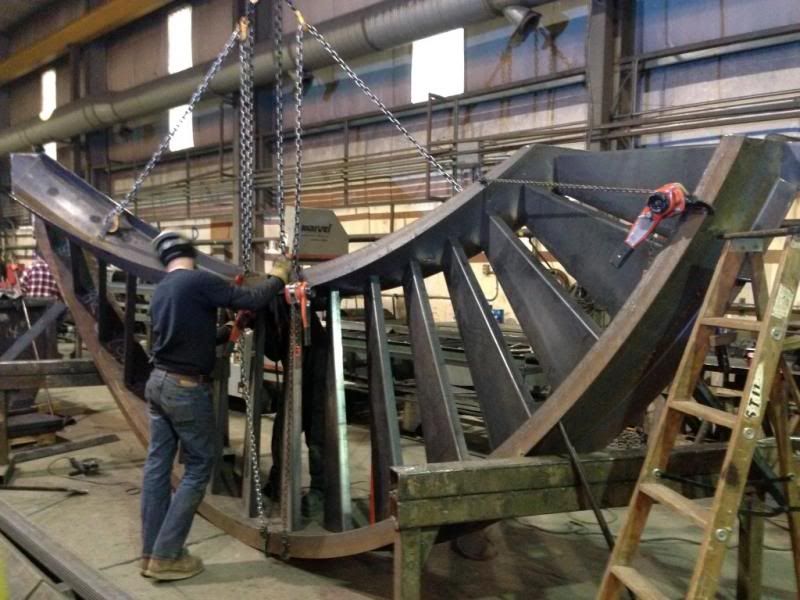
It was great to get dirty and see how much work is involved after it's been drawn.
Built this:

From this:

And this:

Halfway complete:

It was great to get dirty and see how much work is involved after it's been drawn.
1972 Yellow 4dr