Whitebird - the no-nonsense version

Only the most active and interesting projects from our members. Projects must be approved to be in this forum
User avatar
okayfine
Supporter
Posts: 14154
Joined: 12 Nov 2007 23:02
Location: Newbury Park, CA

SR Coolant Outlet

Post by okayfine »

One of the many issues involved in fitting an SR to the 510 chassis is dealing with the coolant outlet. From the S13/S14 chassis, the coolant neck narrows under the SR CAS and pokes in front of the engine - too close to a radiator mounted in a 510 shell to be of any use. Most of the people get around this by cutting, welding, and using a unique hose.

My results aren't much different, however it is unique in two respects. I had a piece of aluminum mandrel bend welded on to the SR coolant outlet flange, routing the coolant downward.

Image

This allowed me to use a stock 2000 Roadster coolant hose, which just happened to fit perfectly to the OE 510 radiator (3-row core on stock tanks). I love it when a plan comes together.

For the other hose, I just cut a stock 510 inlet hose until it fit. A few inches off each end did the trick.
Because when you spend a silly amount of money on a silly, trivial thing that will help you not one jot, you are demonstrating that you have a soul and a heart and that you are the sort of person who has no time for Which? magazine. – Jeremy Clarkson
User avatar
okayfine
Supporter
Posts: 14154
Joined: 12 Nov 2007 23:02
Location: Newbury Park, CA

SU Intake Manifold, Part III

Post by okayfine »

More progress on the SU intake manifold as well. Linkage tabs and the balance tube have been added.

Image

I'll be using modified Roadster linkage bits to convert to cable actuation. Also shown are the very nice ZTherapy 2000 Roadster SUs. Still to come are velocity stacks, filters, and the throttle cable setup.
Because when you spend a silly amount of money on a silly, trivial thing that will help you not one jot, you are demonstrating that you have a soul and a heart and that you are the sort of person who has no time for Which? magazine. – Jeremy Clarkson
User avatar
okayfine
Supporter
Posts: 14154
Joined: 12 Nov 2007 23:02
Location: Newbury Park, CA

Adjustable Front Sway Bar

Post by okayfine »

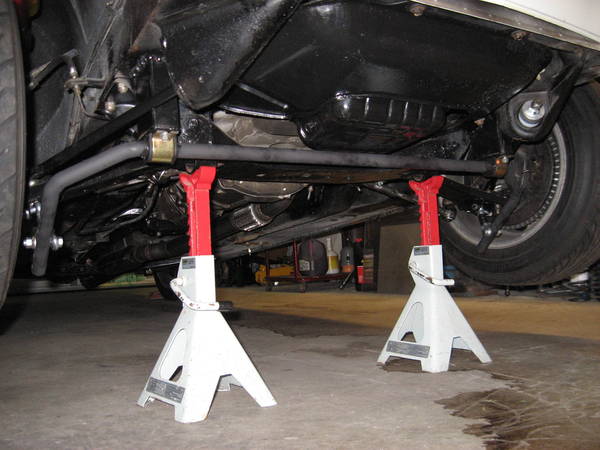
A number of issues cropped up that made me take the easy way out and roll my own sway bars. The right OE sway bar bushing mount must be a bit rusty up inside the frame rail as I snapped off both mounting bolts. After drilling (and getting the holes a little off center -- :shock: :roll: ) and snapping an Easy Out in one, almost snapping another in the second, I gave up on that.

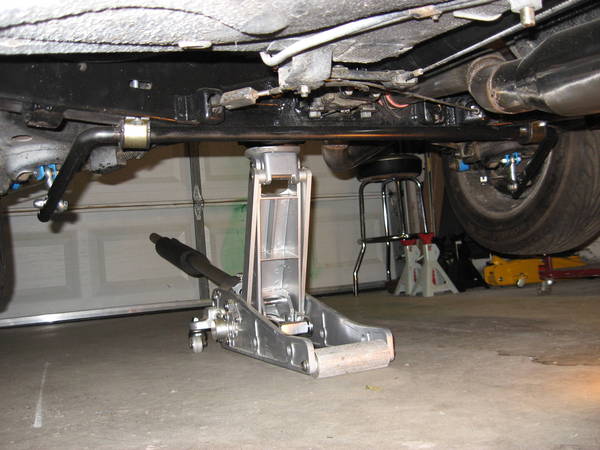
For the front, I began to take inspiration from the BRE Trans-Am car and how they both made and mounted their front sway bars. They used Stressproof steel rod, which can be heated, bent, air-quenched and still retain tinsel strength. Trevor Harris mounted the front bar bushings to standoffs and the ends of the sway bar to brackets bolted beneath to the T/C mounting points on the control arms.

(top of page 165 of the How To Modify book: http://www.datsun510.com/modules.php?na ... age&id=165)

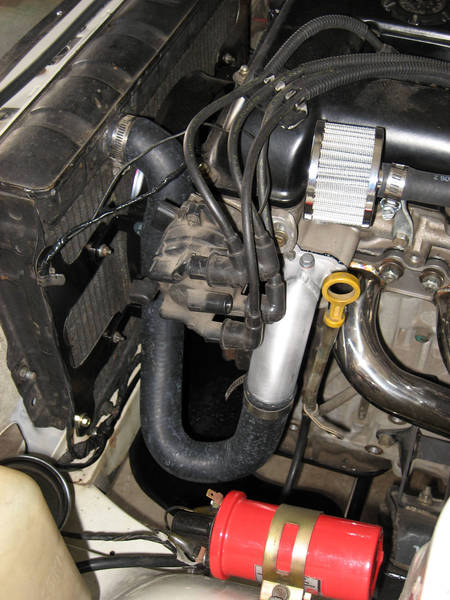
After taking some measurements, doing so would allow me to skip over the busted bolts in the frame. Sure, I'd have to weld in the standoffs, but I'd have to cut and weld the frame rail to get a useable bushing mount anyway. A benefit of doing it this way, with the correct standoff measurement I wouldn't have to have a bend in the sway bar for the oil sump. NOTE: Whitebird isn't a slammed go-kart, so after consideration I didn't get too worried about the sway bar now being the low point of the car's clearance up front. I'd rather sacrifice the sway bar than the oil pan/engine, any day.

Oh, did I mention that, in addition to everything else, the Stressproof material cost me $15 for a five-foot length? Yeah, DIY sway bars, on the cheap. Add bushings and end links and I was into this project for a total of $120 - that's for front AND rear adjustable sway bars.

For Whitebird, I decided on 7/8" sway bars, front and rear. This shouldn't surprise anyone who's read through my Project thread, and should fit well with the goals for the car and the other mild suspension pieces I've installed so far. Sway bar bushings are ES pieces, as they make a product range that will fit the stock 510 mounting spacing. End links are 3/8" economy stuff, nothing fancy because they don't have to be.

Image

I made a template from 1/4" rod, then transfered the marks to the Stressproof. I clamped the Stressproof into my bench vise and heated through where I wanted it to bend with a oxy/acy torch. I used a 4' bending rod I made up for this job, and at 205 pounds, it took about all I had to get the 45° bends I used for the front design. Still, it bent just find with no fuss. Careful bending also kept it in a single plane, which is nice.
Last edited by okayfine on 05 Jan 2009 14:10, edited 1 time in total.
Because when you spend a silly amount of money on a silly, trivial thing that will help you not one jot, you are demonstrating that you have a soul and a heart and that you are the sort of person who has no time for Which? magazine. – Jeremy Clarkson
User avatar
okayfine
Supporter
Posts: 14154
Joined: 12 Nov 2007 23:02
Location: Newbury Park, CA

Adjustable Rear Sway Bar

Post by okayfine »

To compliment the front bar, I made up an adjustable rear bar in 7/8" Stressproof as well. Again I took inspiration from BRE.

I browsed through the How To Modify book, which briefly detailed the rear bar used on the Trans-Am cars. They routed the bar backwards, similar to what Whiteline had done with their version. If I had started this project much earlier (like, in the beginning, when I had the rear end all apart), I might have followed BRE again for the rear. Looking at everything already installed, I wasn't excited about the prospect of undoing and redoing a bunch of work.

Further reading of the How To Modify book actually discussed that very issue. Bob Waar made comments about the difficulty of installation of the original BRE rear sway bar, and how they came up with a new design for the racer/customer bars. This design is similar to that copied by ST and Quickor, where the sway bar center section is mounted to the rear crossmember and the arms are connected below to the spring cups on the A-Arms.

It just so happened that I had a copy of the original typed BRE installation instructions for this version of the BRE rear sway bar. This document included a template to mark holes to drill into the rear crossmember to mount the sway bar bushings (again I used ES items). This template proved handy, as looks are deceiving when you're upside down underneath the car looking at the angled arms of the rear crossmember and attempting to determine how to align the sway bar bushing mounting locations.

Once that was done, however, the rest of the install was basically a breeze. Creating the rear sway bar from a second length of Stressproof was easier than the front bar, as the rear bar only has one bend per side.

Image

One thing I didn't mention in the front sway bar post is the flats I ground into the ends of the sway bars. This flat section (made via careful angle grinder application using a grinding wheel followed by a flapper sanding disc) made it easy to drill the adjustable mounting holes and gave the end link balls a full surface to stand against. 3/8" hardware with Nyloc nuts completed the installation.
Because when you spend a silly amount of money on a silly, trivial thing that will help you not one jot, you are demonstrating that you have a soul and a heart and that you are the sort of person who has no time for Which? magazine. – Jeremy Clarkson
User avatar
okayfine
Supporter
Posts: 14154
Joined: 12 Nov 2007 23:02
Location: Newbury Park, CA

Re: Whitebird

Post by okayfine »

.
Last edited by okayfine on 10 Jun 2009 13:27, edited 1 time in total.
Because when you spend a silly amount of money on a silly, trivial thing that will help you not one jot, you are demonstrating that you have a soul and a heart and that you are the sort of person who has no time for Which? magazine. – Jeremy Clarkson
User avatar
okayfine
Supporter
Posts: 14154
Joined: 12 Nov 2007 23:02
Location: Newbury Park, CA

Re: Whitebird

Post by okayfine »

.
Last edited by okayfine on 10 Jun 2009 13:28, edited 1 time in total.
Because when you spend a silly amount of money on a silly, trivial thing that will help you not one jot, you are demonstrating that you have a soul and a heart and that you are the sort of person who has no time for Which? magazine. – Jeremy Clarkson
User avatar
okayfine
Supporter
Posts: 14154
Joined: 12 Nov 2007 23:02
Location: Newbury Park, CA

Re: Whitebird

Post by okayfine »

.
Last edited by okayfine on 10 Jun 2009 13:29, edited 1 time in total.
Because when you spend a silly amount of money on a silly, trivial thing that will help you not one jot, you are demonstrating that you have a soul and a heart and that you are the sort of person who has no time for Which? magazine. – Jeremy Clarkson
User avatar
okayfine
Supporter
Posts: 14154
Joined: 12 Nov 2007 23:02
Location: Newbury Park, CA

Re: Whitebird

Post by okayfine »

.
Last edited by okayfine on 10 Jun 2009 13:30, edited 1 time in total.
Because when you spend a silly amount of money on a silly, trivial thing that will help you not one jot, you are demonstrating that you have a soul and a heart and that you are the sort of person who has no time for Which? magazine. – Jeremy Clarkson
User avatar
okayfine
Supporter
Posts: 14154
Joined: 12 Nov 2007 23:02
Location: Newbury Park, CA

Re: Whitebird

Post by okayfine »

.
Last edited by okayfine on 10 Jun 2009 13:31, edited 1 time in total.
Because when you spend a silly amount of money on a silly, trivial thing that will help you not one jot, you are demonstrating that you have a soul and a heart and that you are the sort of person who has no time for Which? magazine. – Jeremy Clarkson
User avatar
okayfine
Supporter
Posts: 14154
Joined: 12 Nov 2007 23:02
Location: Newbury Park, CA

SU Intake Manifold - Completed

Post by okayfine »

I have finally completed the SU intake manifold. I'd given a lot of thought to how I wanted the manifold to look. One of the reasons of going with this induction setup was to retain that OE appearance. Because of that, it wouldn't have done to just leave the intake manifold with the sanded finish from page 6.

I had two obvious options, though in the end I chose neither. Option 1 was to get the manifold tumbled to match the finish of the ZTherapy carbs. For that to happen I had to have found a local place to tumble my manifold (difficult) and I would have had to do significantly more work on the manifold to remove all markings (impossible). Essentially, I'd have to prep the manifold as if I were going to polish it, as the tumbling process doesn't hide imperfections.

Option 2 was to have it media blasted with some heavy-weight media. Steel shot was the likely candidate. Still, I'd have to find a local place that had the equipment to do it and that would take on a small job and that wouldn't charge me an arm and a leg. Not in the Conejo Valley.

So we move on to Option 3 - Needle Gun. A friend loaned me one and showed me a sample flat piece of aluminum he'd hit with the gun. It looked promising. In actuality, using the needle gun on round tube was quite difficult, as the vibrating gun kept walking off the intake runners.

After I finished with the needle gun I installed the manifold and stood back. The pock marks from the gun's needles were 1/16" or so, and much larger than the effect I wanted. I needed a way to "blend" in the pock marks, and for that I turned to my angle grinder and wire wheel attachment. I really leaned into the manifold with the wire wheel and, after some effort and time, I ended up with a satisfactory surface.

Image

Close up of the intake runners:

Image

The flange was harder to access with the 3" wire wheel attachment, so it has a more pocked surface than I want. I may try again with a different sized wire wheel.

Still, once the aluminum oxidizes and takes away the shine, I think it will really look like it was a sand-cast piece. It obviously isn't if you know what to look for (or if you've read about Whitebird here or in the DQ), but the illusion is there and that's what I was aiming for.
Because when you spend a silly amount of money on a silly, trivial thing that will help you not one jot, you are demonstrating that you have a soul and a heart and that you are the sort of person who has no time for Which? magazine. – Jeremy Clarkson
User avatar
okayfine
Supporter
Posts: 14154
Joined: 12 Nov 2007 23:02
Location: Newbury Park, CA

SSS SU Induction

Post by okayfine »

So, a final picture of the SU setup on the SR. I bolted on the manifold, the carbs, ran the linkage and the fueling. I still need to install the choke cables, and to get some air horns and K&N filters. Except for the ignition portion of this process, the engine (and, hence, the car) is ready to fire off.

Image
Because when you spend a silly amount of money on a silly, trivial thing that will help you not one jot, you are demonstrating that you have a soul and a heart and that you are the sort of person who has no time for Which? magazine. – Jeremy Clarkson
User avatar
okayfine
Supporter
Posts: 14154
Joined: 12 Nov 2007 23:02
Location: Newbury Park, CA

Re: Whitebird

Post by okayfine »

.
Last edited by okayfine on 10 Jun 2009 13:32, edited 1 time in total.
Because when you spend a silly amount of money on a silly, trivial thing that will help you not one jot, you are demonstrating that you have a soul and a heart and that you are the sort of person who has no time for Which? magazine. – Jeremy Clarkson
User avatar
okayfine
Supporter
Posts: 14154
Joined: 12 Nov 2007 23:02
Location: Newbury Park, CA

Re: Whitebird

Post by okayfine »

.
Last edited by okayfine on 10 Jun 2009 13:33, edited 1 time in total.
Because when you spend a silly amount of money on a silly, trivial thing that will help you not one jot, you are demonstrating that you have a soul and a heart and that you are the sort of person who has no time for Which? magazine. – Jeremy Clarkson
User avatar
okayfine
Supporter
Posts: 14154
Joined: 12 Nov 2007 23:02
Location: Newbury Park, CA

Some NOS - 1969 Fuse Box

Post by okayfine »

I haven't used very many NOS pieces on Whitebird. This is in part because the car was in such good shape originally I didn't need many to replace worn stuff and in part because many of the OE Datsun pieces that I used (grill, instrument cluster) aren't available new. There were some unglamourous NOS parts installed like the front and rear brakes, and to that I add another unglorious NOS part - a '69 fuse box.

Image

Shown here as it came from the dealer when they were available, the fuse box even comes stocked with OE Niles fuses. It's a cool piece though, as almost any NOS part is.
Because when you spend a silly amount of money on a silly, trivial thing that will help you not one jot, you are demonstrating that you have a soul and a heart and that you are the sort of person who has no time for Which? magazine. – Jeremy Clarkson
Locked