Back to my roots

View and post your 510 project(s)
Post Reply
2DoorJim
Supporter
Posts: 283
Joined: 15 Jun 2013 21:43
Location: Calgary

Back to my roots

Post by 2DoorJim »

I thought I’d post some pictures of a project I started a few months ago but first I’ll share what lead to this project. Like most people I was building cars (510s!) from a young age but it’s been 24 years since I owned a 510. The last couple years I was looking for a change having grown tired of old 911s. The 510 was a natural choice though I considered a few other cars from the era, 2002, GTV.

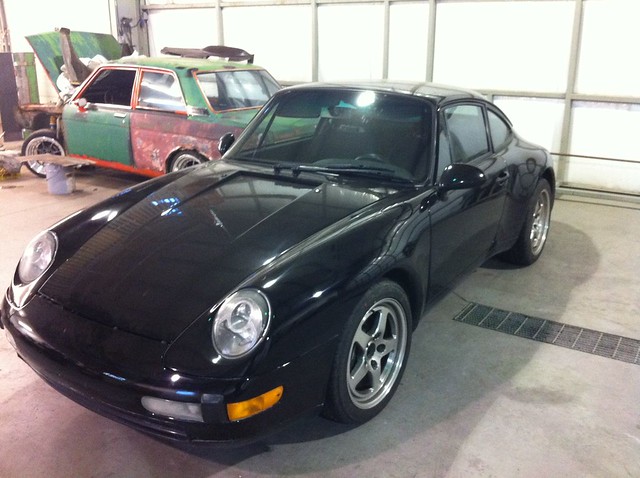
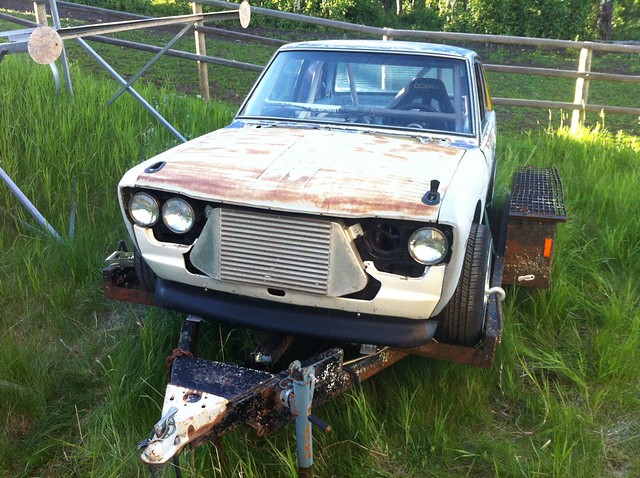
510s are scarce in Calgary and the couple I looked at during the last three years were overpriced and full of rust. Actually they didn’t have that much rust, because those areas were completely missing! Last summer I came across one which was 10 minutes from my house, had current Alberta registration and though it was rusted the price was right. I didn’t want a garage queen because my plans were to modify the car and seeing the way prices are increasing there was no way I’d do this to a rust free example. Due to a skipped timing chain I towed the 510 home. Plans were to set it aside until I finished a cab to coupe conversion currently underway on my 911.

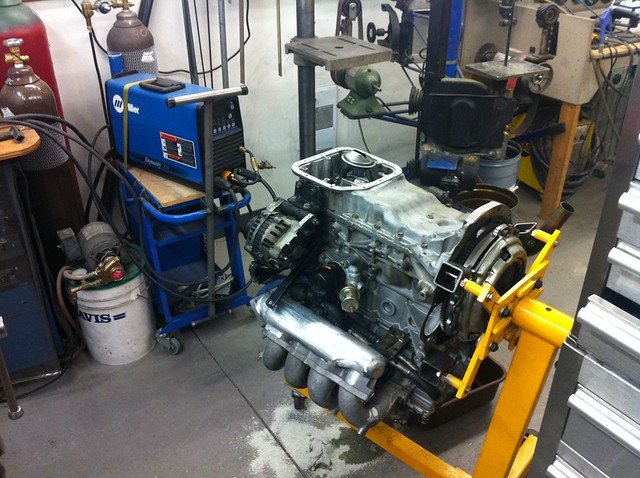
I told some friends about my long shot plans for the rusty 510 and they convinced me to do a SR20 turbo swap instead of my planned L20b turbo. I read about the conversion process here on the Realm and got thinking about where to buy a motor and trans which reminded me of a 510 race car I’d seen advertised a year prior. One thing lead to another and I ended up buying the race car for it’s drivetrain and suspension. I guess I was a little absorbed by the project because I acquired both cars in the space of two weeks, no turning back!

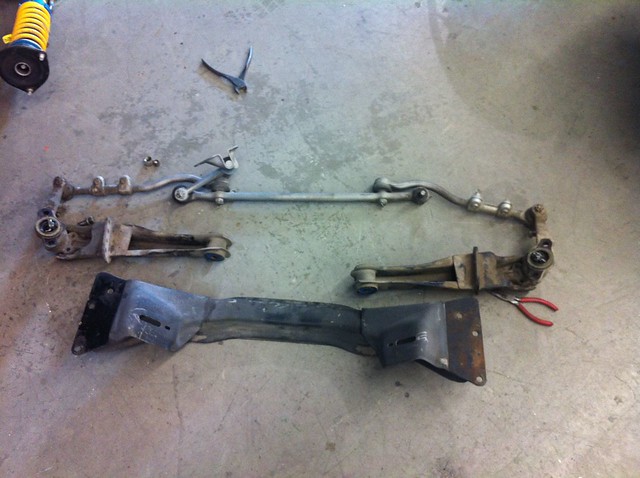
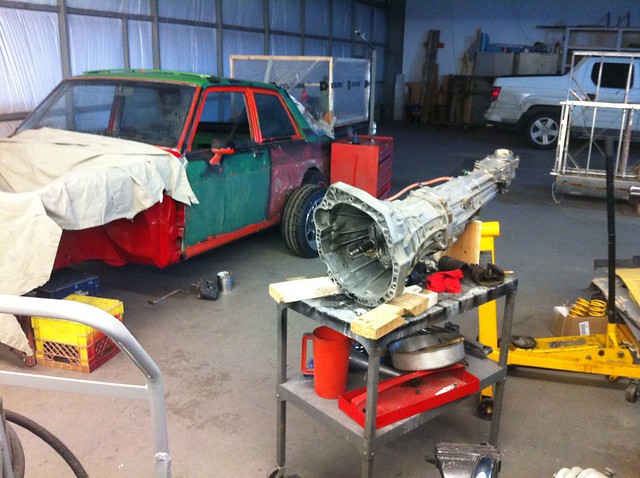
In the fall I pulled the drivetrain and running gear from both cars, sold the race car chassis along with all the running gear from the rusted street car then moved everything left over to my work shop space.

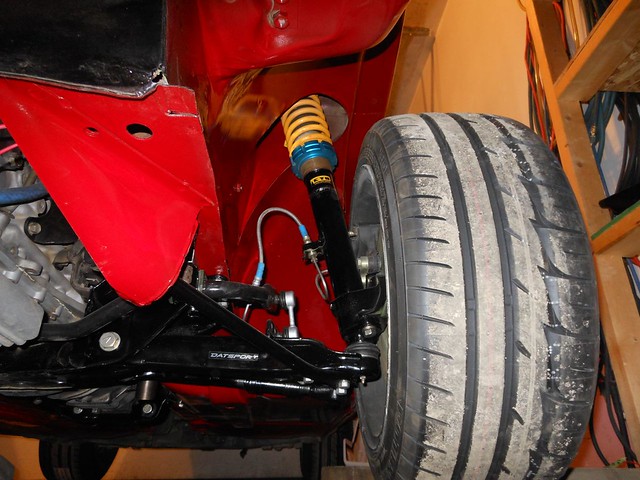
So my plans (which evolved L20>SR20) involve a flared chassis, turbo motor, built up suspension and brakes, but remain street-able for Calgary. One friend reminded me of what it was like to drive a 510 in Calgary back in the 80s. Our roads are not any better today, but at the time my 510 had really stiff suspension for the track. Our local track here recently closed and my street driving style is not very aggressive so I’ll be keeping the suspension soft, probably softer than I’d like.

In November I stripped the front end and, no surprise to discover more rust than I anticipated but I’ve got two hands, some tools and a little skill so I got busy. Generally I work on this project during the day between actual work projects but I lack motivation to do much during evenings and weekends. I was off for 12 days during Christmas and new years, never left the city, and I only put in a total of two or three hours on the car. I did however spend 30 or 40 hours lurking on the Realm reading about other peoples projects. I never get tired of seeing other peoples builds and I have no idea where they get the drive to pour on the hours, this is a thing of the past for me.

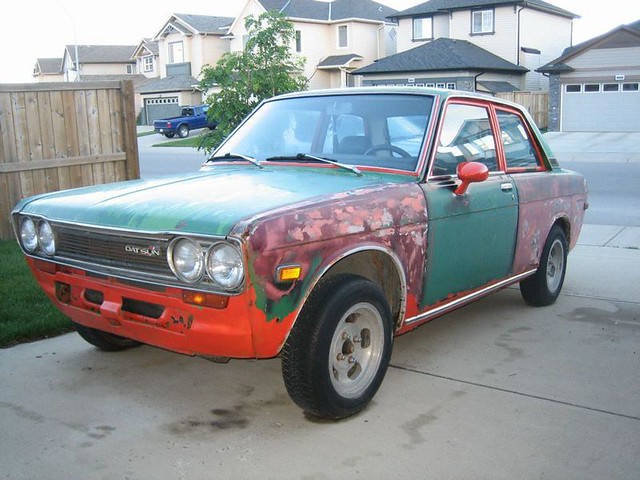
A few shots of my mess. The street chassis sporting urban assault paint scheme

Image

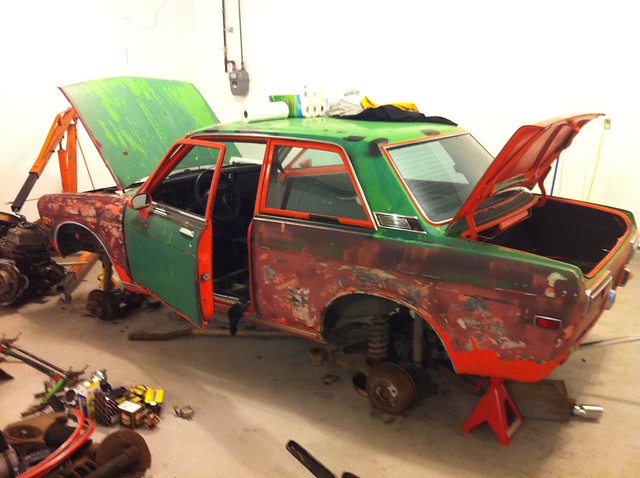
Race car chassis, sporting the identical paint scheme to the street car, just different colours

Image


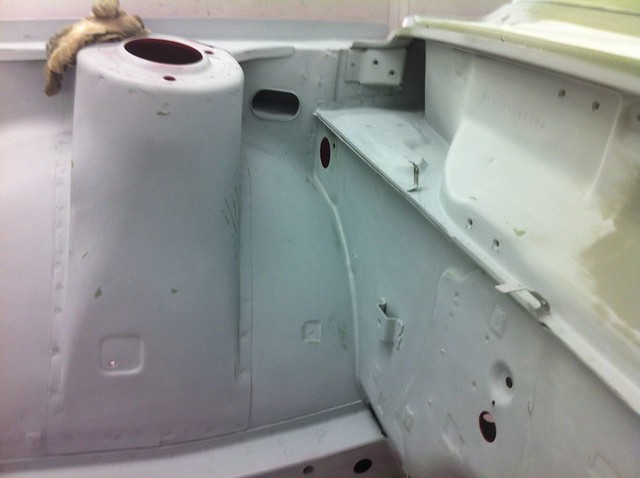
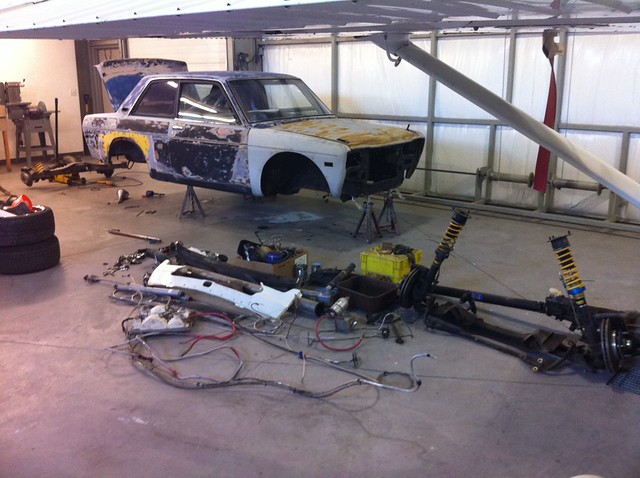
Street car tear down

Image


Race car tear down, I sold this chassis along with all the street chassis drivetrain and suspension parts

Image

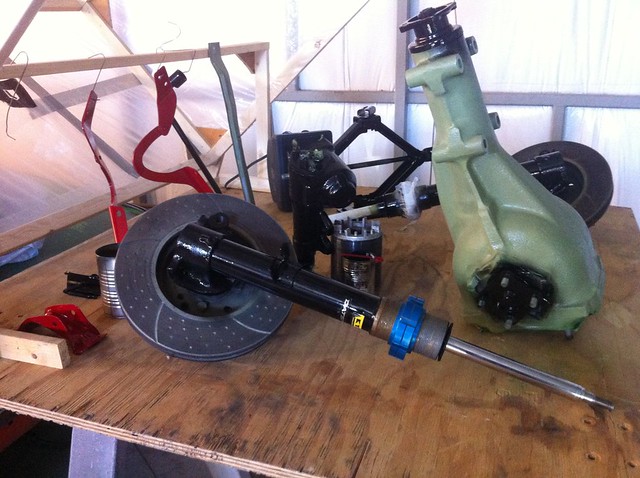
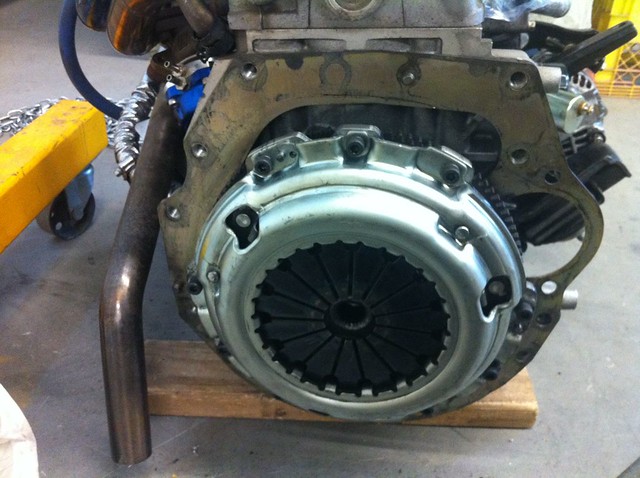
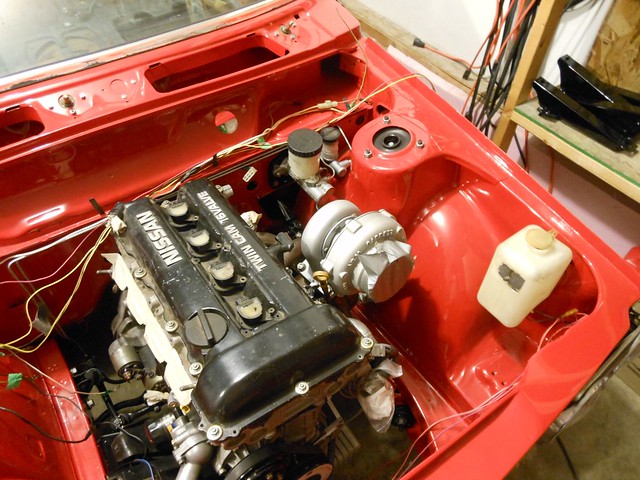
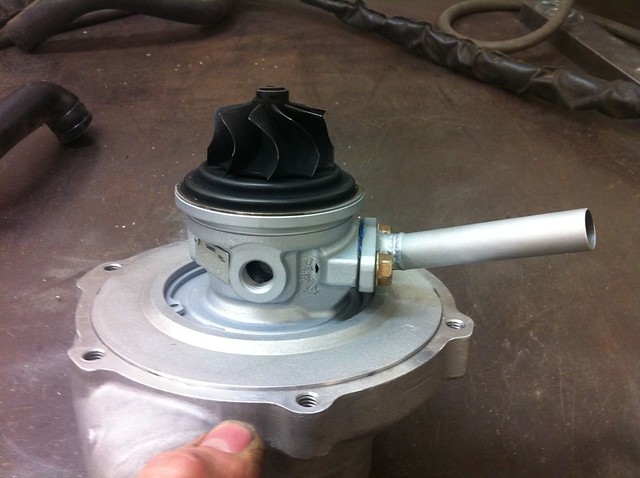
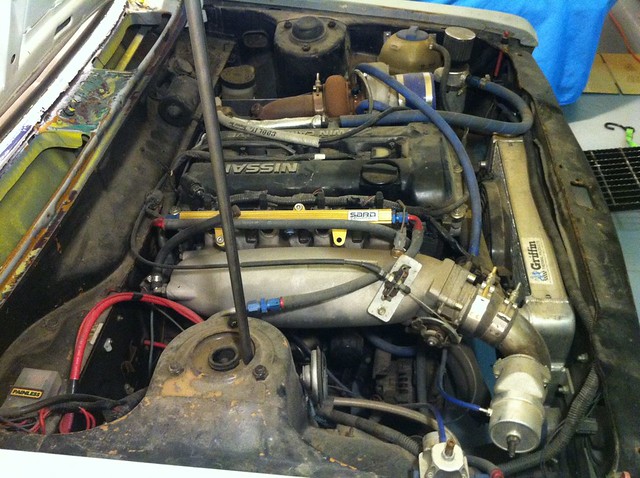
Heart of the race car

Image


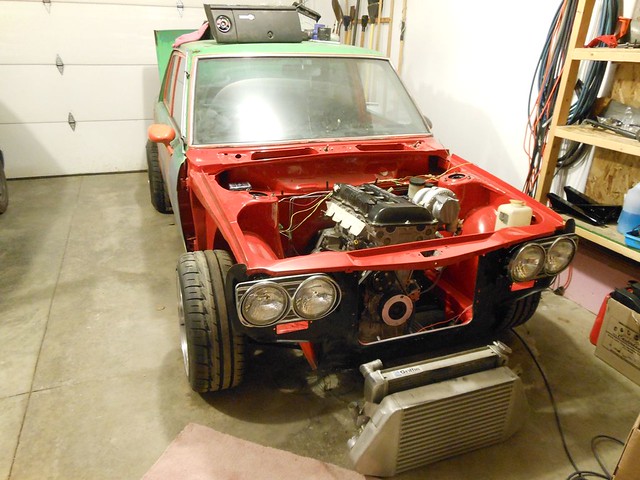
The work on the street car begins. My plan is only to restore the front end of the chassis and the floor pan then proceed with installation of the drive train. Lots of work to replace brake lines, run new fuel plumbing, some wiring etc and bring it up to running. Then, I'll look at moving forward with the rockers, bodywork, flares, paint. Long road ahead, but this won't be a 10/10 restoration, chassis is not worthy.

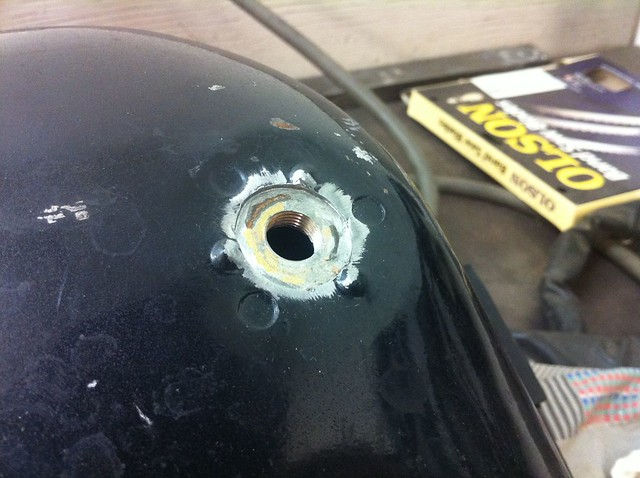
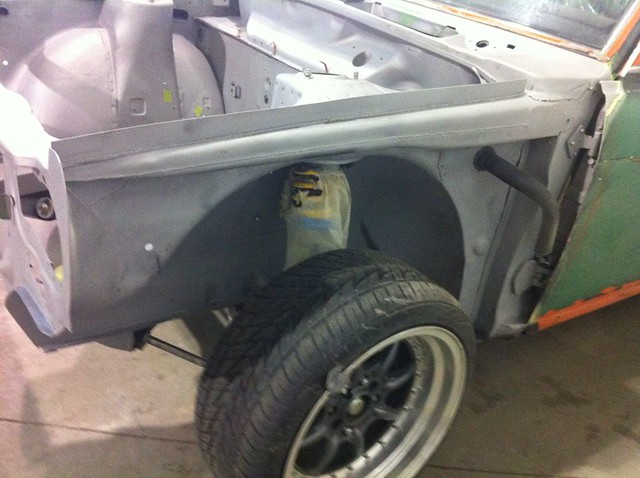
Usual corrosion to both L and R upper frame rails, fender flanges, bumper mounts, eyebrows.

Image

Drivers floor pan had to be replaced along with the rear 10" of frame rail on both sides. Fun work!


NOT

Image


Post sandblasting, engine bay, bottom of floor pan, inside of floor pan

Image

Image


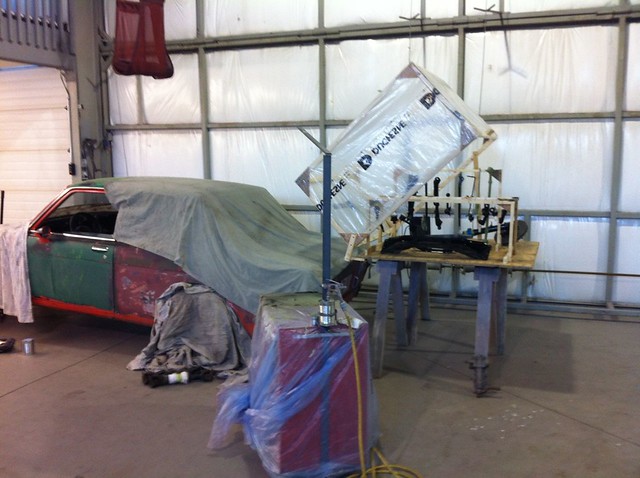
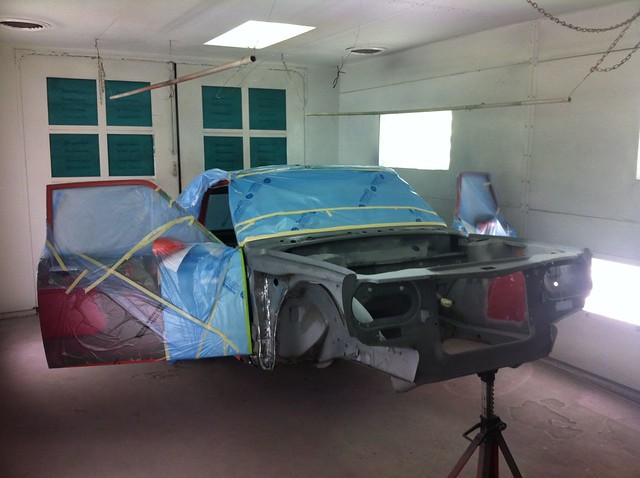
After detailing a number of spots brought out by sandblasting, then trying to thoroughly blow out the sand (ha) I moved it to a paint shop. I don't really paint but this project will be good practice for me. Being a car guy it's a skill I'm lacking, but then I also know better than to create more work, sometimes it's better to pay someone than create a mess.

Image


Epoxy primed
Image

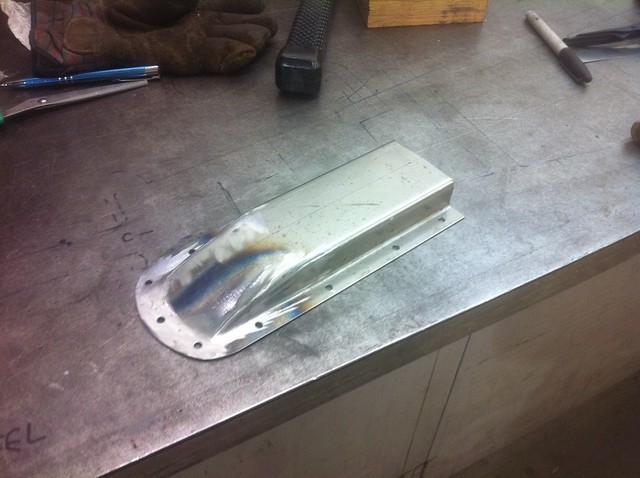
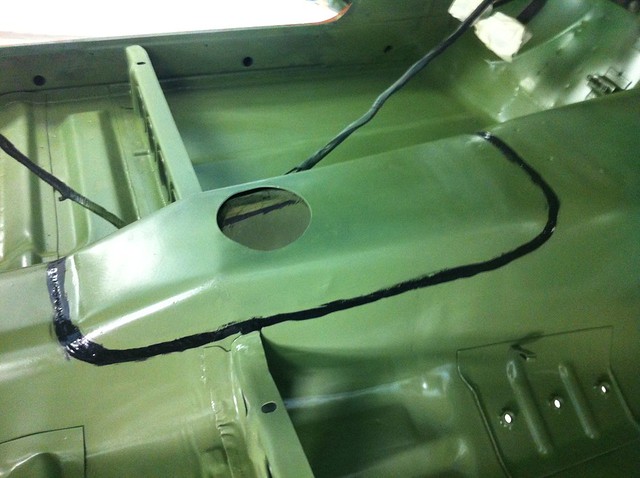
The race car had a custom Datsport tunnel cover to accommodate the SR20 trans. I welded it in place but did not bother with a continuos weld, just sealed it with seam sealer.

Image

Image


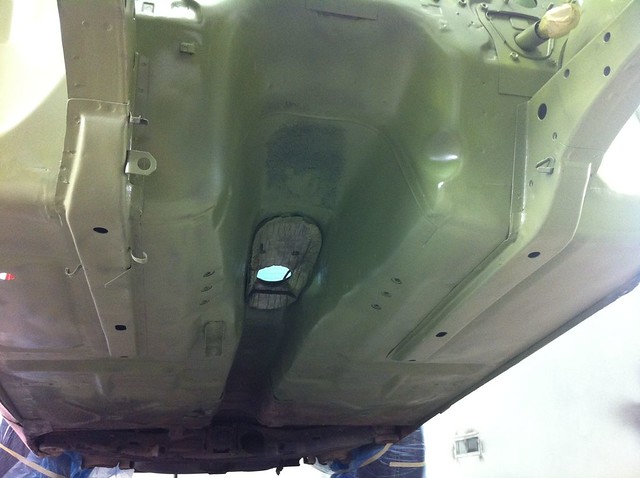
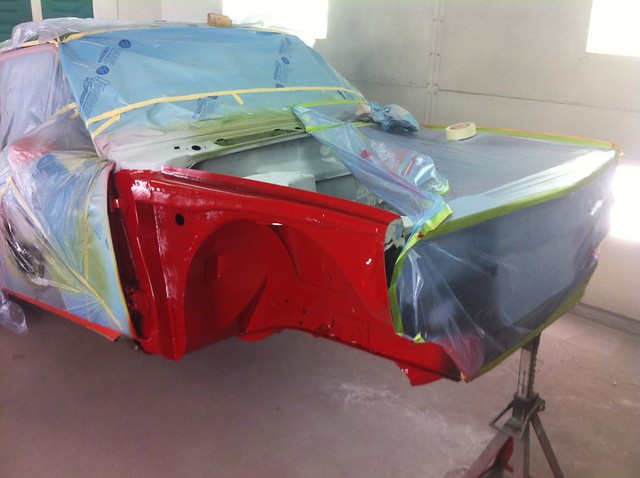
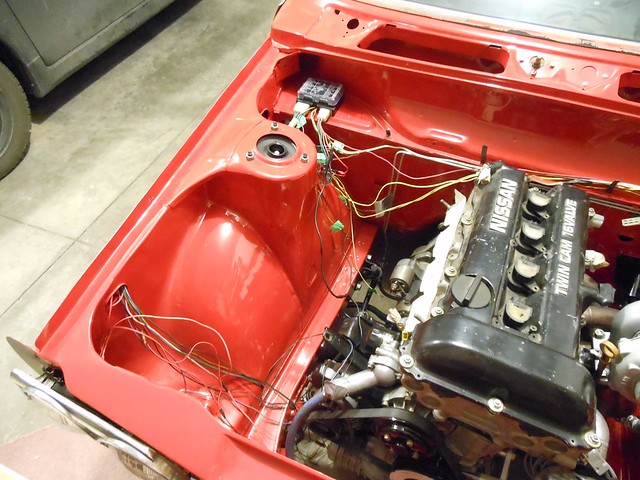
Drivers floor pan inside. The front end has paint (red) but I'm out of time to post up more pictures.

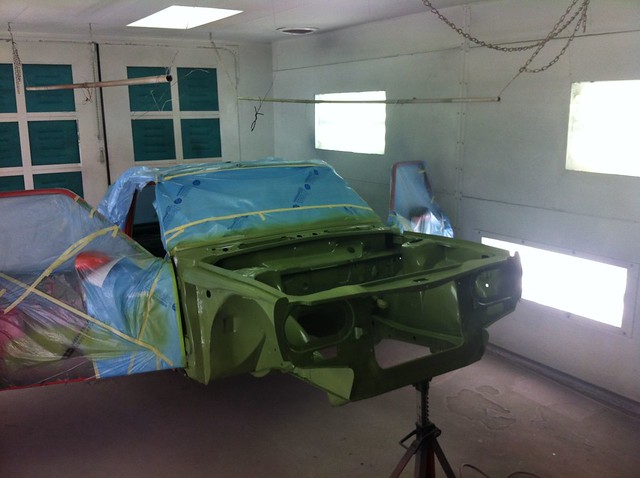
The good thing about getting the car to this stage is seeing some significant progress, colour (of any type) is a sign things are moving along. I have to avoid thinking about how much more work there is. Have the motor running this summer would be nice, and maybe start on the body, but who knows, it might not be complete for a year or two. More pictures tomorrow.


Image
User avatar
two_68_510s
Supporter
Posts: 3894
Joined: 18 Apr 2010 11:20
Location: Ben Lomond California

Re: Back to my roots

Post by two_68_510s »

Magnificent project post! Really nice work.

How about a shot or two of your Porsche conversion?

The hood latches on the race car are interesting, did they work well? You let them go with the car?
Last edited by two_68_510s on 24 Feb 2014 07:30, edited 2 times in total.
Joel

2 '68 510 2 door sedans
'95 240SX


“We will either find a way, or make one.” – Hannibal
User avatar
zKars
Supporter
Posts: 557
Joined: 15 Aug 2013 14:19
Location: Calgary Alberta Canada

Re: Back to my roots

Post by zKars »

So the 510 sand blasters, panel beaters and welders have been busy in Calgary this winter I see! Great looking project. We'll have to swap lookee-see's some day.

So I guess I'm going to have to go by "4 door Jim" now.... 2DJ and 4DJ ... Nice... Must be the water in Alberta. We have four Jim's in the Z club here and now it extends to 510 guys too. Oh well, fewer names to remember. "Hey Jim" works almost every time.
2DoorJim
Supporter
Posts: 283
Joined: 15 Jun 2013 21:43
Location: Calgary

Re: Back to my roots

Post by 2DoorJim »

Thanks for the compliments Joel but the computer is making things look a little better than they actually are. The hood latches are flush units and I think they are readily available, but beware, the ones on the car were high impact plastic and one was sticky, I broke it trying to get it to function.

The Porsche is a little far off topic but it is my other passion so I will indulge in a couple pictures of the roof conversion, however the engine compartment is where I spend my time. I will say though that I can’t begin to describe how a couple pictures will gloss over the amount of actual work involved to bring the roof project together. Lots of work to do it well.

The car is a replacement for a custom 79 930 turbo which I ran for 10 years, both street and track. The 95 911 has stock suspension and brakes, but it went on a huge diet and also runs a turbo, but due to 11.3 CR I built a secondary fuel circuit which runs methanol on a second set of injectors. This stuff is more my passion than the roof project.

Here is the 95 cab, tired old roof, frame broken, fabric ripped

Image


Here are the donor roofs, white is same year as the car but the yellow roof is a 1966! Same exact shape! The yellow one was used as a filler for the sun roof opening.

Image


Trimmed the frame from the top of the windshield but I left the glass in place to act as a template, then lifting the roof on/off a hundred or so times I gradually trimmed the unions. Lots of other unseen details involved in this process.

Image


Trimmed the insert for the sunroof opening. This too was difficult because it was easy to alter the crown of the roof. Without the sunroof box in place the roof was limp.

Image


The roof is mostly welded in place, rear seams leaded, A pillars yet to be dressed. Got to learn all about shrinking and stretching after welding the sunroof filler in place.

Image


DATSUN CONTENT! After paint, glue on headliner, new windshield, changed the door windows and frames, installed rear quarter window and rear glass. Still needs a little interior finishing.

Image


Same day, washed and ready to be put away for winter.

Image


Start of the turbo system

Image


A final shot of what lurks beneath the rear bumper

Image
RONSLYCHUK
Supporter
Posts: 780
Joined: 12 Sep 2004 19:42
Location: Abbotsford B.C.

Re: Back to my roots

Post by RONSLYCHUK »

Wow! That is some really nice work.
User avatar
Byron510
Moderator
Posts: 12658
Joined: 01 Jul 2003 23:06
Location: Maple Ridge, BC

Re: Back to my roots

Post by Byron510 »

Welcome - I sure like your input.

So not being a Porsche guy - was your car not available with a solid skid lid... or were you playing with what you had on hand?

Neat project, and the roof's not changing over 30 years is just a testimate to Porsche and its wisdom to stand behind their original designs.

So why just use the yellow roof for the sun roof delete panel, and not just use the whole thing?

To many questions not Datsun related, but hey we're all cars guys too...


Byron
Love people and use things,
because the opposite never works.
2DoorJim
Supporter
Posts: 283
Joined: 15 Jun 2013 21:43
Location: Calgary

Re: Back to my roots

Post by 2DoorJim »

Back on topic, Jim K. it’s interesting to see what’s going on behind closed garage doors around here. Hard core car culture appears to be fading so coming across someone like you blows me away. Great to see projects like yours, we’ll have to arrange a visit in the near future. I’m not certain if you remember me but I bought a 240 diff from you last summer, I believe you mentioned your 510 to me at the time, long before you owned it though.

Back on track with more 510 pictures

After the green epoxy primer I put a light coat of high solids primer on the engine bay. Novice mistake not thinning the primer enough so I had a few hours of sanding ahead of me.

Image


I sprayed the under side of the floor, the inside of the floor, wheel houses, then pulled the masking off and sprayed the engine bay. I thought I’d minimize overspray into the engine bay but this was offset by sand contamination. It’s not really bad but it is evident in a few spots lower down in the bay. I probably used compressed air for a half hour or so on two different occasions, along with lots of vacuuming and sand still came out from somewhere. It’s exactly as bad as I read about on the web.

Image


I think I figured out which of these chemicals is most important

Image


The donor race car had Datsport suspension. Unfortunately it was all in the car while sandblasting but it needed to be repainted anyway. Once the chassis was back at my shop I cleaned all the suspension parts, primed and painted them.

Image


Image


Image


Image


Next I pulled the oil pan off the motor only to verify that the parts which were supposed to be inside, were actually in there. It’s a rebelo built motor with H rods, forged pistons and some top end work. I’m still not clear at this time what all has been done but the motor was not a killer high boost build, designed for strong mid range and lower boost.

Image


Pulled the housings off the turbo. It’s garrett ball bearing but appears to based on T3 with a GT compressor and ported compressor housing. Turbine is far too small by my guess, good for response but will cause back pressure at top rpms I think. I’ll run it first before splitting cash. This project is already nearing what I have into the porsche above, and I’m not even close to being done yet.

Image


The race motor came with Australian brand Microtech EFI but I’m converting it to SDS, hence the need to build a custom crank position sensor. I’ll Sell the few Microtech bits to offset some of the cost.

Image


Light weight flywheel, triple puck disk with spring center 240mm dia. I was concerned that this disk would be too touchy for street use so I talked to some younger folk I know at a speed shop in Edmonton who build these motors, they said it would be fine since it has a spring center and maybe just a little touchy he said.

The transmission was leaking real bad out of the bell housing, of course I thought input shaft seal but got looking on the web and found lots of comments from guys who changed the seal only to find the leak remained. I washed the bell housing out then set the trans on the bell housing end. It was leaking out of the ball stud - threaded hole is not blind. Simple fix. Changed the fluid for some redline shock proof lightweight. Not sure if the syncros will have an issue with the redline product. New tail seal as well


Image


Image


Mated the engine and trans, tried to find the 10 or so missing bell housing bolts! sheesh, L series only needed four bolts... then installed the motor from the bottom. I need to clean up all the nut and bolt hardware for the suspension and steering before final assembly. My goal right now is to get the wheels back on so I can move it around in my shop since it’s been an obstacle for the last while. The work so far represents Oct through last week so updates will be slow to come from here on.

Image
2DoorJim
Supporter
Posts: 283
Joined: 15 Jun 2013 21:43
Location: Calgary

Re: Back to my roots

Post by 2DoorJim »

Thanks for the welcome Byron, it's unique to come back to the 510 world in the presence of the internet versus the 80s. Sharing my project and reading about others (like yours) is certainly motivating - something I need.

Skid lid - good one! yes the non turbo cars are popular in both cab and coupe, but this unit fell into my lap and it was pretty rough from having the top down for several years, curb rash original wheels, (rash in general!). Coupes fetch a good dollar and finding a low budget one worthy of tin snips would be a loooong wait. The turbos models are also coupes but fetch near double a non turbo car, lots more weight too from AWD, bigger brakes, bigger trans, bigger wheels. Now I have a light weight, non sunroof 95, a model which otherwise would be rare. Being it was so rough to begin with I didn't devalue it either.

The roofs were free and I was unsure if the yellow one would work so I took both. When I got them home I discovered the yellow one had bad corrosion and bondo around the rear quarter windows and bottom of the rear window. It looked really fussy to deal with so I elected to use the late roof instead. Also noticed a minor change to the channel which accepts the door seal and a few other subtle differences so I was apprehensive but the corrosion sealed the deal.

Noticed you were in town, missed a meet and greet opportunity.
Byron510 wrote:Welcome - I sure like your input.

So not being a Porsche guy - was your car not available with a solid skid lid... or were you playing with what you had on hand?

Neat project, and the roof's not changing over 30 years is just a testimate to Porsche and its wisdom to stand behind their original designs.

So why just use the yellow roof for the sun roof delete panel, and not just use the whole thing?

To many questions not Datsun related, but hey we're all cars guys too...


Byron
goichi1
Supporter
Posts: 4064
Joined: 22 Jan 2008 21:57
Location: Fayetteville, GA

Re: Back to my roots

Post by goichi1 »

Really cool thread! super nice work on the porsche, also made it look really easy! but I'm sure there was a lot of work involved. How do you like that Dynasty 200dx? I really envy your huge shop!! Must be nice having all that room.

EDIT: I just noticed that's a airplane hangar. Is that a 172 wing??
User avatar
two_68_510s
Supporter
Posts: 3894
Joined: 18 Apr 2010 11:20
Location: Ben Lomond California

Re: Back to my roots

Post by two_68_510s »

"Got to learn all about shrinking and stretching after welding the sunroof filler in place." I bet! :lol:

Great stuff, good to see fancy metal work like that come to fruition, car looks good when cleaned up! :)

Is the "frame" stiffer on the convertible?
Joel

2 '68 510 2 door sedans
'95 240SX


“We will either find a way, or make one.” – Hannibal
2DoorJim
Supporter
Posts: 283
Joined: 15 Jun 2013 21:43
Location: Calgary

Re: Back to my roots

Post by 2DoorJim »

Ron, thanks for your comment above.

goichi, the 200DX is OK. Each tig I've owned or used had different attributes and of the two 200DX machines I've got now one seems to work different (better?) than the other. I used to have a 300DX predecessor to the 200s (first 300DX in calgary, demo machine) and it generally sucked on AC where the newer models appear to be refined and work better on AC. DC worked fine on all. I complained a number of times about my 300 and finally got in touch with a factory engineer, he admitted that improvements were made on the later production units. That pretty much says it. 200 amp is a good range to do 99% of anything tig for auto hobbies, the other 1% can also be done, just a little slower. I love being able to transport the machine and plug into 115v. You don't get full output on 115v but I've done numerous repair jobs and never tripped a breaker.

Plane is a 172 which my partner had/sold. He's a young 79 yo ame/pilot and car nut. He's starting to think about retirement.

Two 68 510s, the 911 cab chassis is a little stiffer down low, .020" thicker metal on inner/outer rocker structure and an extra triangular gusset at the base of A pillar where it connects to the rocker. Rest of the car is the same as a coupe except for the roof of course.

Jim
Last edited by 2DoorJim on 14 Apr 2014 17:45, edited 1 time in total.
TerryHackman
Supporter
Posts: 673
Joined: 24 Oct 2004 10:08
Location: Edmonton Ab.

Re: Back to my roots

Post by TerryHackman »

What brand is that green epoxy primer you are using?
2DoorJim
Supporter
Posts: 283
Joined: 15 Jun 2013 21:43
Location: Calgary

Re: Back to my roots

Post by 2DoorJim »

edit: I need to post updated pictures!
Last edited by 2DoorJim on 20 Jan 2016 23:46, edited 1 time in total.
2DoorJim
Supporter
Posts: 283
Joined: 15 Jun 2013 21:43
Location: Calgary

Re: Back to my roots

Post by 2DoorJim »

Time to post an update on my long drawn out project. It should have been running by now but I only put in a couple hours a week. Gradually it will come together but the whole body needs attention once I get it running, and that's going to be a huge project.

I had the 510 where I work but found that I wasn't getting much time to work on it during the day and I don't seem to have the ambition to head back to work during the evening or weekends so I moved the 510 home after the suspension was installed.

Image


Unwrapped the wiring harness and paired out the auto trans stuff. Total sticky mess of tape goo, zeibart tar undercoating saturated with oil. Wiped each strand with solvent, cleaned the fuse box and laid out the wiring. Going through the right frame rail and need to shorten most circuits.

Image

Image


I rearranged the left heater hose due to firewall clearance and due to plans I have for the throttle linkage.

Image

Image

Image


Blasted, primed and painted the headlight parts. Reassembly took a couple hours until I figured out there's a specific bucket for low beam vs high beam. I had a few assemblies to choose from and picked the ones with least corrosion. 40 year old parts sure get beat up.

Image


Built a stainless battery box for my little battery. This will get dropped through the right rear of the trunk floor. Also aluminum hold down frame and post mounted disconnect switch. I'll vent the battery externally with some different caps.

Image

Image


I searched and didn't see much info on retrofitting speedos that are compatible with the SR20 gearbox, other than going aftermarket. I had a speedo from an old 930 turbo as well as the sensor and ring from inside the trans which I'm figuring I'll mount on the side of the R180. After about four evenings of gradual trimming with a dremel I managed to mount the speedo. Tough to make it fit, preserve the PC board on the 510 dash, re-wire the high beam light etc. I polished up the lenses too and now the cluster looks like new. I thought about swapping the needles between the 510 and 930 speedo but felt I'd ruin something inside the speedo head.

Image

Image


I've decided to run a header tank mounted under the trunk floor which will be gravity fed from the fuel tank. Needed a large fitting in the fuel tank and decided to used the drain bung. Threaded 1/4 npt then dressed the tank skin back before welding it.

Image


Cleaned up the turbo which was rusty on the outside and also build an oil drain for it. The motor had a bunch of aeroquip fittings but something that bothered me about the billet alum aeroquip drain was limited access to the header flange bolts. This drain provides wrench clearance whereas before you had to remove the center section from the turbine housing in order to unbolt the housing from the header. Big deal, naw, not really but just making things easier to service when the imminent turbo upgrade occurs :)

Image


5% done 95% to go! Can't wait to have this thing running, all I think about, all day long every day. Lots of time spent here to see how other people put their projects together.

Image
User avatar
510wizard
Supporter
Posts: 1031
Joined: 12 Sep 2005 09:50
Location: Reno, Nevada

Re: Back to my roots

Post by 510wizard »

How about a picture of that bench grinder/polisher tree. That's a neat space saving idea. Nice job on the car!
Post Reply