Back to my roots
Re: Back to my roots
Are you near Springbank airport?
Re: Back to my roots
All day, sometimes all night

Re: Back to my roots
Magic. You'll have a unique 510 when you're done, and lots of people say that, but finally in your case it will be true!
Because when you spend a silly amount of money on a silly, trivial thing that will help you not one jot, you are demonstrating that you have a soul and a heart and that you are the sort of person who has no time for Which? magazine. – Jeremy Clarkson
Re: Back to my roots
Thanks for the compliment Julian, I just hope it looks OK when done, I've had varrying degrees of doubt through this whole process.
Final coat of primer on several parts last night, paint going on parts later this week and maybe the chassis next week.
Final coat of primer on several parts last night, paint going on parts later this week and maybe the chassis next week.
Re: Back to my roots
Do you ever walk over to visit Ross and Barry at Racetech/SDS?

Re: Back to my roots
2DoorJim wrote: Final coat of primer on several parts last night, paint going on parts later this week and maybe the chassis next week.
much luck with the flow out ......if your using a similar product to the 2k ATX urathane primer that I used. it should flow out just as smooth as the top coat..... much practice can be had........i thought it should be ruff like the epoxy primer
two_68_510s wrote:I guess our donkeys are quicker then your sled dogs!
Re: Back to my roots
Yup, but only on the days when they don't drop in510rob wrote:Do you ever walk over to visit Ross and Barry at Racetech/SDS?
Re: Back to my roots
haha, awesome!
-
harryagain
- Supporter
- Posts: 279
- Joined: 06 Apr 2008 04:16
- Location: Perth, Western Australia
Re: Back to my roots
I just found your thread 2doorjim, looking good, lots of time going into your build. Thanks for the info on the trans tunnel as well by the way....
My cars
1971 Datsun 510 2Dr
1971 Datsun 1600 4dr - FJ20
VW Golf
My 2dr Build
http://www.the510realm.com/viewtopic.php?f=3&t=27563
1971 Datsun 510 2Dr
1971 Datsun 1600 4dr - FJ20
VW Golf
My 2dr Build
http://www.the510realm.com/viewtopic.php?f=3&t=27563
Re: Back to my roots
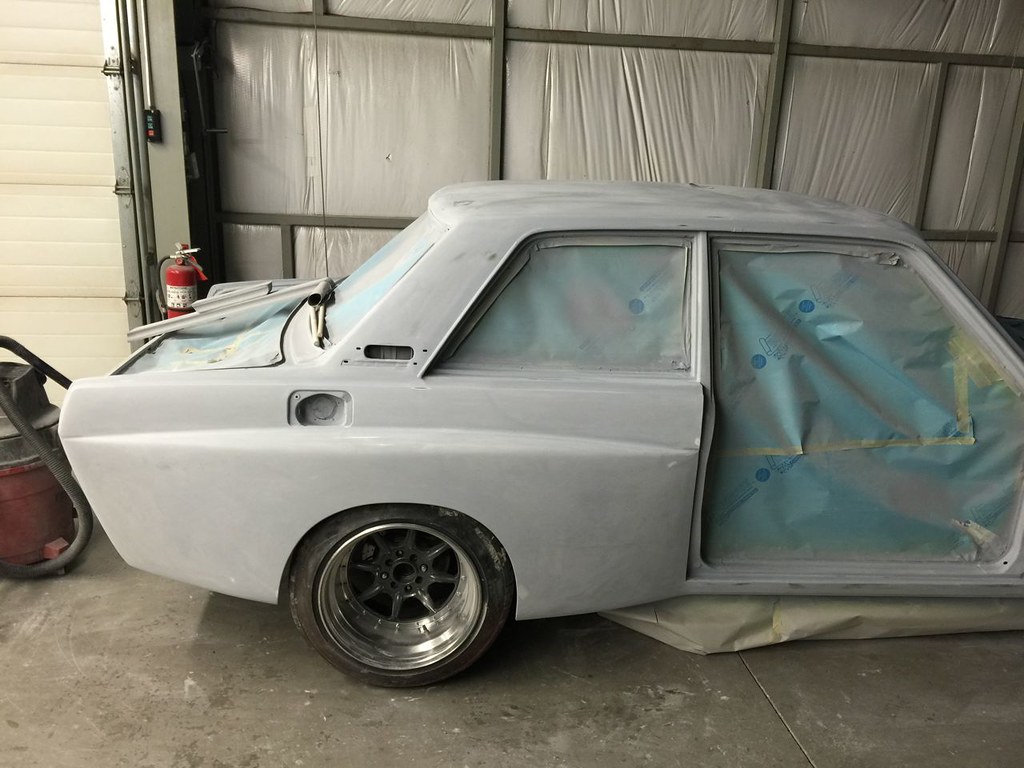
Making bodywork progress but I can't express enough how autobody is an acquired skill unlike mechanical devices where you can simply unbolt and reassemble if you made an error.
I wanted to weld up the several sets of mirror holes in the doors and in the process of shrinking a bump which resulted from an overtightened mirror fastener I created a proud vertical crease on the door. Me figures ok, I'll just shrink that crease, only to find the crease progressed down the door. I stopped at the third round to figure out what was going on since I had good success on the other door doing the exact same thing. I decided to go back and stretch the skin at my first shrink point, miraculously the vertical bump went away! To do this delicate work you need the ability to diagnose what's going on, and it's not always readily apparent.
Anyhow, I put final primer on my hood, trunk, valance, and fenders.
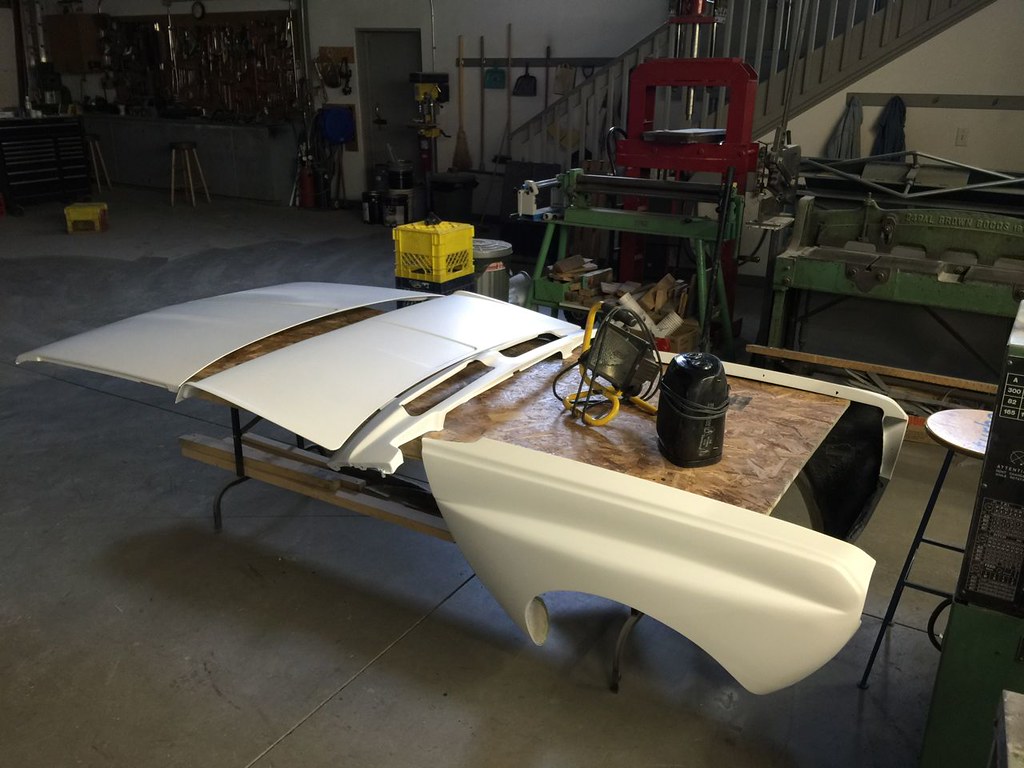
Wet sanded all the parts, depending on the texture of my primer I used 400 or 600 wet dry paper. Only broke through in two spots!
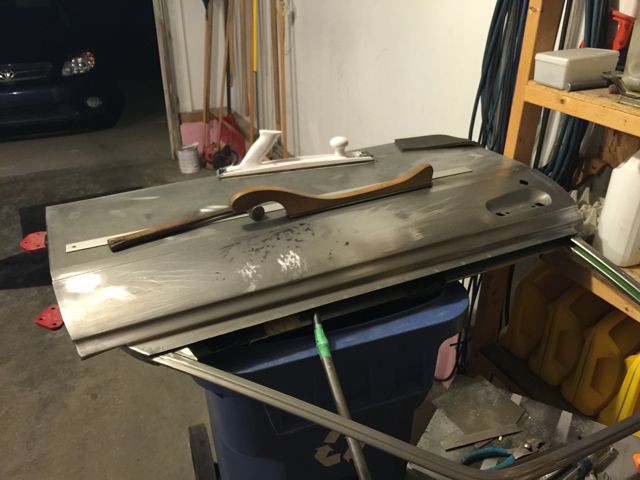
Here is one door with the mirror holes welded up. As I describe above it's somewhat delicate work but after a couple hours per door I managed to get almost all the dents out to the point where I used a straight edge and had uniform contour and decent contact with sanding board over the whole skin. You can see a tool I have stuffed in the window slot which I used to push up in spots. One door had a little too much crown to I used a shrinking disk to reduce the crown.
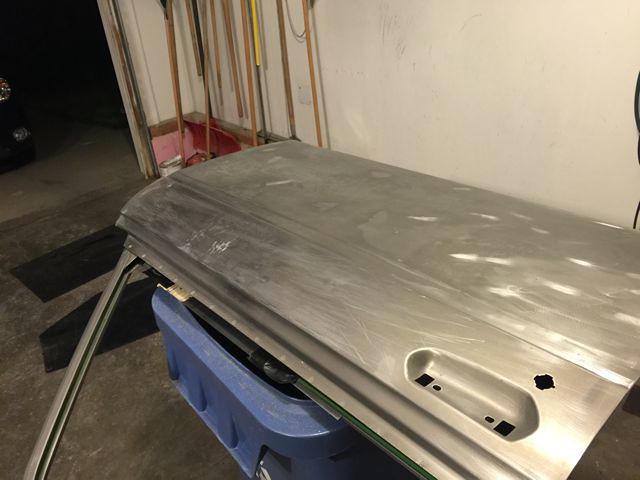
Not bad for 43 year old doors especially considering how rusty the chassis was. I only had to replace one square inch on the bottom trailing corner of the driver side door.
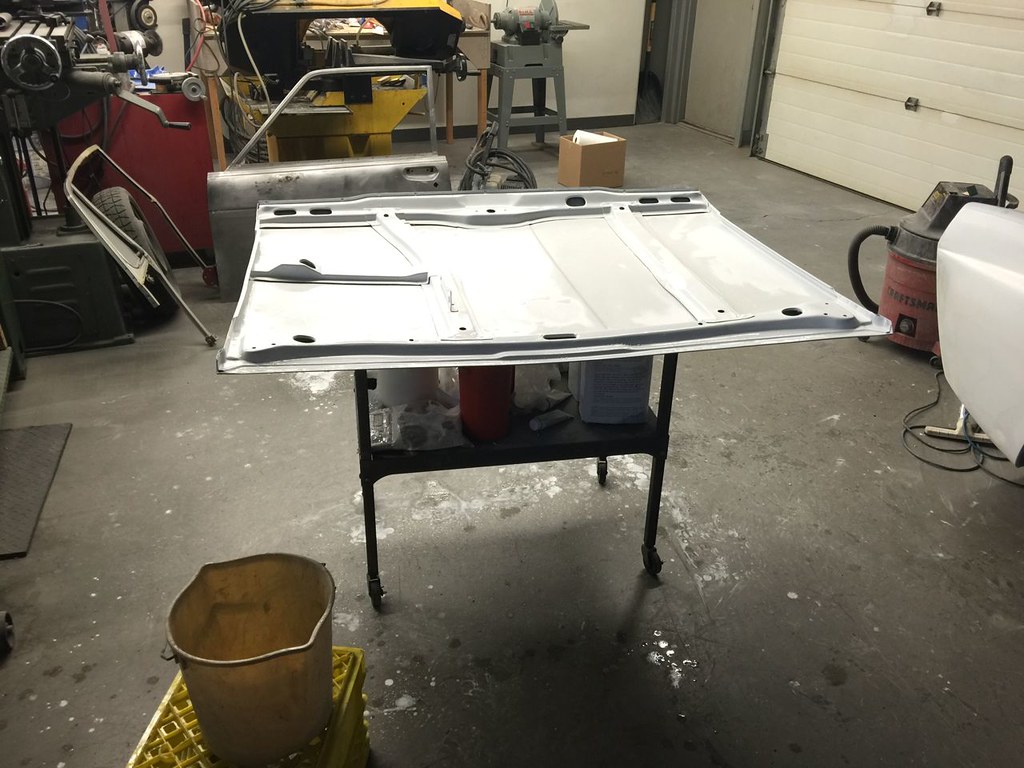
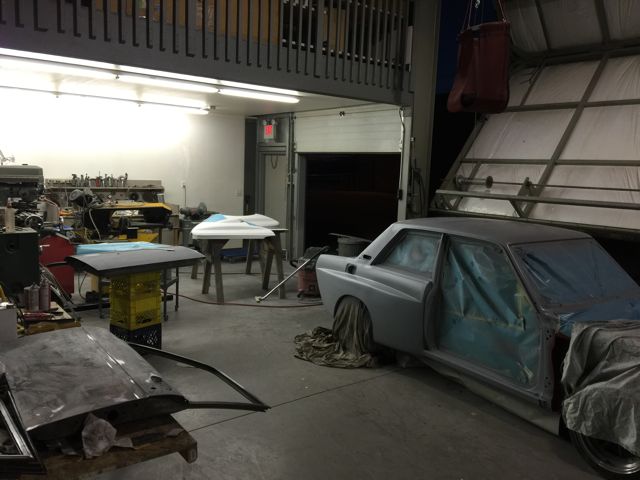
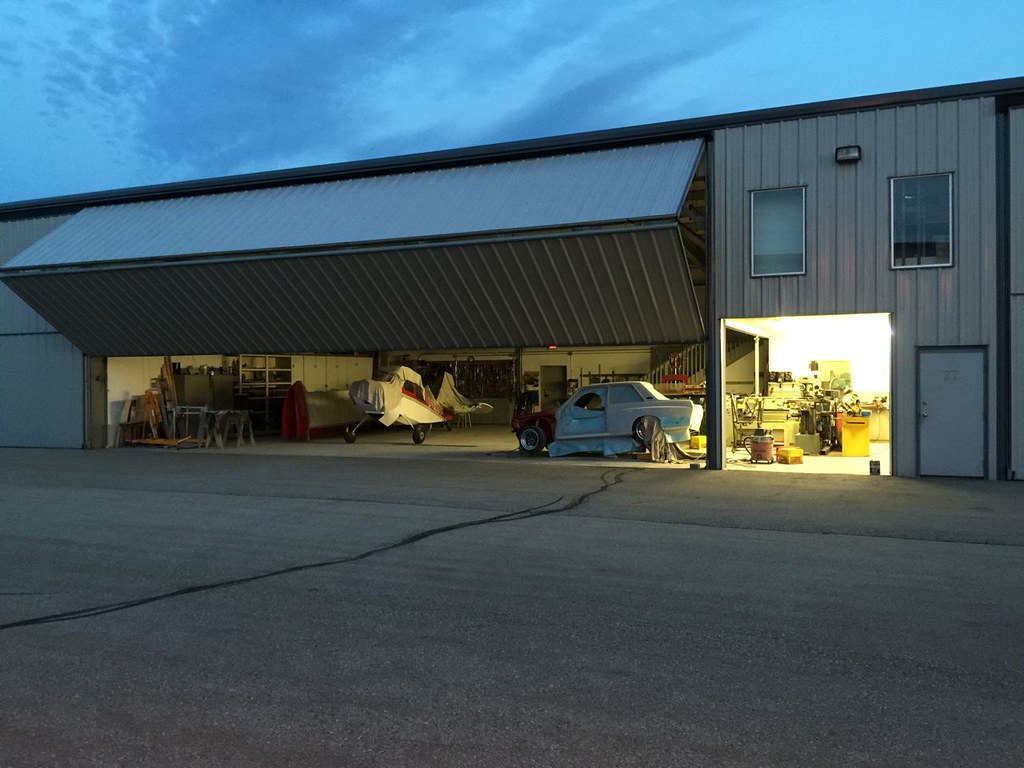
At this point I sprayed a coat of high build on both doors and blocked them. One door received a second coat while I also put a coat of high build on the chassis and some gravel guard on the lower half of the valance and the bottom on the front fenders. Shop turns into one big spray booth. Midnight outside, so as to avoid onlookers at the airport. No such luck. Still had someone stick their nose in to see what's going on.
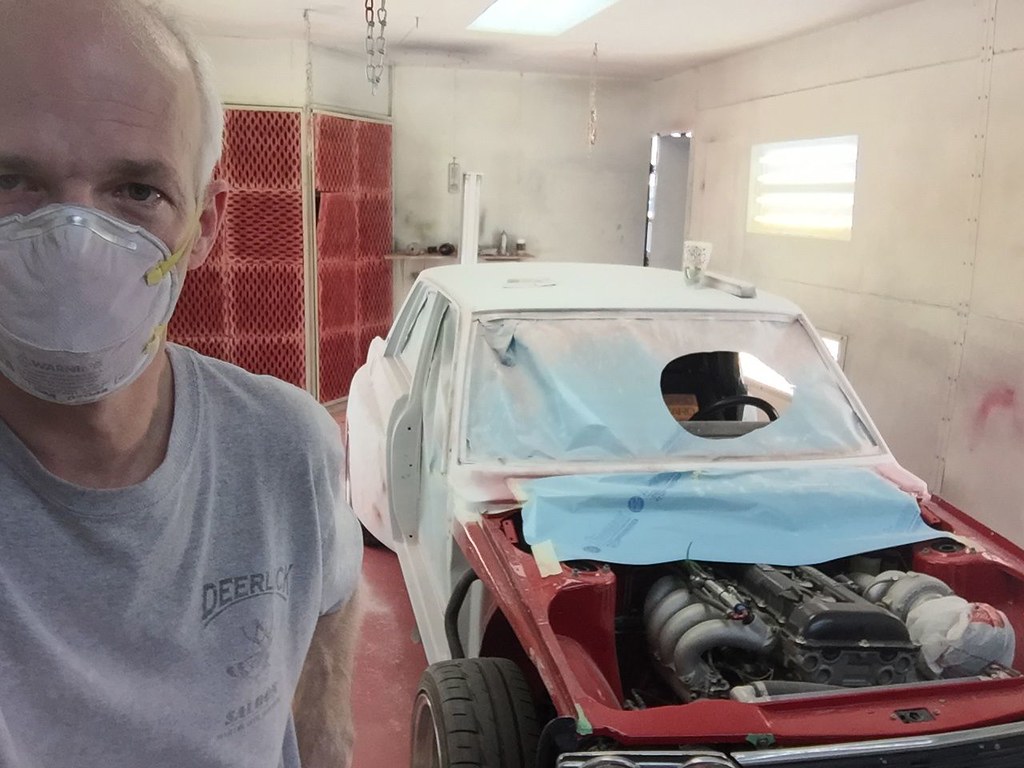
Doofus at work. After a couple day delay due to a wind storm that ripped my car door out of my hand and bent the door stay, on the exact day I was supposed to move my parts to the paint booth, I finally got them moved and got setup. It doesn't look like much in this picture but when this is only your second time spraying you keep questioning yourself if you have the parts properly prepared, or know what you're doing.
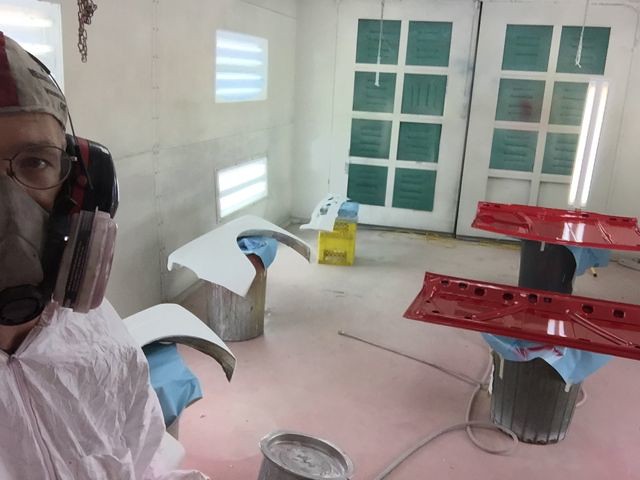
No better pictures yet but the end result was good application, no runs and no orange peel, but a couple thin spots which I thought for certain had good coverage. Guess I need to look closer at all edges and corners while spraying. I also found everything to be too low in order to see the glancing light. I had to keep getting on my knees while spraying which is cumbersome.
Shortfalls were mostly dust. This isn't really a dust free booth, more of a commercial environment. I talked to a painter today who knows the booth and he advised what I need to do to cut the dust issue in this specific building. I also found out I needed to mask the back side of my front fenders. I also forgot to open the water drain on the air drier and started to notice a couple tiny ball bearing - like specs. They didn't look like dust but more like a ball from a fine tip ball point pen. I went out and drained the water trap and purged the air hose then all was fine. Doofus.
I wanted to weld up the several sets of mirror holes in the doors and in the process of shrinking a bump which resulted from an overtightened mirror fastener I created a proud vertical crease on the door. Me figures ok, I'll just shrink that crease, only to find the crease progressed down the door. I stopped at the third round to figure out what was going on since I had good success on the other door doing the exact same thing. I decided to go back and stretch the skin at my first shrink point, miraculously the vertical bump went away! To do this delicate work you need the ability to diagnose what's going on, and it's not always readily apparent.
Anyhow, I put final primer on my hood, trunk, valance, and fenders.
Wet sanded all the parts, depending on the texture of my primer I used 400 or 600 wet dry paper. Only broke through in two spots!
Here is one door with the mirror holes welded up. As I describe above it's somewhat delicate work but after a couple hours per door I managed to get almost all the dents out to the point where I used a straight edge and had uniform contour and decent contact with sanding board over the whole skin. You can see a tool I have stuffed in the window slot which I used to push up in spots. One door had a little too much crown to I used a shrinking disk to reduce the crown.
Not bad for 43 year old doors especially considering how rusty the chassis was. I only had to replace one square inch on the bottom trailing corner of the driver side door.
At this point I sprayed a coat of high build on both doors and blocked them. One door received a second coat while I also put a coat of high build on the chassis and some gravel guard on the lower half of the valance and the bottom on the front fenders. Shop turns into one big spray booth. Midnight outside, so as to avoid onlookers at the airport. No such luck. Still had someone stick their nose in to see what's going on.
Doofus at work. After a couple day delay due to a wind storm that ripped my car door out of my hand and bent the door stay, on the exact day I was supposed to move my parts to the paint booth, I finally got them moved and got setup. It doesn't look like much in this picture but when this is only your second time spraying you keep questioning yourself if you have the parts properly prepared, or know what you're doing.
No better pictures yet but the end result was good application, no runs and no orange peel, but a couple thin spots which I thought for certain had good coverage. Guess I need to look closer at all edges and corners while spraying. I also found everything to be too low in order to see the glancing light. I had to keep getting on my knees while spraying which is cumbersome.
Shortfalls were mostly dust. This isn't really a dust free booth, more of a commercial environment. I talked to a painter today who knows the booth and he advised what I need to do to cut the dust issue in this specific building. I also found out I needed to mask the back side of my front fenders. I also forgot to open the water drain on the air drier and started to notice a couple tiny ball bearing - like specs. They didn't look like dust but more like a ball from a fine tip ball point pen. I went out and drained the water trap and purged the air hose then all was fine. Doofus.
Last edited by 2DoorJim on 04 Aug 2015 22:10, edited 1 time in total.
Re: Back to my roots
But doesn't it feel good to see colour on the panels?
Great progress. Paint for me is always exciting. I've pAinted less than 10 cars in my automotive life, and like am as nervous as hell. But it so rewarding to just see it all done and shining in one colour.
Byron
Great progress. Paint for me is always exciting. I've pAinted less than 10 cars in my automotive life, and like am as nervous as hell. But it so rewarding to just see it all done and shining in one colour.
Byron
Love people and use things,
because the opposite never works.
because the opposite never works.
Re: Back to my roots
You are right about that Byron, it sure does feel good to see paint going on. The end is in sight!
"nervous" that's an accurate description of the feeling through the whole process. I had good success with the engine bay when I did it over a year ago but the long interval made it feel like this was my first time painting. Applying multiple coats of primer in the recent past likely gave me some practice with the gun but the paint is on a whole nother level.
"nervous" that's an accurate description of the feeling through the whole process. I had good success with the engine bay when I did it over a year ago but the long interval made it feel like this was my first time painting. Applying multiple coats of primer in the recent past likely gave me some practice with the gun but the paint is on a whole nother level.
-
arabian_ryda
- Posts: 226
- Joined: 29 Mar 2004 20:40
- Location: edmonton,alberta
Re: Back to my roots
great progress and beautiful car. very well done and your time frames are still fairly good. some guys spend 10 years and dont get as much as you did in 2. i live in Edmonton and i am also int he process of doing a sr20 swap. hope to meet/cruise with you one day. cheers.
-amir
-amir
Re: Back to my roots
Hi Amir, this thing has bothered me taking two year to get done but then I blew it out of proportion. In my opinion even two years is too much of a persons life, I'm involved in porsches and I see people take their car down for a bit of work which quickly grows into a major overhaul which in one case took the guy nine years to get back together!!! Crazy. People with a busy life and kids have maybe only 10 hours per week to devote to a project, guys like me who abandon their wife for a day or two at a time can stuff a few good hours into a project if motivated. I'm also involved in some home built aircraft and I see people take on projects which require multiple thousands of hours which is impractical if a person only has 10 or so hours per week to devote to a project.
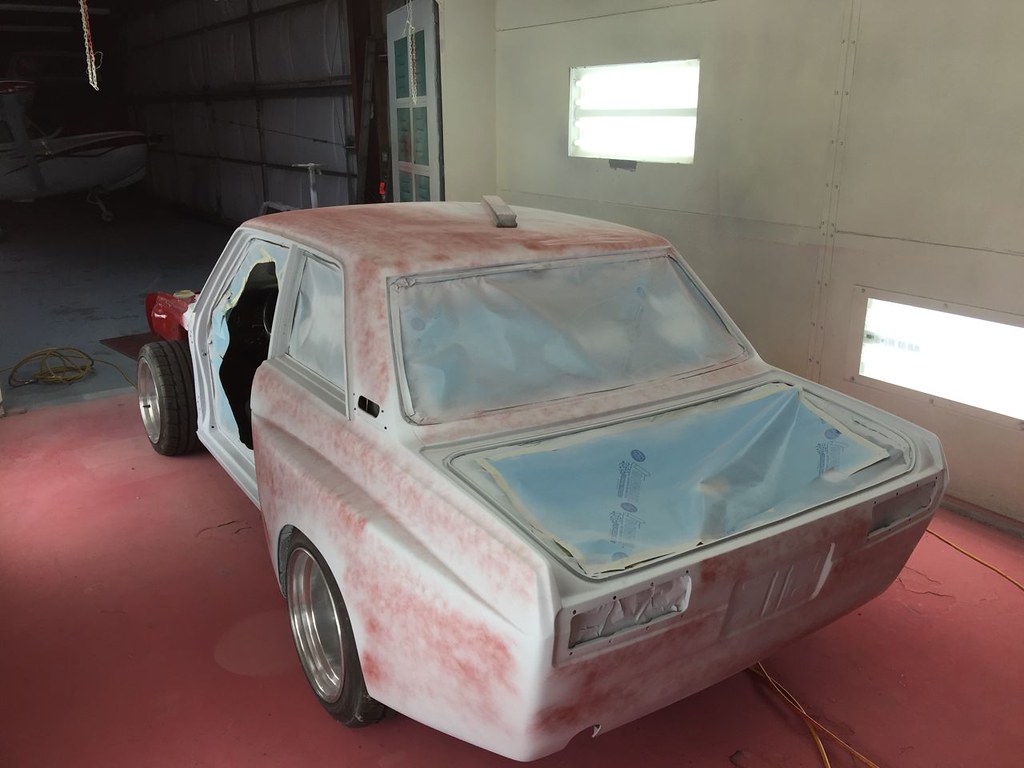
Closing in on the completion of this monster project I've applied a coat of high build primer and sanded like a bandit. Several posts back a member noted my large Dura Block sanding block. A friend suggested I buy it and all I can say is it's the perfect tool for the job. $100 bucks plus $50 a roll for adhesive backed paper but comes out to $1.00 a paper change, cheap. In the first 5 minutes of using this thing it uncovered a few small flat spots I created with my plastic Hutchings board.
A page or two back I was undecided about how to mod my fuel filler since my fender flare interfered with the filler door. I ended up reducing the size of the fuel filler pocket but there's still sufficient room for the gas pump nozzle. I needed to modify the door by trimming about 1" off the bottom, started with cutting the hinge off and trimming the door to size then hem the edge like the factory did before welded the hinge back on.
After shooting the high build primer I did a late day application of gravel guard. It seems every step of autobody involves spraying something which requires masking, and masking, and more masking. With the shutz gun dispensing gravel guard it was surprising how far small specs of material landed on areas of the car which were already final sanded. Run your hand over every spot again and again to find all these stray specks of gravel guard.
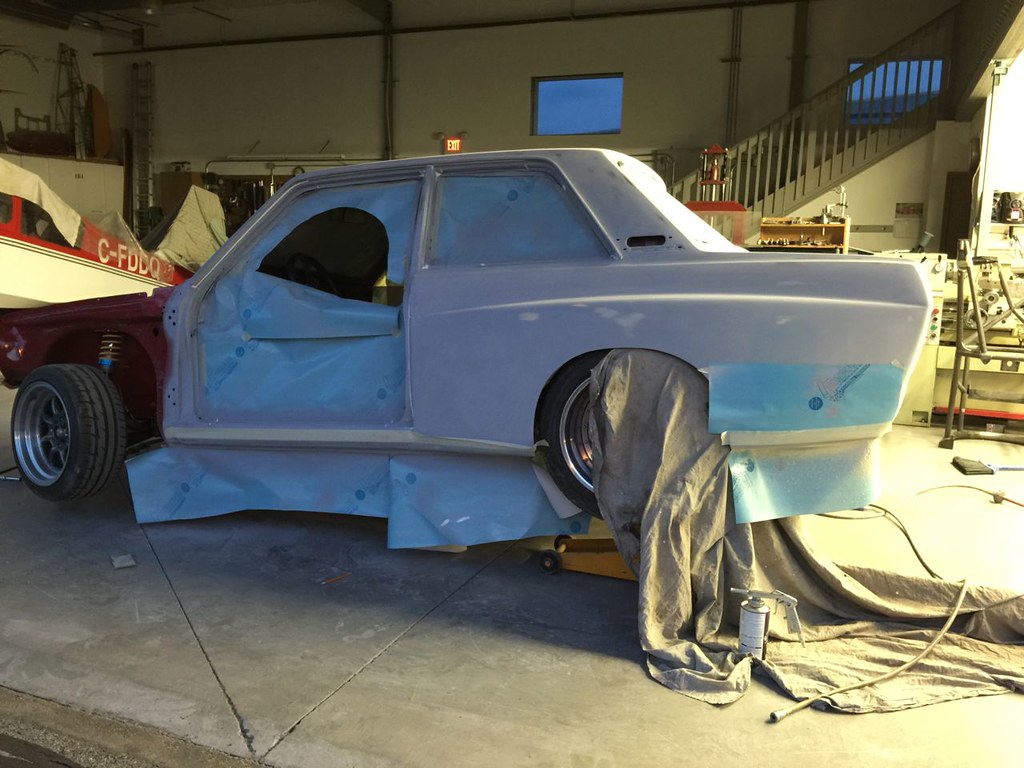
Yesterday at 10am I drove the car over to the paint booth, sprayed on some guide coat and did my final sanding. The primer gun had some dispensing issues and I had lots of areas with dry spray so more sanding was required than what should have been needed. A quick break for lunch, 4bucks, and inform Honey that I would likely be home late. Got to get it painted today!!!!
Doofus:
By 5pm I was done sanding and had the booth blown out then started masking which took until 8pm. I jacked the car up so I could start by shooting paint on the underside of the rockers followed by putting the car back on the ground so I could reach the roof for spraying. Prior to spraying I hosed the floor down and taped up a bunch of seams on the air inlet doors, compressed air, tack rag, compressed air and more tack rag. It started to rain outside which was perfect timing to help minimize my dust issues.
It took from 8 to about 11 just to get this far with the cowl, pillars, door frames, qtr windows and roof done before working down onto the fenders. Amateur=slow! I had to make a quick trip back to my shop to snag another can of reducer from my partner who happened to have some leftovers of the same paint line I used. Guess I'd have been up the creek with the car half done waiting for the store to open the next morning then having to resume, somehow. Did I mention amateur?
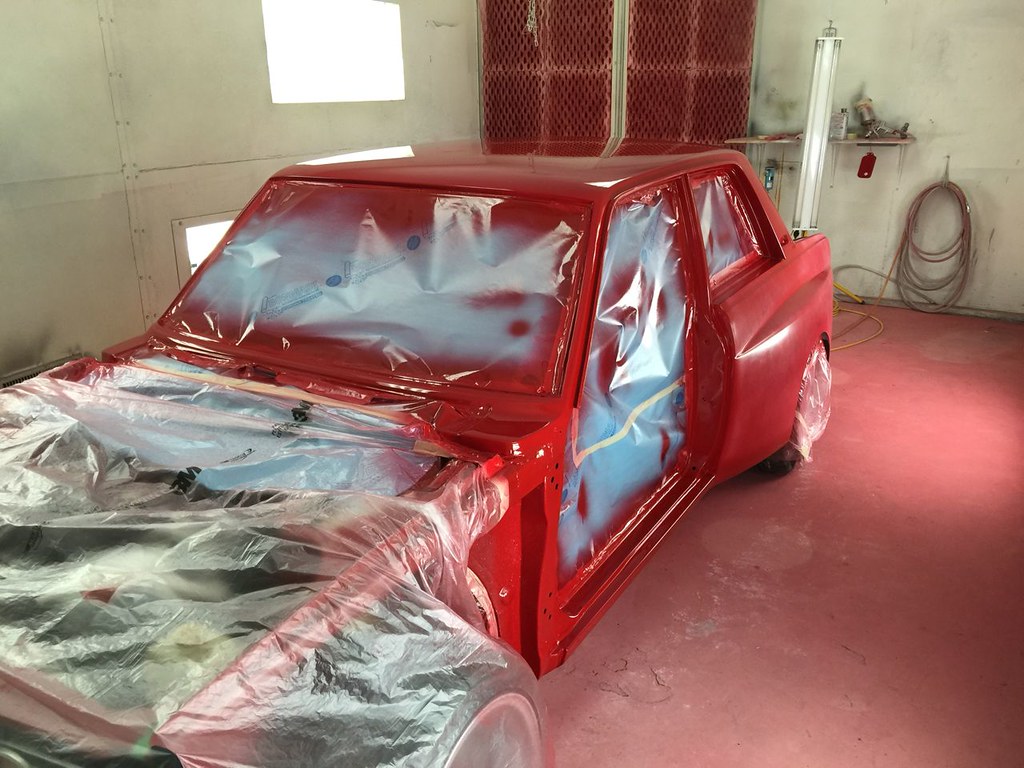
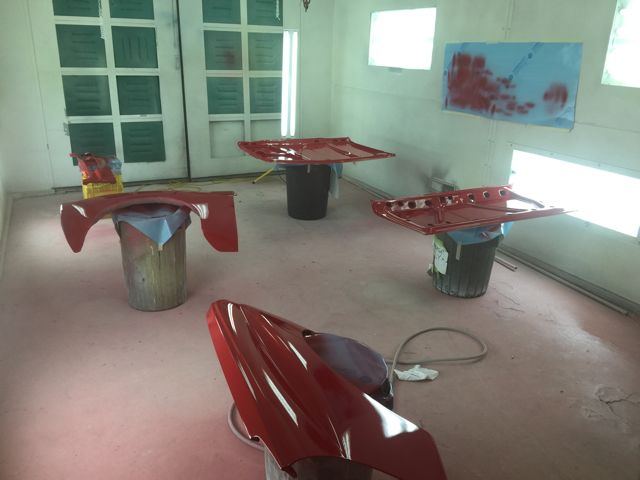
2am headed home. Seeing the aftermath this morning it looks pretty good, got good flow out most everywhere but it wasn't without lots of kneeling down and even laying on the floor numerous times trying to get a different perspective on the application then looking again in about 5 minutes to observe the flow out. Started with a light coat, med coat, then four heavy coats. A small run to sand out and only two small transition spots to sand out on the C pillars where there was a bit of dry spray since I was so slow
I wanted a certain color of red (red... old school 80s) which was supposed to match the paint I used on the engine bay but oddly the new paint looks lighter, bit more cherry red, than saturated like blood red yet where I masked at the cowl grill the old and new paint seem to match. Still have a few dust specs lower down but the roof turned out almost dust free.
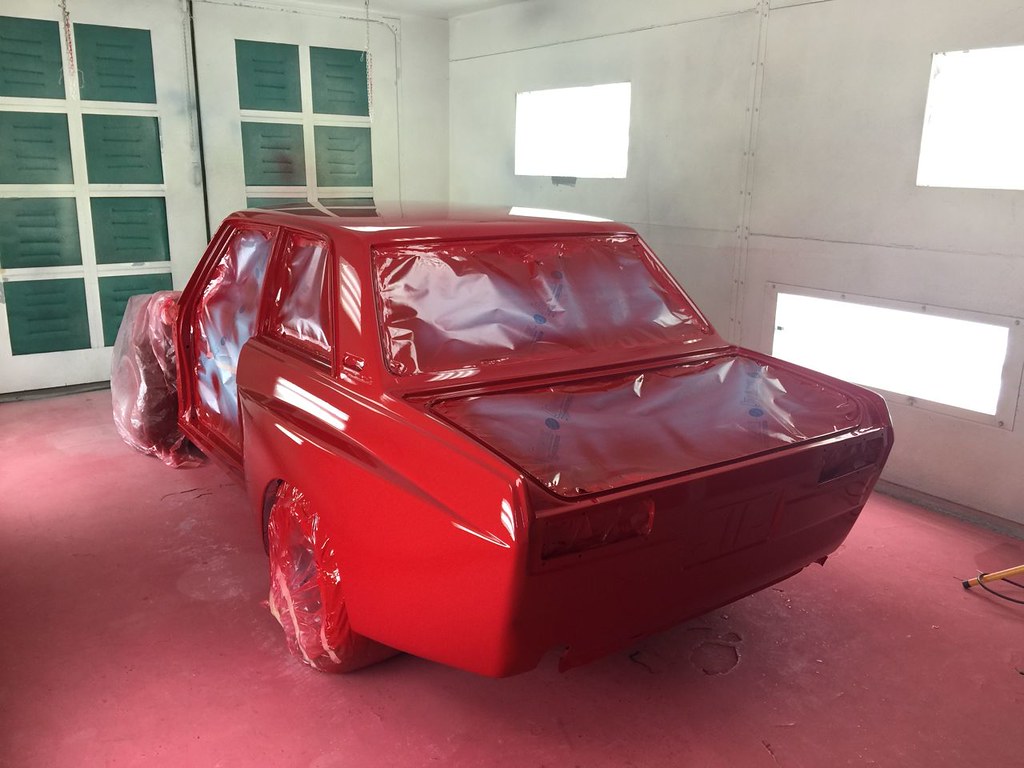
Edit, all the red on the floor isn't from me, it was from a prior aircraft which was painted red, lots of area = lots of overspray.
Closing in on the completion of this monster project I've applied a coat of high build primer and sanded like a bandit. Several posts back a member noted my large Dura Block sanding block. A friend suggested I buy it and all I can say is it's the perfect tool for the job. $100 bucks plus $50 a roll for adhesive backed paper but comes out to $1.00 a paper change, cheap. In the first 5 minutes of using this thing it uncovered a few small flat spots I created with my plastic Hutchings board.
A page or two back I was undecided about how to mod my fuel filler since my fender flare interfered with the filler door. I ended up reducing the size of the fuel filler pocket but there's still sufficient room for the gas pump nozzle. I needed to modify the door by trimming about 1" off the bottom, started with cutting the hinge off and trimming the door to size then hem the edge like the factory did before welded the hinge back on.
After shooting the high build primer I did a late day application of gravel guard. It seems every step of autobody involves spraying something which requires masking, and masking, and more masking. With the shutz gun dispensing gravel guard it was surprising how far small specs of material landed on areas of the car which were already final sanded. Run your hand over every spot again and again to find all these stray specks of gravel guard.
Yesterday at 10am I drove the car over to the paint booth, sprayed on some guide coat and did my final sanding. The primer gun had some dispensing issues and I had lots of areas with dry spray so more sanding was required than what should have been needed. A quick break for lunch, 4bucks, and inform Honey that I would likely be home late. Got to get it painted today!!!!
Doofus:
By 5pm I was done sanding and had the booth blown out then started masking which took until 8pm. I jacked the car up so I could start by shooting paint on the underside of the rockers followed by putting the car back on the ground so I could reach the roof for spraying. Prior to spraying I hosed the floor down and taped up a bunch of seams on the air inlet doors, compressed air, tack rag, compressed air and more tack rag. It started to rain outside which was perfect timing to help minimize my dust issues.
It took from 8 to about 11 just to get this far with the cowl, pillars, door frames, qtr windows and roof done before working down onto the fenders. Amateur=slow! I had to make a quick trip back to my shop to snag another can of reducer from my partner who happened to have some leftovers of the same paint line I used. Guess I'd have been up the creek with the car half done waiting for the store to open the next morning then having to resume, somehow. Did I mention amateur?
2am headed home. Seeing the aftermath this morning it looks pretty good, got good flow out most everywhere but it wasn't without lots of kneeling down and even laying on the floor numerous times trying to get a different perspective on the application then looking again in about 5 minutes to observe the flow out. Started with a light coat, med coat, then four heavy coats. A small run to sand out and only two small transition spots to sand out on the C pillars where there was a bit of dry spray since I was so slow
I wanted a certain color of red (red... old school 80s) which was supposed to match the paint I used on the engine bay but oddly the new paint looks lighter, bit more cherry red, than saturated like blood red yet where I masked at the cowl grill the old and new paint seem to match. Still have a few dust specs lower down but the roof turned out almost dust free.
Edit, all the red on the floor isn't from me, it was from a prior aircraft which was painted red, lots of area = lots of overspray.
Last edited by 2DoorJim on 05 Aug 2015 17:59, edited 1 time in total.
Re: Back to my roots
looks awesome Jim