Noob build
Re: Noob build
So I did a bunch of misc stuff on the car, first powder coated some headlight buckets and various other bits and pieces. Thought those plastic retaining nuts would survive. They did on one headlight bucket, not on the other. Thanks to the Z shop's Glenn, who knows every Datsun part ever made, I'll get some more.
Then I finally got my dash... and the gauges didn't fit. Some miscommunication but I'm having another one made. Played around with the idea of making my own but said screw it unless I absolutely need to.
Next up was the fuel cell cover, welded that thing in and seam sealer-ed it. I'll sink in a battery box and then the trunk will be ready for undercoat.
Finally spent some time plumbing in my brake lines. Wanted to do this before the motor was in... Not the prettiest of jobs but it'll work for the time being. I was initially planning on running fuel and brake lines in the trans tunnel but I'll wait and see how that KA tranny fits first... If it's too tight then I'll have no choice but to go inside the car.
With Xmas coming up it's doubtful much progress will be made since I'll be on the wrong side of the pond.
-
- Posts: 261
- Joined: 19 May 2013 20:57
- Location: Langley, BC
Re: Noob build
more info on the dash please. Someone is making those? Looks like what a lhd coupe dash would look like?
Re: Noob build
Yesss. I want one!
'72 2 door KA project | S14 Silvia RB25DET | S14 RB26DETT (sold) | '90 Audi 90Q20V (sold)
Re: Noob build
It's an LHD SSS dash replica, guys in Australia are making them. They posted about it on DPAN a while ago and I got in touch with them. It fits nice but the OD of my gauges was too big... So rather than to chop it up they are making me a replacement. This one is available if you want it. Hole ID's are 4" and 2-16". The far left hole fits the stock vent. They are nice dashes, but they will need some textured paint to go over them once they are all fit.
If you want to get in touch with the guys from AUS go to Facebook and search for Jeffrey Heidenreich in 510 fanatics or DPAN. He should pop up there.
Re: Noob build
Sending PM
'72 2 door KA project | S14 Silvia RB25DET | S14 RB26DETT (sold) | '90 Audi 90Q20V (sold)
Re: Noob build
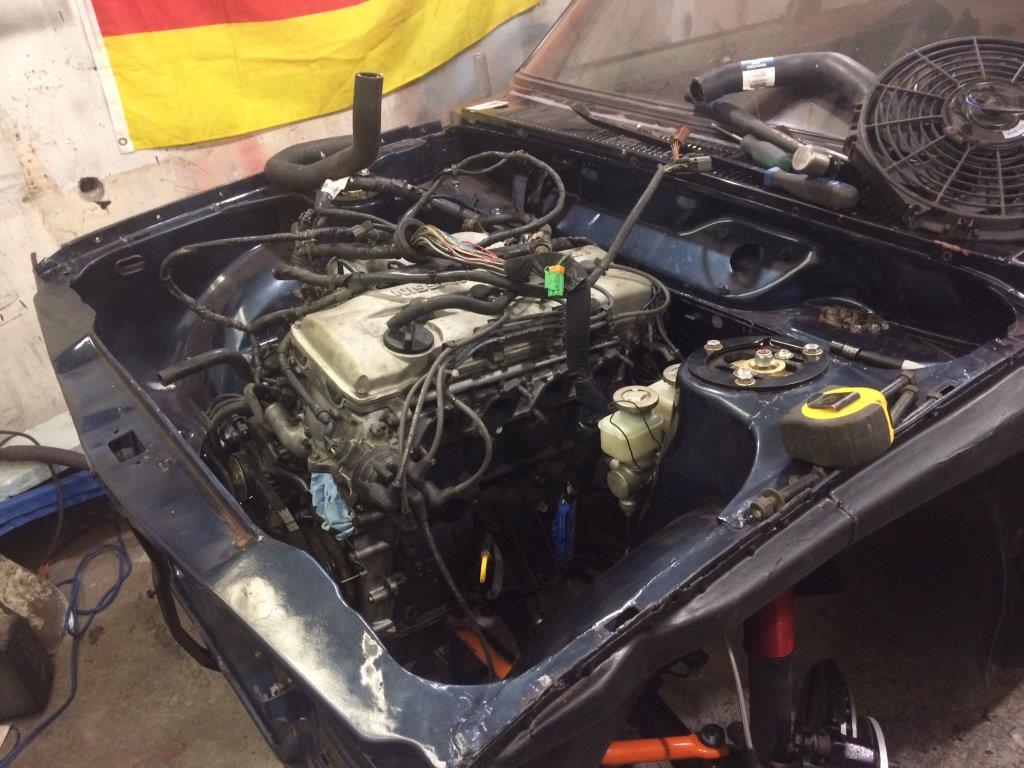
With all the snow and ice it was a pain in the ass, but the engine is finally in . Man what a squeeze, real snug fit on the firewall. Went well though, used 510 isolators on the bottom holes, no problem there. Put in a new clutch and resurfaced flywheel prior to install, went together smooth as silk. Also did the single belt conversion. Noticed that a 36.5" belt is a bit long, so I ordered a 35". Definitely need a spacer on the front though, will have the made up.
Now I've spent some time scratching my head on what I want to do, but it's coming. Put in the sway bar and steering box with T3 brace last night. They make nice stuff
Next on the list:
1. Trim bottom transmission supports. That will be a lot of trimming from what I can see now.
2. Run fuel lines to tank & pump. Will run them through the car as there is nowhere else that makes sense.
3. Run brake lines. Same as above.
4. Put in new clutch fork boot, install new slave, fill trans with fluid, plumb in lines and clutch is done.
5. Delete S.C.V control vlave, EGR and canister. It was half done, I just need to finish it. Run vacuum straight to fuel pressure regulator.
6. Modify fan shroud - that should be fun. The eBay special doesn't fit at all, I hope it won't be too much of a pain.
7. Massage header to fit around steering rack... hope to avoid cutting and welding, we'll see how flexible it is.
8. Find a way to make the PCV work since it'll be a 90 right off the throttle body and then straight into the MAF. I for sure want to keep it, it'll be where I can find space.
9. Once the 240Z tranny isolator is here bolt in the trans with the T3 mount.
10. Wire up CanAm box.
Should keep me out of trouble for a while...
Re: Noob build
Having a look at how hacked up the strut tops were, i'd suggest getting another pair of those spacers, and putting them under the strut tops but above the camber plates as a load spreader, the one on the top wont be doing much other than hiding that hack job in comparison to one underneath.
Love the colour it is going to be!
Re: Noob build
Appreciate the nod on the colour choice, always thought it would look good in a dark blue.Stoney wrote:Having a look at how hacked up the strut tops were, i'd suggest getting another pair of those spacers, and putting them under the strut tops but above the camber plates as a load spreader, the one on the top wont be doing much other than hiding that hack job in comparison to one underneath.
Love the colour it is going to be!
The hackjob bugged me too, but the top of the strut towers are slightly curved. I held the ring to the underside and it makes no better contact than the top of the camber plate I got from Aaron. That thing is beefy and I'm not worried. The previous setup was much weaker, those 1/4" bolts that went all around held all that weight. The Home Depot washers were all deformed, it was pretty ugly. But once it's on the road I'll monitor it.
-
- Posts: 4
- Joined: 14 Jan 2017 17:29
- Location: NorCal
Re: Noob build
In for this build, great work so far
Re: Noob build
Thanks for the kind words!Platinum510 wrote:In for this build, great work so far
Spent last night scratching my head on where to mount the battery, think I'll put it where the fuel tank used to be. The sub box will occupy the remainder of that space.
Then I started working on the fuel and rear brake lines. After weighing my options decided to run it inside the car along the passenger side, bulkhead fittings at the engine bay and rear seat box. That way there's no chance of them ever getting crushed over a bump, rock etc... Will start bending tube tomorrow.
Fuel pump is a Walbro 255, 10 micron filter in front of it. Will also add a check valve in front of the filter. Since all the tank connections are -8, I went with -8 fittings and hoses in the trunk area, and -6 after the pump and for the return lines. It's overkill for the NA KA, but in case I ever wanted a turbo or supercharger I wouldn't have to change any of the lines.
Re: Noob build
Well the last weeks have been a little slow, but I did manage to get most of my fuel system done. Ran the lines through the car and have the hoses hooked to the pump. Just waiting on a few fittings and it'll be complete.
Next up was to alter the header. The most fun a person can have. I had to cut it in spots where (I thought) it would be easy enough to weld in the new piece. Needless to say, I was just able to manage with running stupid amounts of stickout on the tungsten. It was late, welds are ugly but it fitup fairly well. The real challenge is not going too hot or the metal droops into the pipe, restricting flow. Since I'll never see the inside again let's hope it worked out well.
Next up is modifying the rad shroud, finishing the fuel lines, figuring out what rad hoses will work, filling all fluids wiring and then I can finally fire it.
Re: Noob build
Well this last week has been one of close but no cigar. I plumbed the engine, wired up the CanAm box and went to start it. (For the record, the CanAm box is awesome and super easy to use. Big props to those guys for making a quality product)
Long story short, the stainless braided fuel lines that came with the car leaked all over the place and I was short two fittings to tube it out, so I'll be finishing that tomorrow. Decided to go for it regardless of creating lake gasoline under my car; result, no spark.
After removing the fuel lines and cleaning up in disappointment I went home to do some research. Found a picture of the ignition control module that wasn't included with the harness I was using. Went back to the shop, found one voila, spark. Of course, no fire since I had no fuel... At least the girlfriend took an artsy photo of the work in progress.
So I went on to rebuild my half shafts, of course two of the Teflon spacers out of the first shaft were missing so I had to get a spare set of shafts to rob from. 40 years of rust buildup in the U-joints makes it a pain to get the old out, the rest is pretty straight forward. Getting the new boot on doesn't look like it'll be fun, but we'll see
Can't wait for tomorrow, will have the two tube fittings to finally get this thing fired up.
Re: Noob build
Spent a bit of time at the shop last night, almost done the first half shaft rebuild but I ended up damaging a U-joint like rookie. Regardless, spent a bit of time seeing if the 240SX steering column switches will mount to the 510 column. I couldn't believe it, but it's a perfect fit. The only challenge will be getting turn signal cancelling and horn switch to work as the 240SX stock piece is too small to fit over the 510 steering column. The trim will obviously need to be modified but the stock 240SX trim is a good start.
- Attachments
-
- 72.jpg (185.11 KiB) Viewed 4787 times
- McShagger510
- Posts: 1821
- Joined: 26 Mar 2004 20:55
- Location: East Van, Canada
Re: Noob build
Coming together nicely! I luv the fuel lines and the route you have chosen. Keep up the rad work!
James
James
The person with the sun in their eyes has the right of way. - my brother
'72 2dr. 510 Turbo
'73 240Z all stock
'71 2dr. 510 stock......for now
'91 Nissan truck *SOLD*
'02 TOYOTA Tacoma
'78 Kawasaki Z1-R
'84 Kawasaki GPZ750 Turbo
'99 Kawasaki ZRX1100
'72 2dr. 510 Turbo
'73 240Z all stock
'71 2dr. 510 stock......for now
'91 Nissan truck *SOLD*
'02 TOYOTA Tacoma
'78 Kawasaki Z1-R
'84 Kawasaki GPZ750 Turbo
'99 Kawasaki ZRX1100