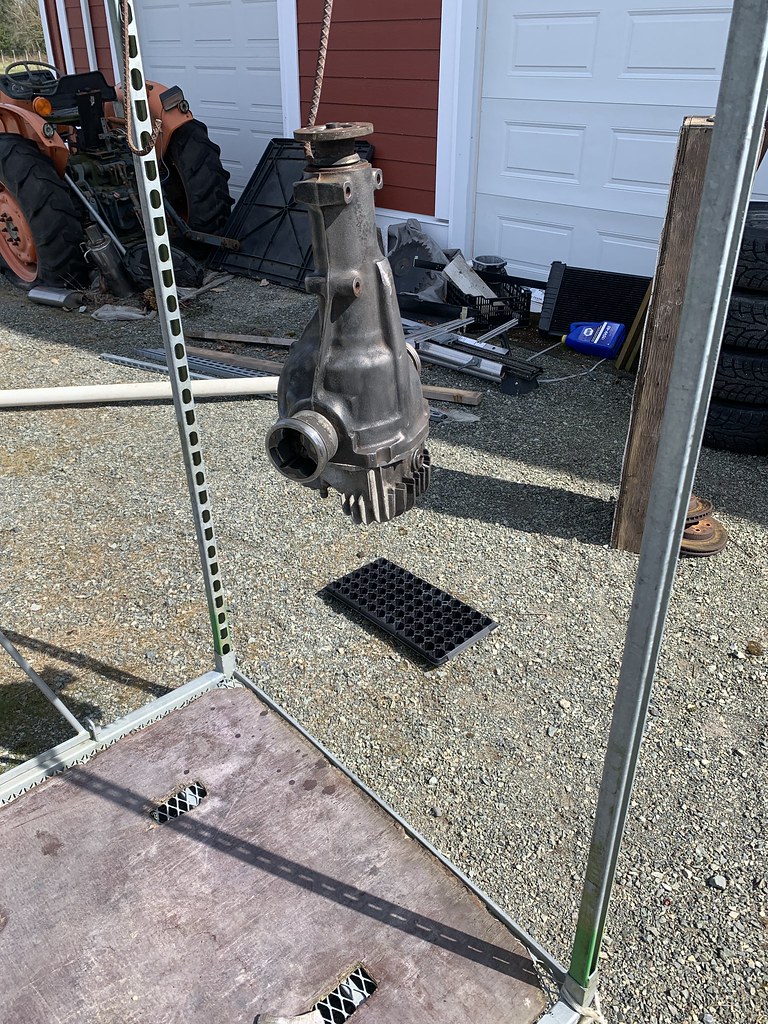
Old fuel pump?
Cool setup. Is this just to flush the rebuild or are you planning on a pump/filter once in the car?
Jordan's '72 2 door KA project
Re: Jordan's '72 2 door KA project
Stu
1972 4-door 510
2004 Volvo V70R 6spd manual
Factory Five Racing Cobra
1991 Ford F250 4x4 extended cab
2005 Mini Cooper S - death via forklift :(
1972 4-door 510
2004 Volvo V70R 6spd manual
Factory Five Racing Cobra
1991 Ford F250 4x4 extended cab
2005 Mini Cooper S - death via forklift :(
Re: Jordan's '72 2 door KA project
What is your purpose for building the pump/filter test setup?

Re: Jordan's '72 2 door KA project
It’s a scrap lube pump from work that was used to filter a big gearbox.
This is just to get it nice and clean before it goes in the car. With a rebuilt and healthy transmission and a clean start, I’m hoping that the oil will actually still look decent when I change it going forward. Time will tell!
I wanted to verify that the trans seemed good after rebuild and flush out any inbuilt contamination. I wanted to spin it primarily to mix up the oil in the trans so the kidney loop worked good and secondarily to allow the bench rest of operation.
'72 2 door KA project | S14 Silvia RB25DET | S14 RB26DETT (sold) | '90 Audi 90Q20V (sold)

Re: Jordan's '72 2 door KA project
JordanTr wrote: ↑24 Mar 2021 08:03 Thanks guys!!
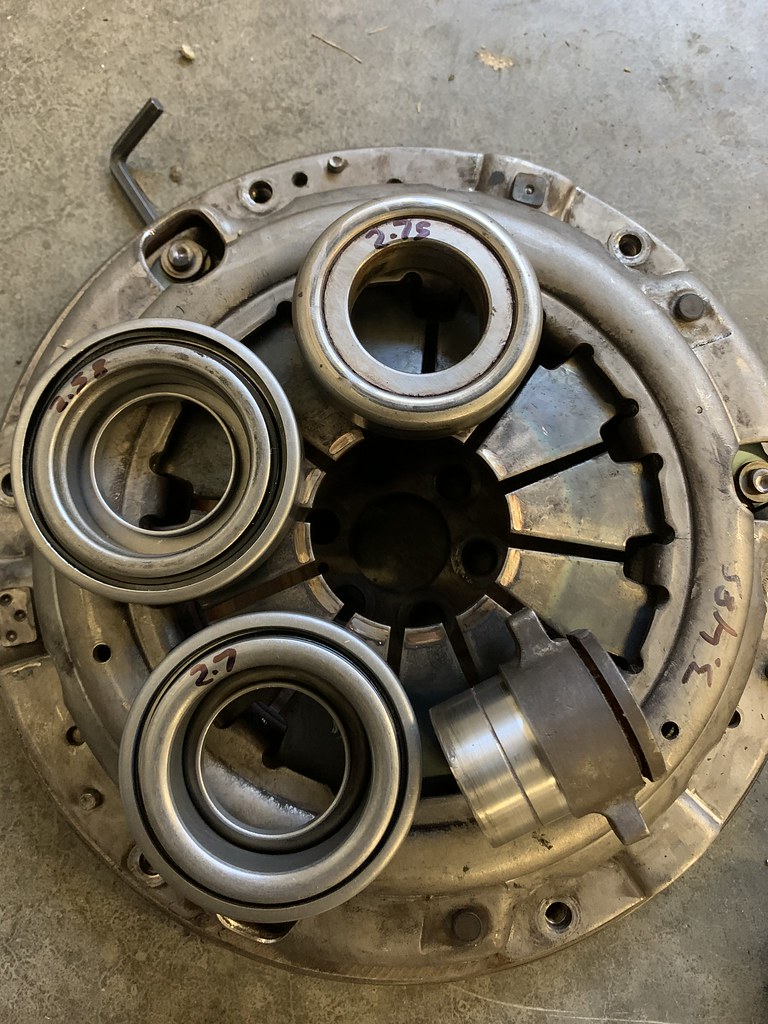
I actually have been on the phone with my bearing engineer for work things but this is a more interesting topic. We did some RCA on it and looked at some more pictures and it’s very clear that the major pitting craters are ball spaced which stems from true brinelling due to overload. This is pretty clearly seen on the one photo of the inner ring.
Makes sense too since the damaged bearings are right next to 1st gear... clutch dumps!!
I have a potentially bearing upgrade for the next time around but need to do some more thinking on it.
I would be excited to do another one now that it’s not so scary!!
Ah yes that makes sense.
Re: Jordan's '72 2 door KA project
Fun begins tomorrow!

'72 2 door KA project | S14 Silvia RB25DET | S14 RB26DETT (sold) | '90 Audi 90Q20V (sold)
Re: Jordan's '72 2 door KA project
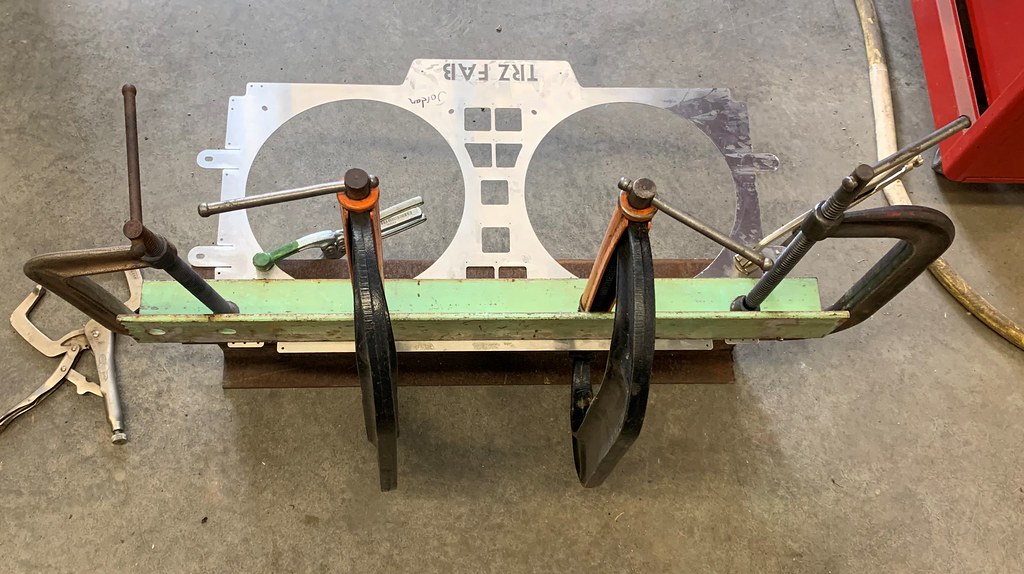
Unfortunately, I don't have access to any kind of metal brake so I had to redneck the bending with an I beam, square channel, and C clamps. The I beam is nice since the relief in the web allows clearance for clamps etc when the bend is complete. Because of this, it's not quite as pretty as the computer version due to some dolly scars but all in all I am very happy with it.
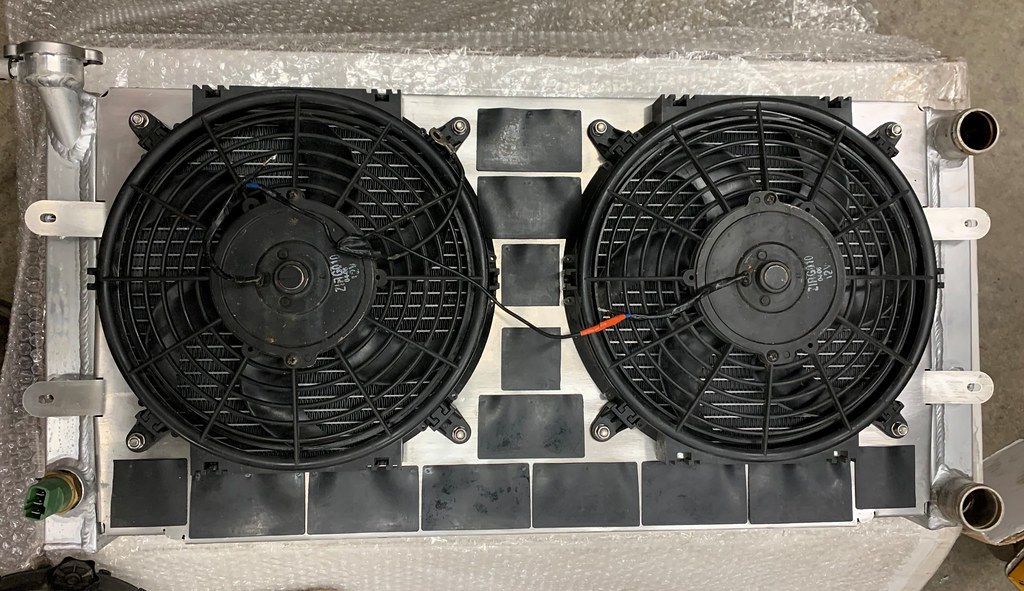
Fans fit as intended!
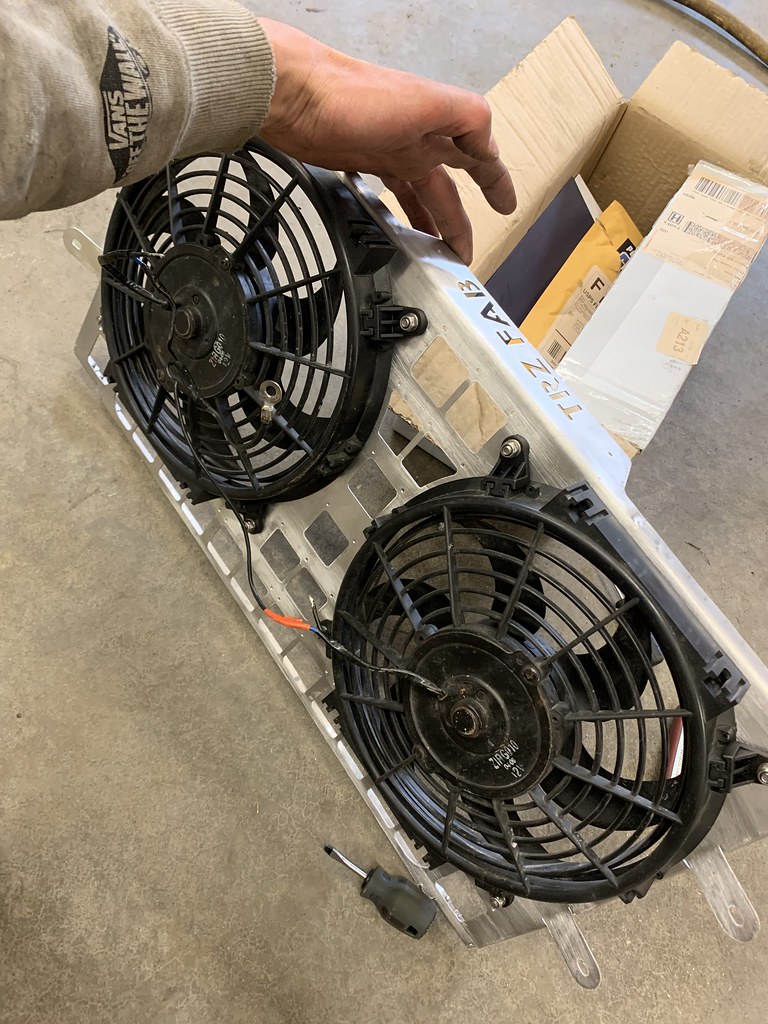
Flaps on. All creds to 3DMagicMike on Instagram for the idea and Spal PN 30130012. If I did it again, I would spread the holes for the flapper knobs a little further apart so that the rubber isn't wrinkled. After some trial and error on scrap aluminum, I ended up with about a #32 final drill size in the pilot holes that the waterjet cut.

I realized once home that there were a bunch of bungs and connections I still needed to install on the charge piping/exhaust. Extra wideband port, barb for wastegate on hot pipe, IACV air barb on cold pipe, methanol nozzle bung on cold pipe.... etc..
I harvested a 1/8" elbow to build an FNPT bung for the potential future meth nozzle.

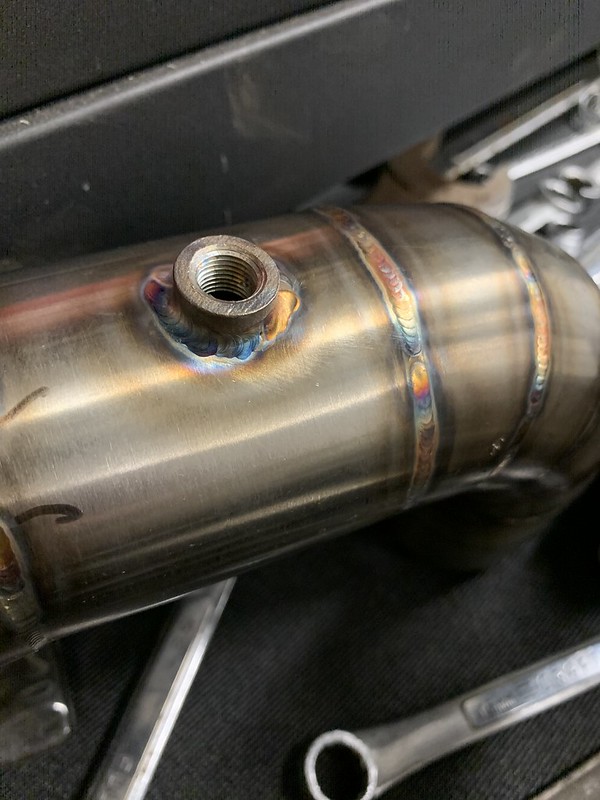
Wastegate bung on the hot pipe.

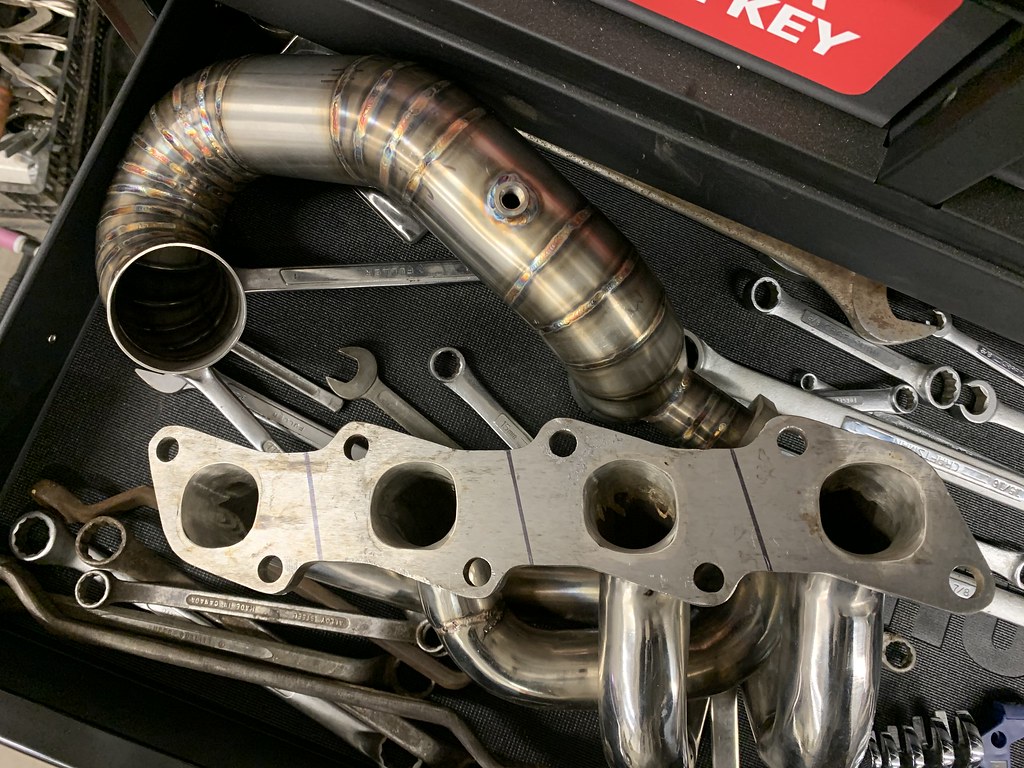
And... more adventures with the eBay manifold!
With the plan mentioned here, I marked out the flange in preparation for some zip cut action. I cut it at a weird angle to maximize the beefiness of the flanges at the fasteners.
And then.. SPROING. The inner 2 flanges pulled away from the gasket surface as you can see below. There was definitely some residual stress in the manifold.
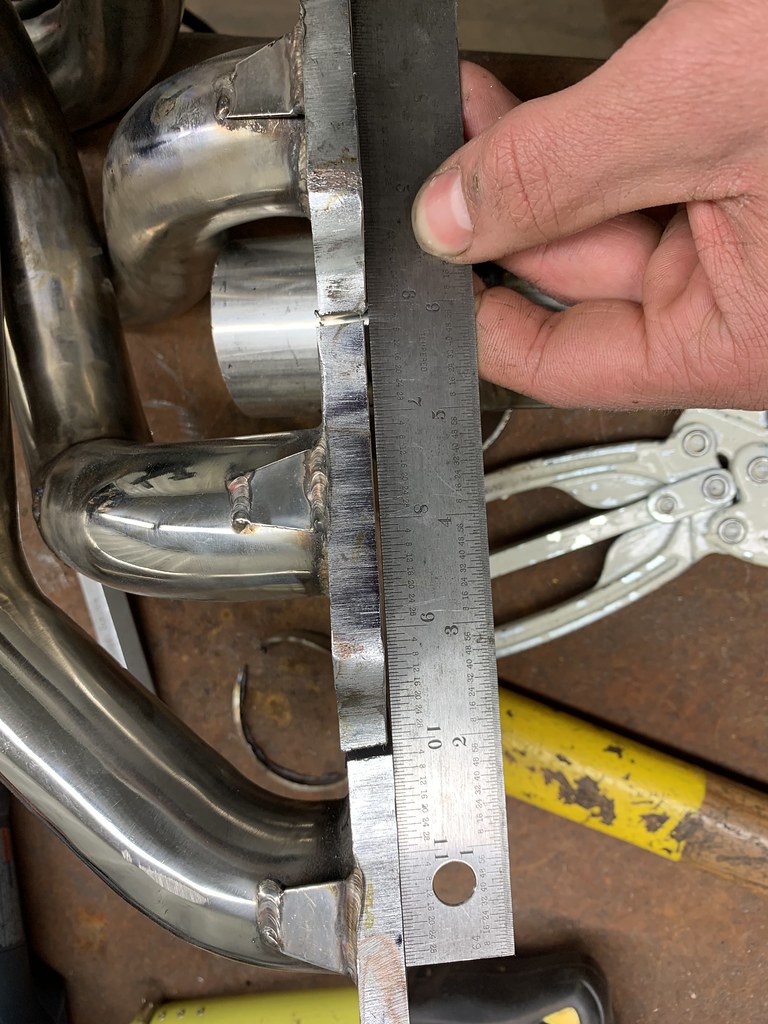
After hitting the big belt sander a bunch, there was still no evidence of fresh surfacing on the recessed flange.

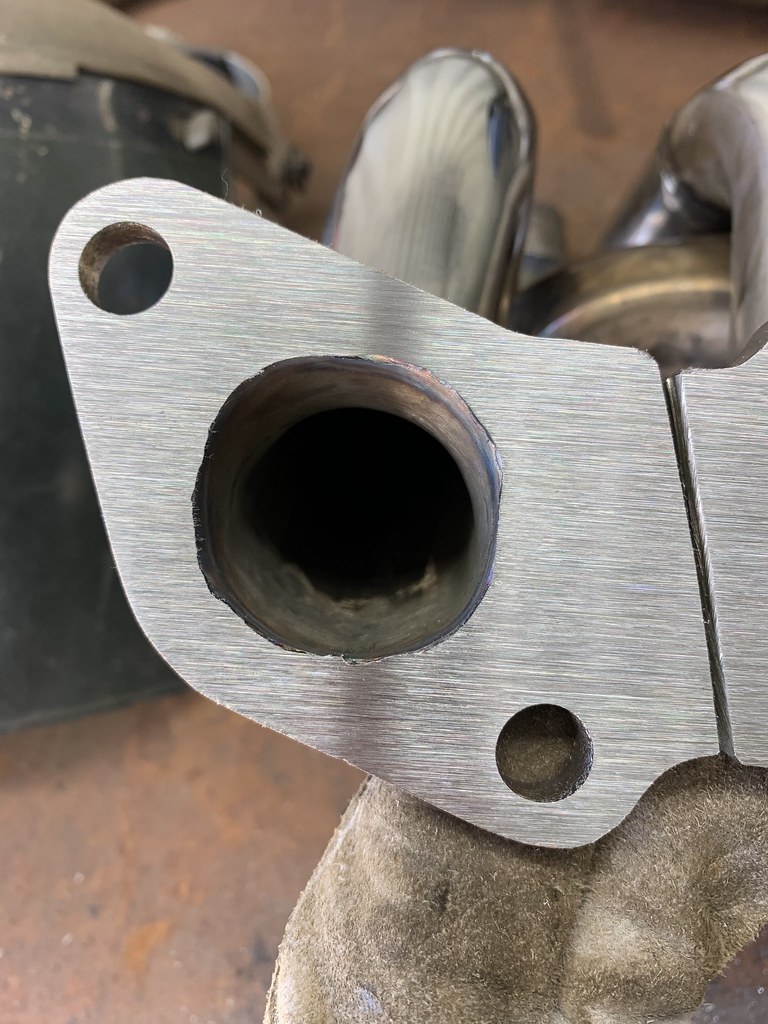
Finally got the gasket surface coplanar again and then it was apparent that the sanding exercise had removed the inner seal weld from cylinders 1 and 4. Back the the welding table we go... It will get decked flat again tomorrow.


Fans fit as intended!
Flaps on. All creds to 3DMagicMike on Instagram for the idea and Spal PN 30130012. If I did it again, I would spread the holes for the flapper knobs a little further apart so that the rubber isn't wrinkled. After some trial and error on scrap aluminum, I ended up with about a #32 final drill size in the pilot holes that the waterjet cut.
I realized once home that there were a bunch of bungs and connections I still needed to install on the charge piping/exhaust. Extra wideband port, barb for wastegate on hot pipe, IACV air barb on cold pipe, methanol nozzle bung on cold pipe.... etc..
I harvested a 1/8" elbow to build an FNPT bung for the potential future meth nozzle.
Wastegate bung on the hot pipe.
And... more adventures with the eBay manifold!
With the plan mentioned here, I marked out the flange in preparation for some zip cut action. I cut it at a weird angle to maximize the beefiness of the flanges at the fasteners.
And then.. SPROING. The inner 2 flanges pulled away from the gasket surface as you can see below. There was definitely some residual stress in the manifold.
After hitting the big belt sander a bunch, there was still no evidence of fresh surfacing on the recessed flange.
Finally got the gasket surface coplanar again and then it was apparent that the sanding exercise had removed the inner seal weld from cylinders 1 and 4. Back the the welding table we go... It will get decked flat again tomorrow.
'72 2 door KA project | S14 Silvia RB25DET | S14 RB26DETT (sold) | '90 Audi 90Q20V (sold)

Re: Jordan's '72 2 door KA project
Dang you are good!!!!
"People don't like it when shit doesn't match their rule of thumb." Sam
Re: Jordan's '72 2 door KA project
Got the last of the manifold flattened after the new circ weld. I then sanded the flange by hand with 150 since the big belt sander was set up for 80 and had some big striations.
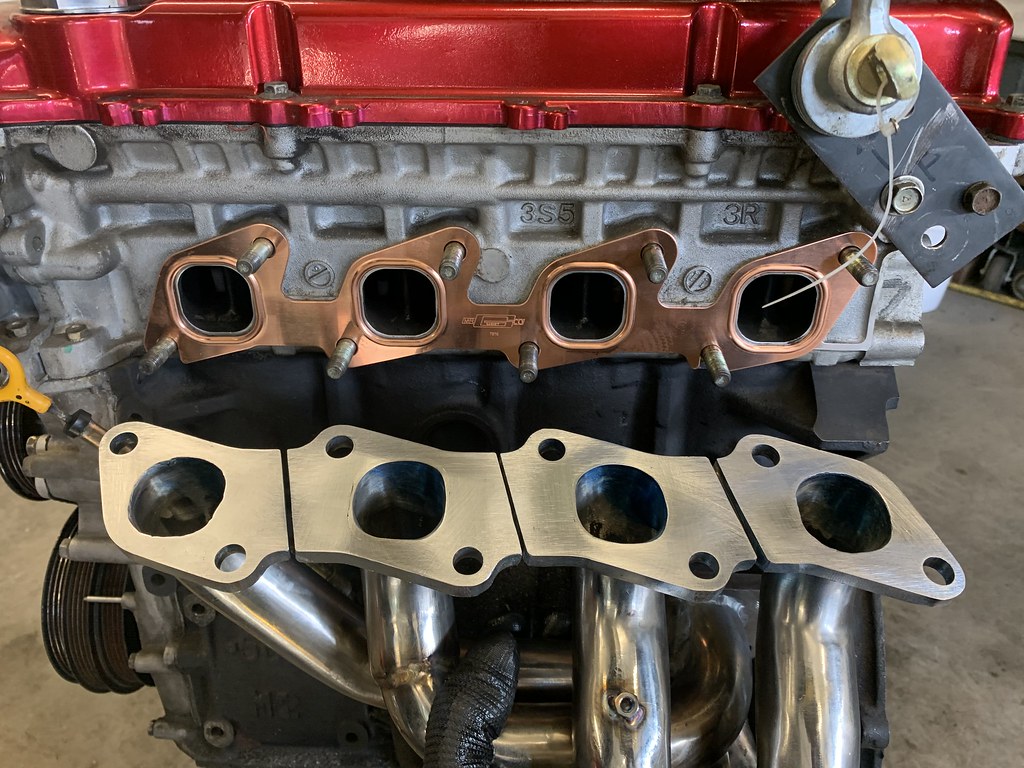
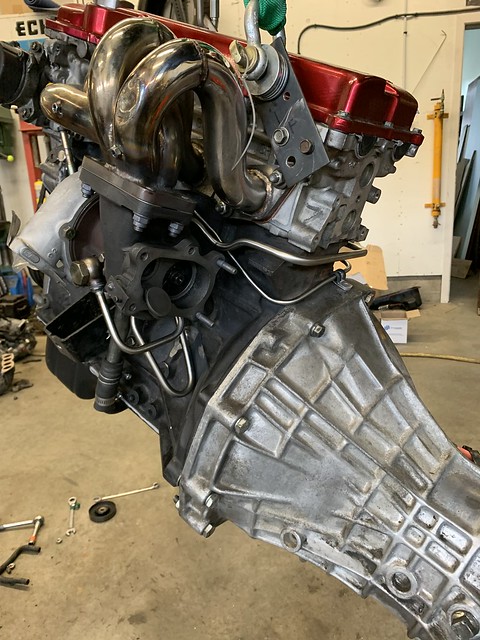
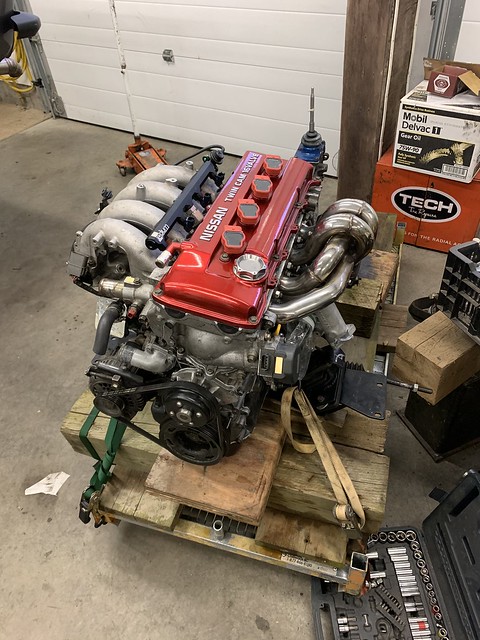
Brief daylight shot before engine drop for all the mods.

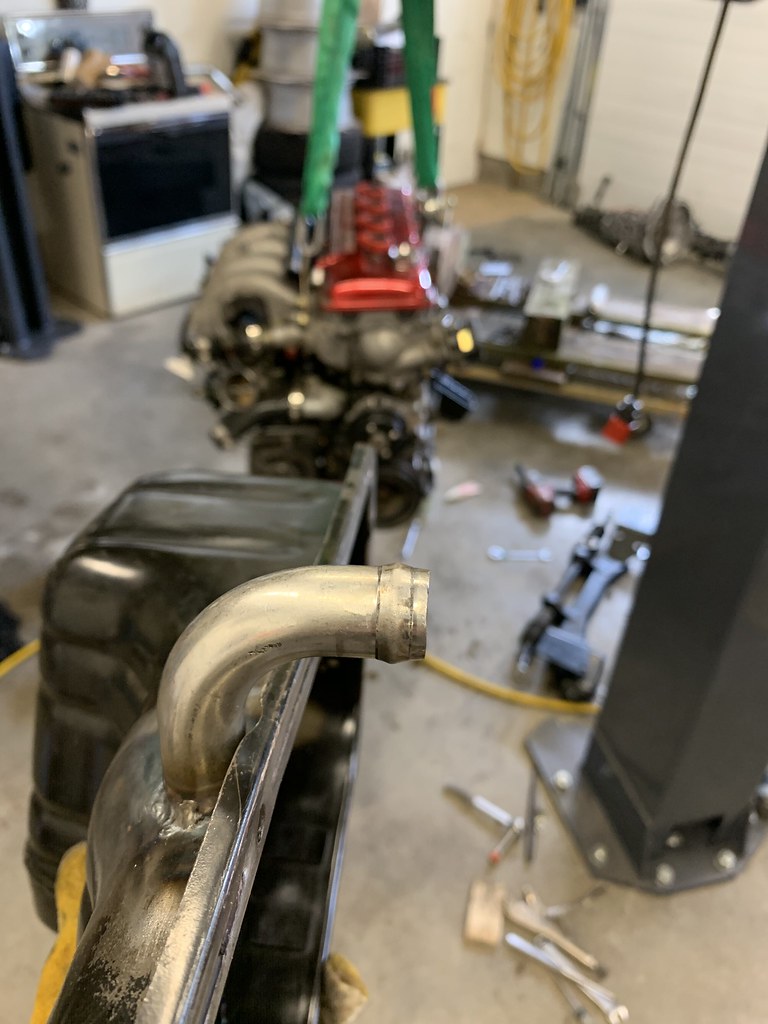
Put the turbo manifold and turbo on the engine to ensure it squeezes through the frame rails on the way out and it JUST clears which is a relief. This means I can install many of the lines etc while it is out of the car.

Now there are many many parts to swap over.
Cleaned up and painted a few parts that were just raw from the perpetual mock-up before

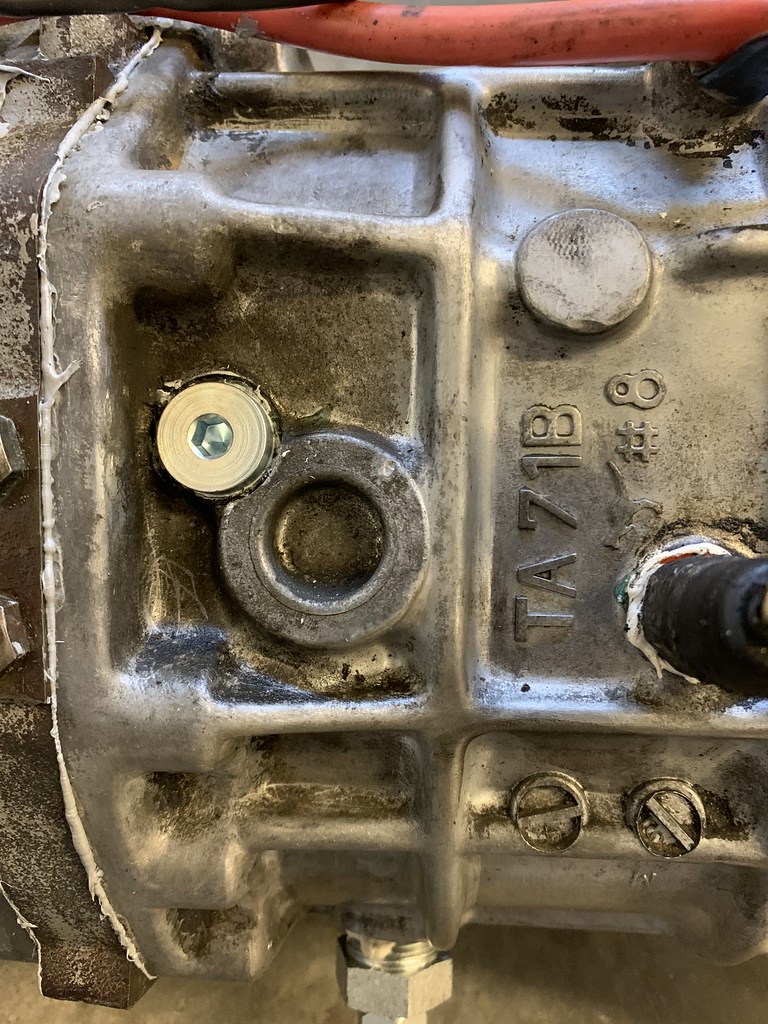
Installed the M14x1.5 hex head O ring plugs for the 3 un-used switches on the trans. It cleans it up and I think these will be less leaky than the previous. One fitting (not pictured) is M14x1.5 to #6 JIC so I can power flush this bad boy one day again maybe!
Rolled a hose barb onto the turbo drain that's welded into the pan. Thanks DAD for all the cool tools. Retire and you can use them too!
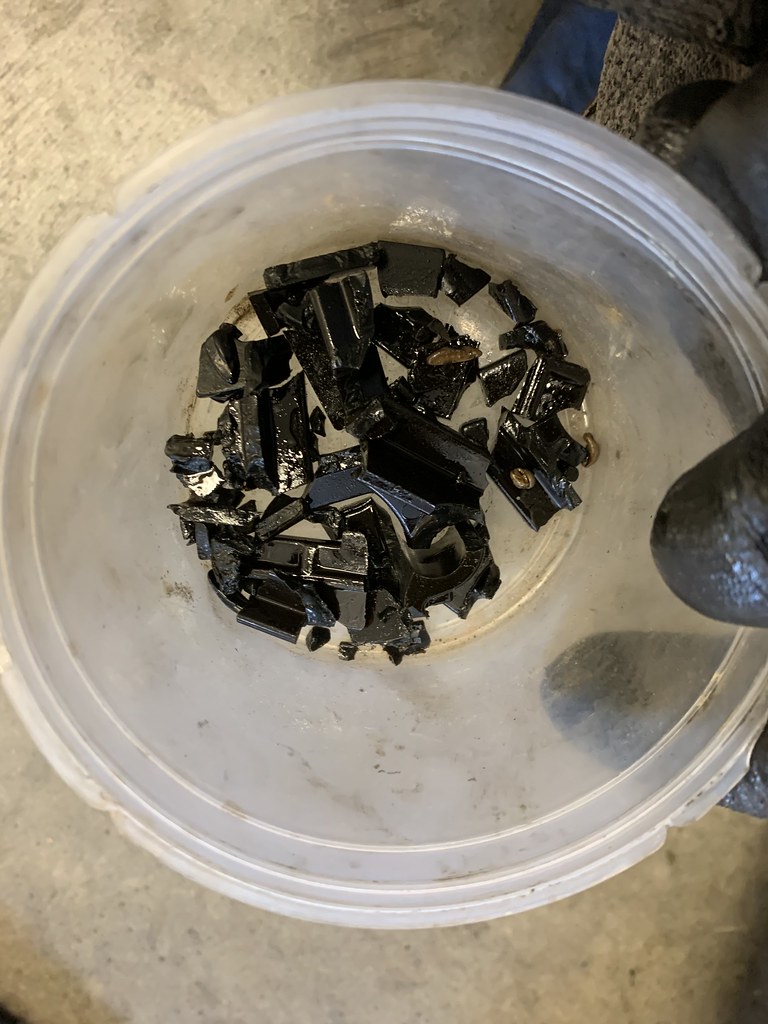
Then things got ugly... Dropped the pan to swap the turbo drain pan on and found a collection of treasures. Took more apart to confirm that it was indeed timing chain guide related and it was. The lower left (taught) side chain guide was basically gone. Strange since nothing ever seemed amiss with chain noise, ticking etc. The tensioner operates on the slack side and seems to work well and that chain guide has very little wear. The new taught side guides are metal backed so it should hold up better.
Frantically called around this morning (called Alberta to get an extra hour head start) but there was nothing to be had in the great white north. NOTHING. And what they could contemplate getting was 6+ weeks away. Bit the bullet at 8am and ordered Rock Auto parts and paid as much as I could for shipping. Supposedly it left Florida today and I'll see it tomorrow. Like Amazon, but more costly...
Today I spent a bunch of time prepping my Z31T R200 clutch LSD for install thanks to the unicorn donor Z31 I picked up a couple years ago. The driveway confirms its functionality.. || Cleaned up the case, zip cut the offending nubs for crossmember fitment, painted said case, swapped rear covers etc. It all took longer than anticipated but I sure was glad I put bolts in at the moustache bar last time I was in there. This is diff #5 in this car and hopefully the last one. 3.9 R160LSD, 3.7 Z31T vLSD, 3.9 Z31 w/S13 1.5 way cLSD, 3.9 Z31 open, Now Z31T 3.7 cLSD. 5th time is a charm?
After installing in the car, I needed to put the giant CV companion flange back on and torque the pinion nut. I got smart this time and strapped the rims to the crossmember and went for it. Blue loctite and 170 ft-lbs went well.
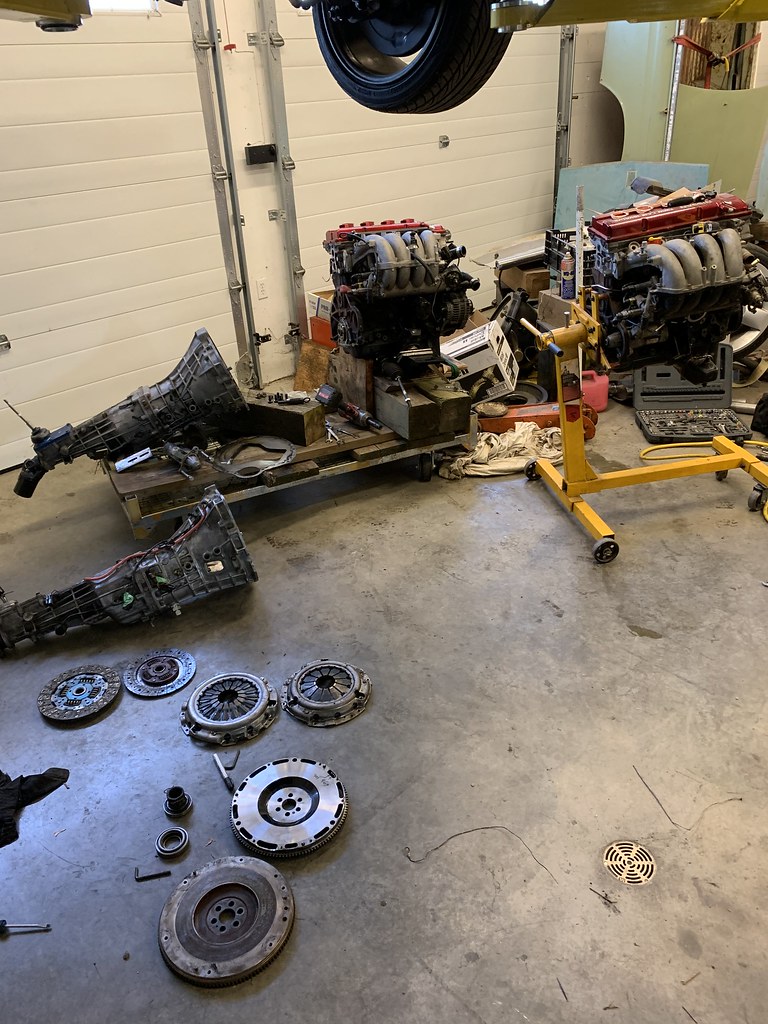
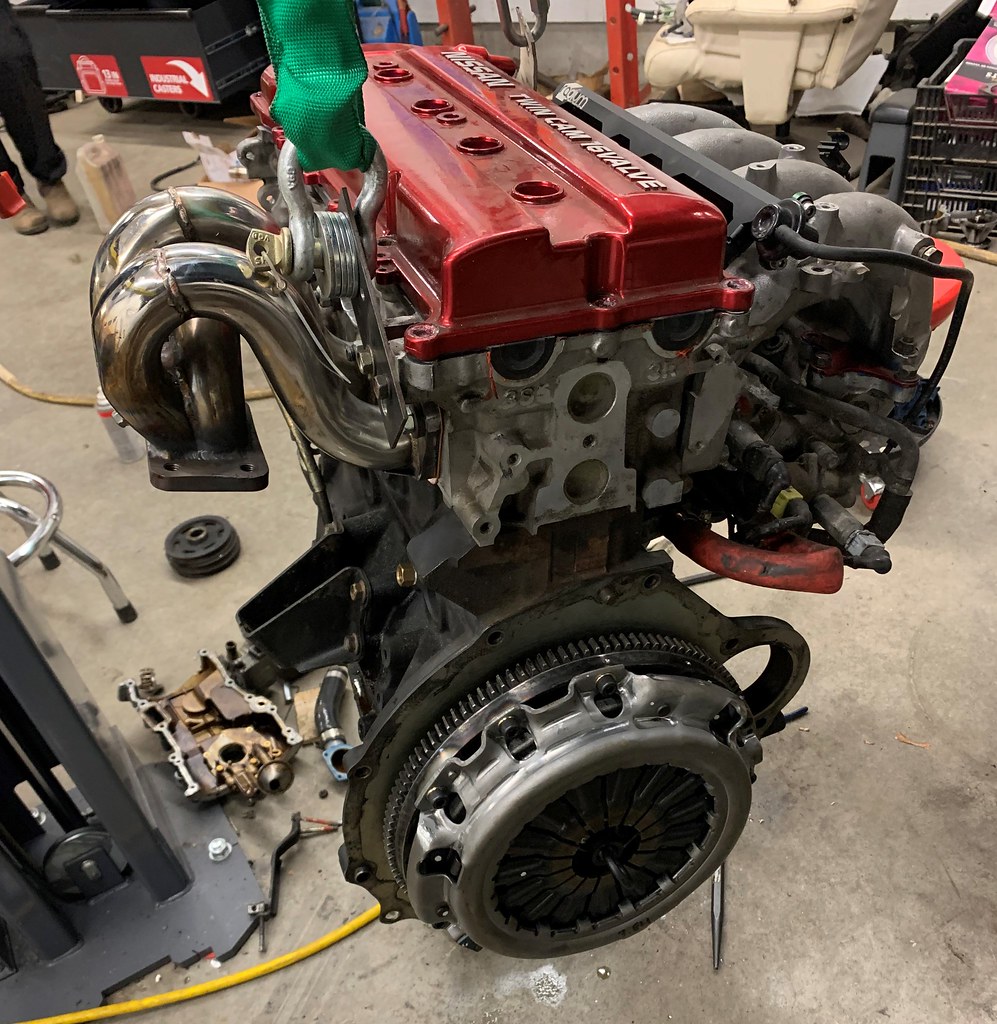
While I wait for the timing guide parts, I went ahead and got my new clutch setup figured out. Many moons ago I had it precision balanced so it feels good to finally install it. It's a cromoly RB25 flywheel with a 250mm 350Z/Z33 exedy clutch disk and clutch cover. This is the latest upgrade to the white bunny kit and it ditches the heavy 23lb D21 flywheel. I figured it would be a bit lighter than stock and I was correct but not as light as anticipated. Stock clutch is 225mm.
Hoping to have lots of cake and eat it too with this setup.: Stock ish pedal feel, good driveability, affordable, a little more rev happy all in one? we will see.
_______Stock_______XTD RB25/Z33
FW_____20.6lb______14.2lb
PP:_____9.6_________13
Total: __30.2 ________27.2

The internet "experts" say that you can install this setup with the Z33 release bearing and all is well but the parts are clearly quite a bit taller so I measured and setting it up that way would just not allow the release bearing to release properly. FWIW, the Z33 and KA TOBs are the same thickness but the shoulder diameter that mates with the spring differs a little. Look closely, I marked it. I ended up stealing the throwout bearing from my dads kits since I wasn't comfortable with the ~1/16" overlap between the pressure plate fingers and the bearing shoulder with the supplied Z33 bearing.
After measuring the total stack-up (crank face to pressure plate fingers, it was apparent that the Z33/RB25 setup was nearly 0.4" thicker. From the days prowling RB26 stuff, I knew there were different height release sleeves for different applications and different clutches etc. For this, I just ended up machining 3/8" off the throw out sleeve shoulder to properly situate the assembly like the stock one and ensure the TOB can rest when released instead of being preloaded by the pressure plate all the time. You can see the original groove from the should stress relief in the pic below.
Got the clutch assembly mounted and torqued this evening. TRZ spec "hi ten" pressure plate bolts (class 12.9 SHCS).
Hoping to get the turbo mounted and all the lines run before orange and blue santa shows up tomorrow.
Brief daylight shot before engine drop for all the mods.
Put the turbo manifold and turbo on the engine to ensure it squeezes through the frame rails on the way out and it JUST clears which is a relief. This means I can install many of the lines etc while it is out of the car.
Now there are many many parts to swap over.
Cleaned up and painted a few parts that were just raw from the perpetual mock-up before
Installed the M14x1.5 hex head O ring plugs for the 3 un-used switches on the trans. It cleans it up and I think these will be less leaky than the previous. One fitting (not pictured) is M14x1.5 to #6 JIC so I can power flush this bad boy one day again maybe!
Rolled a hose barb onto the turbo drain that's welded into the pan. Thanks DAD for all the cool tools. Retire and you can use them too!
Then things got ugly... Dropped the pan to swap the turbo drain pan on and found a collection of treasures. Took more apart to confirm that it was indeed timing chain guide related and it was. The lower left (taught) side chain guide was basically gone. Strange since nothing ever seemed amiss with chain noise, ticking etc. The tensioner operates on the slack side and seems to work well and that chain guide has very little wear. The new taught side guides are metal backed so it should hold up better.
Frantically called around this morning (called Alberta to get an extra hour head start) but there was nothing to be had in the great white north. NOTHING. And what they could contemplate getting was 6+ weeks away. Bit the bullet at 8am and ordered Rock Auto parts and paid as much as I could for shipping. Supposedly it left Florida today and I'll see it tomorrow. Like Amazon, but more costly...
Today I spent a bunch of time prepping my Z31T R200 clutch LSD for install thanks to the unicorn donor Z31 I picked up a couple years ago. The driveway confirms its functionality.. || Cleaned up the case, zip cut the offending nubs for crossmember fitment, painted said case, swapped rear covers etc. It all took longer than anticipated but I sure was glad I put bolts in at the moustache bar last time I was in there. This is diff #5 in this car and hopefully the last one. 3.9 R160LSD, 3.7 Z31T vLSD, 3.9 Z31 w/S13 1.5 way cLSD, 3.9 Z31 open, Now Z31T 3.7 cLSD. 5th time is a charm?
After installing in the car, I needed to put the giant CV companion flange back on and torque the pinion nut. I got smart this time and strapped the rims to the crossmember and went for it. Blue loctite and 170 ft-lbs went well.
While I wait for the timing guide parts, I went ahead and got my new clutch setup figured out. Many moons ago I had it precision balanced so it feels good to finally install it. It's a cromoly RB25 flywheel with a 250mm 350Z/Z33 exedy clutch disk and clutch cover. This is the latest upgrade to the white bunny kit and it ditches the heavy 23lb D21 flywheel. I figured it would be a bit lighter than stock and I was correct but not as light as anticipated. Stock clutch is 225mm.
Hoping to have lots of cake and eat it too with this setup.: Stock ish pedal feel, good driveability, affordable, a little more rev happy all in one? we will see.
_______Stock_______XTD RB25/Z33
FW_____20.6lb______14.2lb
PP:_____9.6_________13
Total: __30.2 ________27.2
The internet "experts" say that you can install this setup with the Z33 release bearing and all is well but the parts are clearly quite a bit taller so I measured and setting it up that way would just not allow the release bearing to release properly. FWIW, the Z33 and KA TOBs are the same thickness but the shoulder diameter that mates with the spring differs a little. Look closely, I marked it. I ended up stealing the throwout bearing from my dads kits since I wasn't comfortable with the ~1/16" overlap between the pressure plate fingers and the bearing shoulder with the supplied Z33 bearing.
After measuring the total stack-up (crank face to pressure plate fingers, it was apparent that the Z33/RB25 setup was nearly 0.4" thicker. From the days prowling RB26 stuff, I knew there were different height release sleeves for different applications and different clutches etc. For this, I just ended up machining 3/8" off the throw out sleeve shoulder to properly situate the assembly like the stock one and ensure the TOB can rest when released instead of being preloaded by the pressure plate all the time. You can see the original groove from the should stress relief in the pic below.
Got the clutch assembly mounted and torqued this evening. TRZ spec "hi ten" pressure plate bolts (class 12.9 SHCS).
Hoping to get the turbo mounted and all the lines run before orange and blue santa shows up tomorrow.
'72 2 door KA project | S14 Silvia RB25DET | S14 RB26DETT (sold) | '90 Audi 90Q20V (sold)
Re: Jordan's '72 2 door KA project
Re: Jordan's '72 2 door KA project
After ordering the timing chain guide from Rock Auto, it came from Miami in 28 hours!! That's a long way away in a short time. I was very impressed. I checked the tensioner itself when I was in there and blew air through its oil line and ensured it wasn't gummed up and all seemed well.
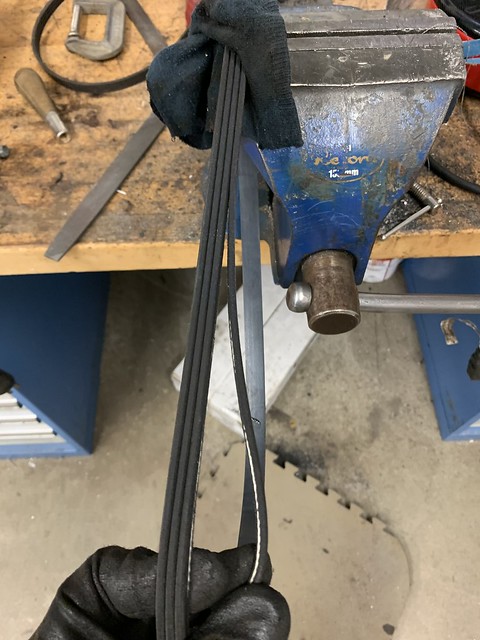
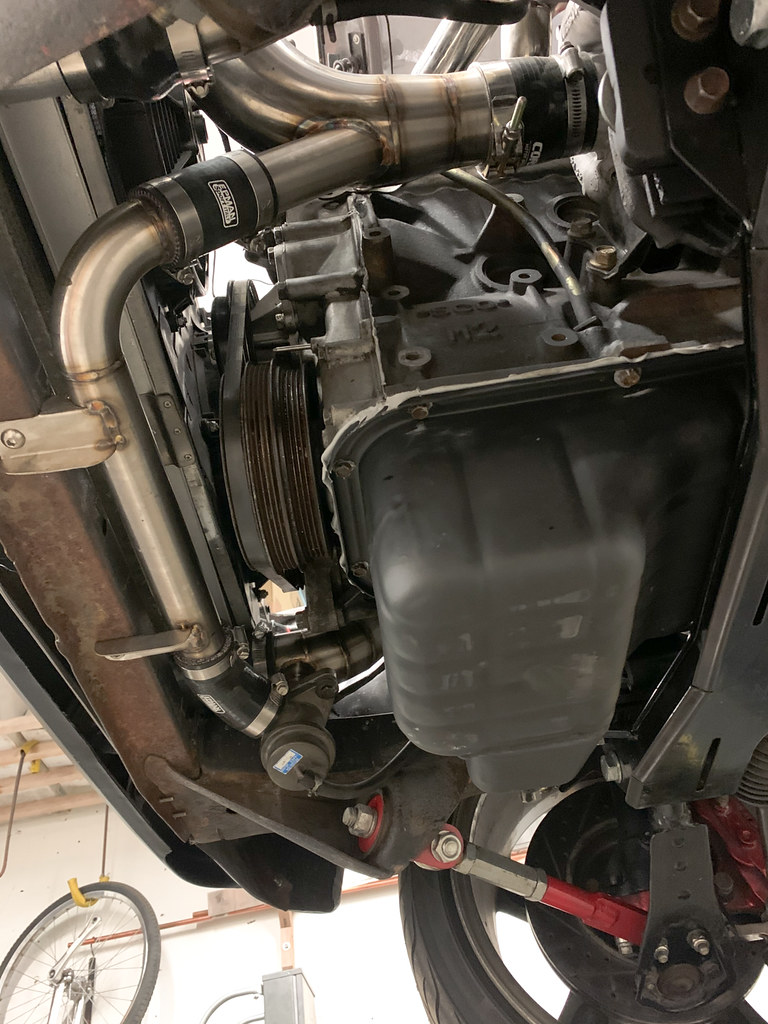
My cold pipe had minor interference with the alternator since I ended up using the KA24E setup to run a single belt which moves it forward. I went searching for a shorter belt to gain the clearance I needed. The go-to 3 rib belt is a 3PK910 aka 910mm circumference. After looking around for shorter 3 rib belts and coming up short, I thought about checking belt lengths for other belts such as 4pk, 5pk, 6pk etc. I easily found shorter 4pk belts locally so I purchased several in case my measurements were poor. After slipping on the 4PK875 and verifying I was just on the tight side of the adjustment, I carefully slit the belt down to 3 ribs. Now, I have enough cold pipe clearance to carry on.

Did some more flange flattening after installing the turbo and seeing daylight between the flanges.

Got the turbo hard lines on for good and built a little bracket for behind the head. Had to D+T a couple of the bosses on the head since Nissan stopped tapping them on the S14s.


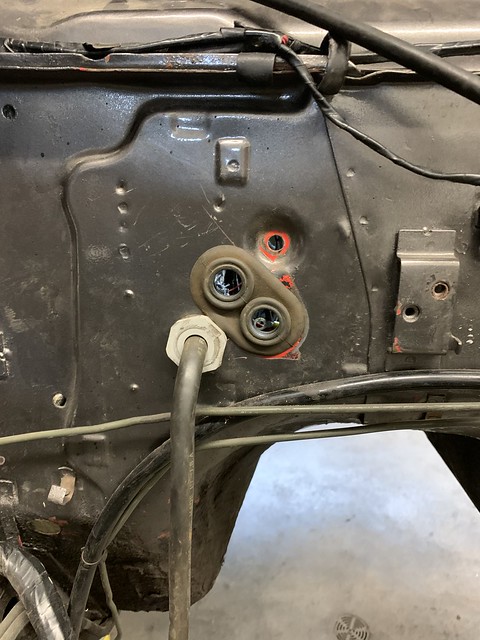
I nibbled a hole for the new passenger side mounted heater lines.

Ready for install.
Back in!
I need to sort out my heater lines and install all the things today and then it'll be ready for first start!!
My cold pipe had minor interference with the alternator since I ended up using the KA24E setup to run a single belt which moves it forward. I went searching for a shorter belt to gain the clearance I needed. The go-to 3 rib belt is a 3PK910 aka 910mm circumference. After looking around for shorter 3 rib belts and coming up short, I thought about checking belt lengths for other belts such as 4pk, 5pk, 6pk etc. I easily found shorter 4pk belts locally so I purchased several in case my measurements were poor. After slipping on the 4PK875 and verifying I was just on the tight side of the adjustment, I carefully slit the belt down to 3 ribs. Now, I have enough cold pipe clearance to carry on.
Did some more flange flattening after installing the turbo and seeing daylight between the flanges.
Got the turbo hard lines on for good and built a little bracket for behind the head. Had to D+T a couple of the bosses on the head since Nissan stopped tapping them on the S14s.
I nibbled a hole for the new passenger side mounted heater lines.
Ready for install.
Back in!
I need to sort out my heater lines and install all the things today and then it'll be ready for first start!!
Last edited by JordanTr on 09 Apr 2021 10:19, edited 2 times in total.
'72 2 door KA project | S14 Silvia RB25DET | S14 RB26DETT (sold) | '90 Audi 90Q20V (sold)
Re: Jordan's '72 2 door KA project
Love the 4 to 3 rib mod.
Your fab work is impressive. It also makes me feel OK with my decision to stay NA .
.
Your fab work is impressive. It also makes me feel OK with my decision to stay NA
 .
.Stu
1972 4-door 510
2004 Volvo V70R 6spd manual
Factory Five Racing Cobra
1991 Ford F250 4x4 extended cab
2005 Mini Cooper S - death via forklift :(
1972 4-door 510
2004 Volvo V70R 6spd manual
Factory Five Racing Cobra
1991 Ford F250 4x4 extended cab
2005 Mini Cooper S - death via forklift :(
-
RONSLYCHUK
- Supporter
- Posts: 783
- Joined: 12 Sep 2004 19:42
- Location: Abbotsford B.C.
Re: Jordan's '72 2 door KA project
Great work Jordan. I can’t wait to see it running!
Re: Jordan's '72 2 door KA project
So much going on here, my head would explode, hope startup goes good!
Boost 2021
I was happily doing yard work in Kimberley until a storm came up and now we have 1" of snow and counting. I'll take it as a sign that I need to head inside and update this saga.
The first order of business was to get the heater box back together with the new valve and new line routing. My least favorite place to be is under the dash so I built a little template of the firewall that I could bolt to the heater box so that the rest of the work was just workbench (or floor) work.
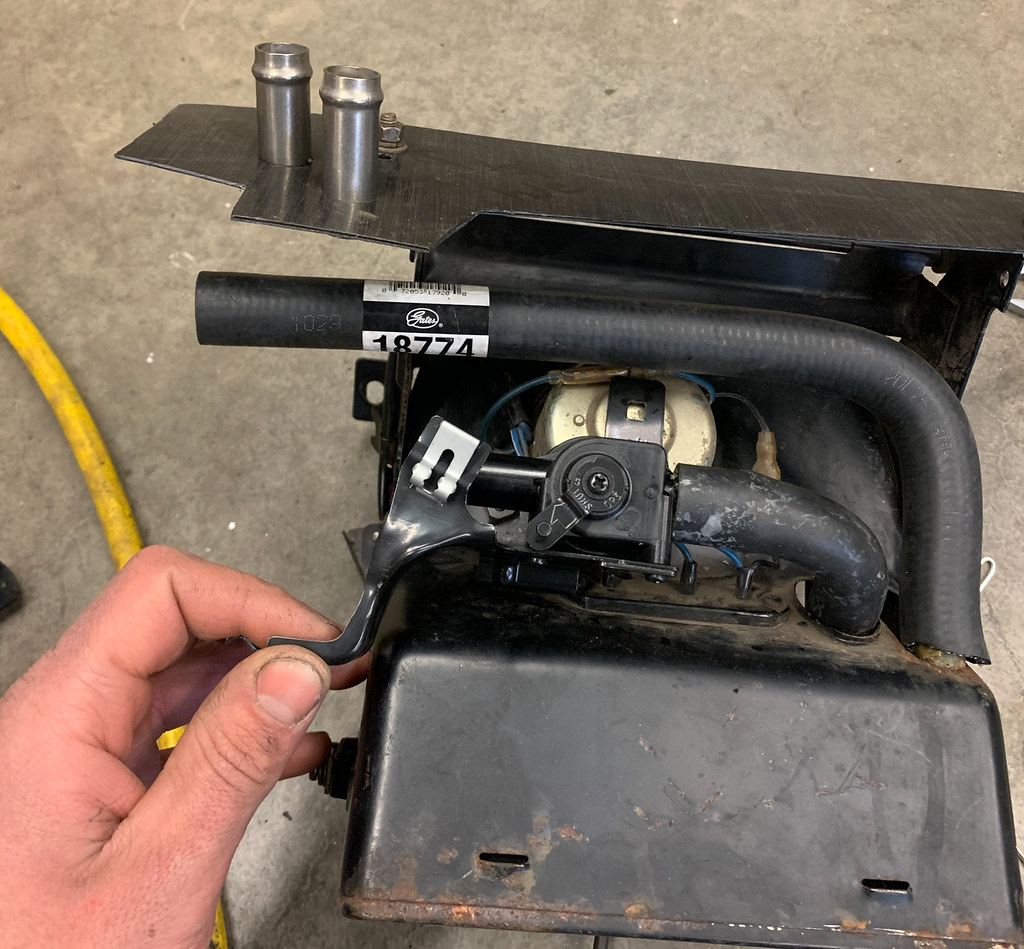
We had some SS flared ends kicking around and some mandrel bent 3/4" elbows so I paired all that up and welded it together. What isn't pictured is the strap that connects the 2 lines together and then bolts to the heater frame.
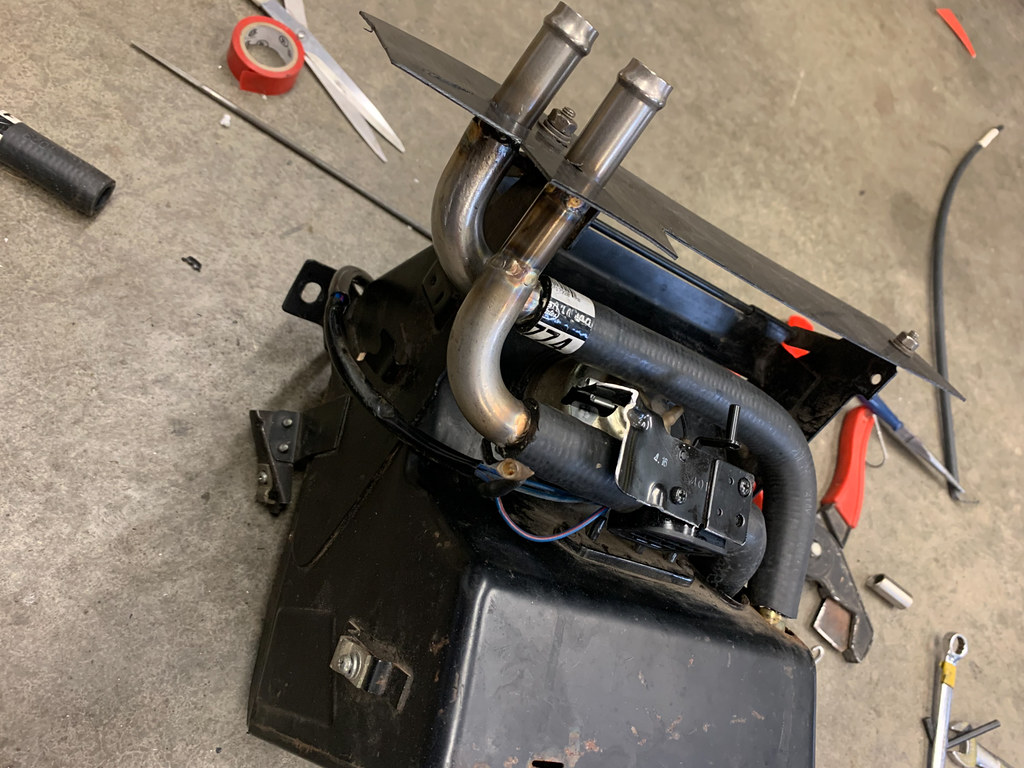
For final closure, thanks to Stu for the part numbers on the hoses!
I ended up sacrificing 1x Gates 18801 (Z shape) for my idle air control.
I used Gates 18774 to go across the heater box and Gates 18850 for the line that came from deep within the heater box.
The lines between the KA and the firewall are both Gates 18801 (uncut) but they aren't perfect since the inlet and outlets are clocked about 90* apart so the hoses have some twist in them but heatant still gets through fine. I got amazingly lucky as 1 of the about 20 hoses the local FLAPS had on the shelf was the 18801 that I needed!

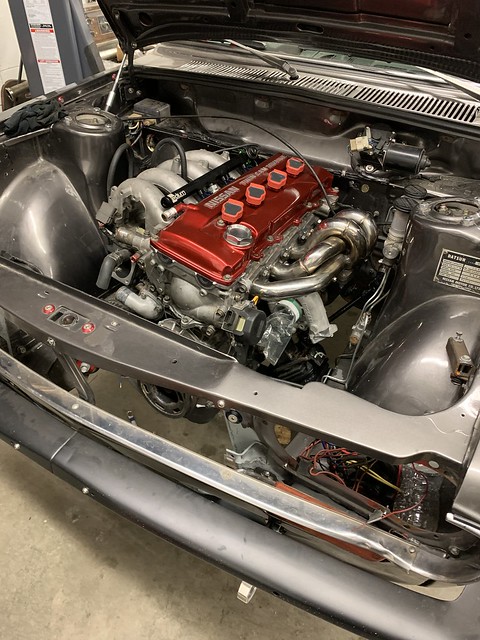
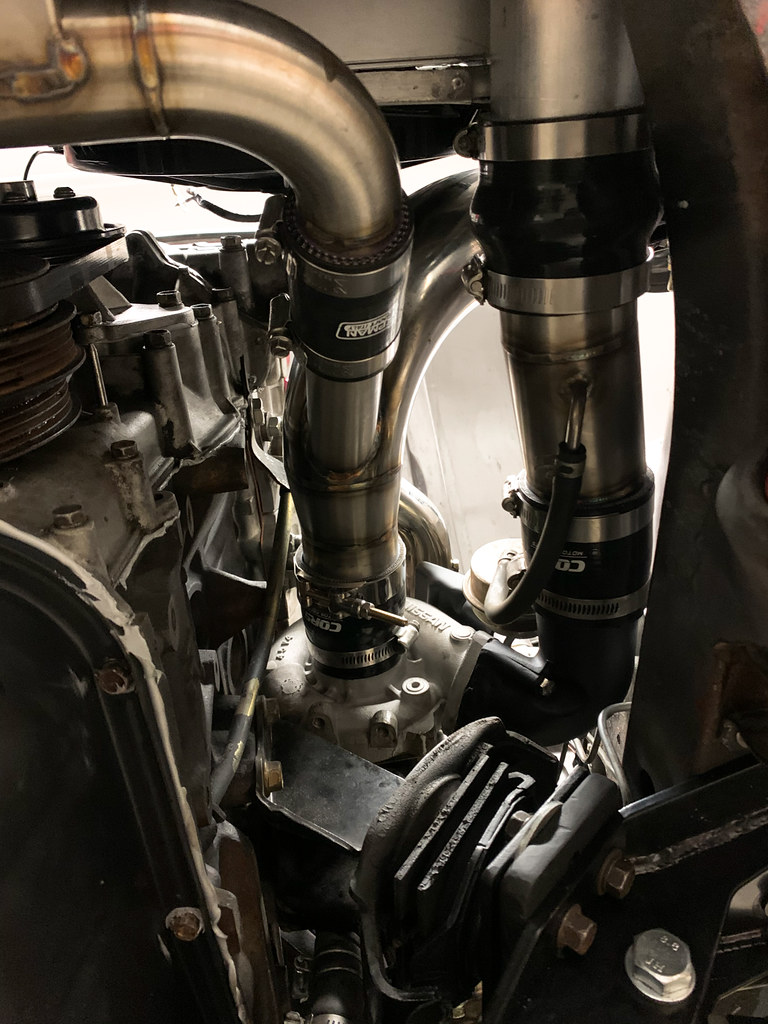
I spent some time joyously connecting all my laborious but now complete pipes.
Starring: non-smashed up oil pan, BNR32 BOV, 1.5" recirc line.
Starring: RB25 turbo, Franken S chassis mounts, JBC x member.
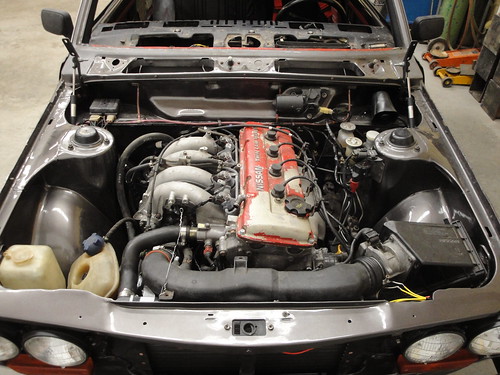
Engine bay has come a ways since 2010 haha!
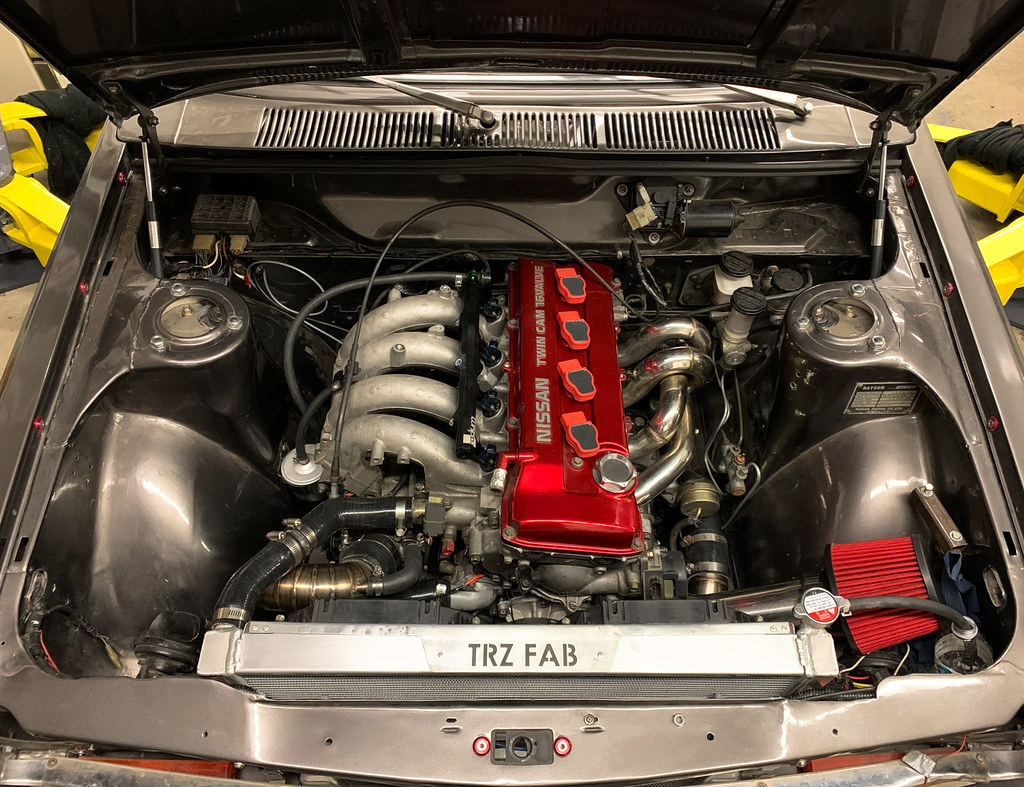
Top view
One of the pre-start up items I addressed was leaving the oil feed to turbo banjo loose so that I could crank the engine over (with the CAS pulled) to ensure oil was getting to the head and turbo before a real startup. After about 4 crank overs to try to get oil primed and visible at the turbo and still having no oil, I really went for it on the next one which left a generous oil slick under the turbo! Oil to turbo... check!
I spent some time late into the night cleaning up the engine harness a little. I connected the R35 MAF plug on for good and tidied up the coil power which originally had a loop going back into the car for when I had the factory tach setup when the KA was stock. I also re-worked the fan wiring since the fans were relocated once again.
After getting the harness back in, I was able to fire the car up and move it back on forth in the barn to verify that the clutch and trans all worked ok.
Sometime circa 02:00 hours, I managed to break the calibration of my wideband by powering it up with the sensor unplugged by accident. This made from some head scratching the next day until I pulled it from the exhaust to do a fresh air recal.
I added some fuel and pulled 10* of timing out in Nistune so I could rip it around a bit.
Here's a driveway video from the next day!
First impressions:
Smoke after shifts (Need to sort out PCV setup for boost and add catch can). You can see this in the video.
Boost threshold is low which is great.
It rips
It makes the sounds
Also, it rips
Trans shifts nice and smooth
Gold bunny clutch with properly machined release sleeve works great. Feels a bit OEM + but nothing like my RB26 clutch was.
Long awaited LSD chirps both tires
No leaks!!
After her annual bath, I was able to take it for a little cruise around the neighbourhood. It was bittersweet since I came home with a trailing cloud of blue smoke. I hope that a proper catch can and PCV setup will alleviate this. Hoping the cause is residual oil pushed into the exhaust from the pressurized crank case but it could be a lot worse too. Diagnosis to follow on the next trip down. Worst case, I'm begging for my spare block out of my dad's truck to build...
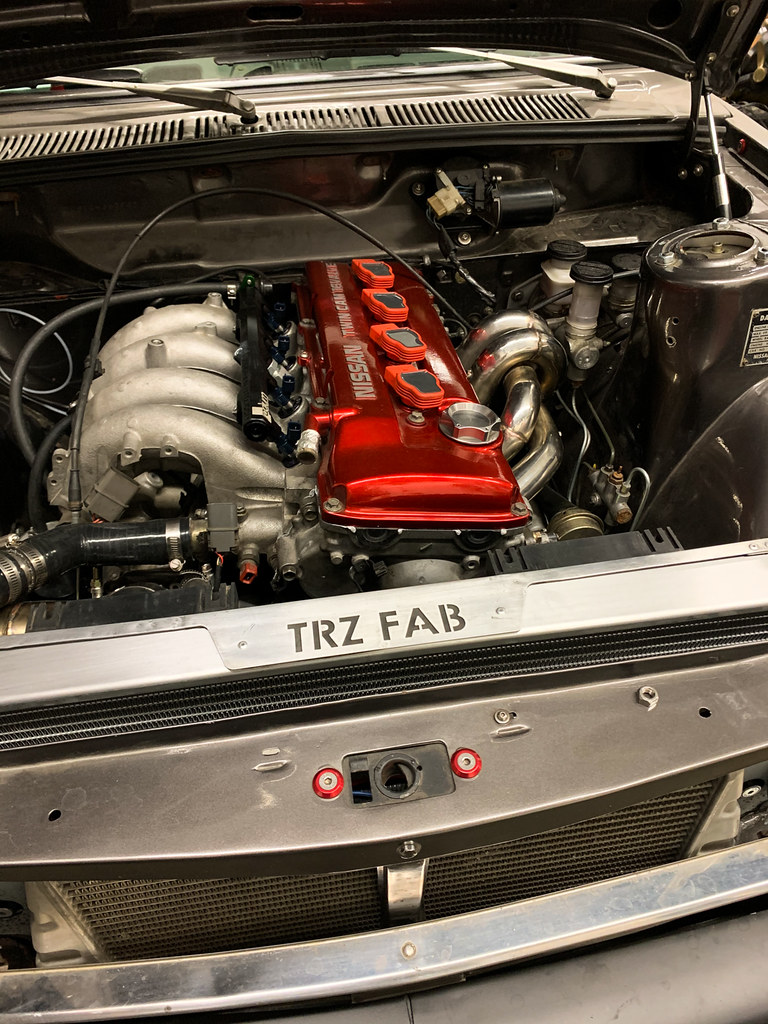
Here's a decent picture to leave on a high note.

The first order of business was to get the heater box back together with the new valve and new line routing. My least favorite place to be is under the dash so I built a little template of the firewall that I could bolt to the heater box so that the rest of the work was just workbench (or floor) work.
We had some SS flared ends kicking around and some mandrel bent 3/4" elbows so I paired all that up and welded it together. What isn't pictured is the strap that connects the 2 lines together and then bolts to the heater frame.
For final closure, thanks to Stu for the part numbers on the hoses!
I ended up sacrificing 1x Gates 18801 (Z shape) for my idle air control.
I used Gates 18774 to go across the heater box and Gates 18850 for the line that came from deep within the heater box.
The lines between the KA and the firewall are both Gates 18801 (uncut) but they aren't perfect since the inlet and outlets are clocked about 90* apart so the hoses have some twist in them but heatant still gets through fine. I got amazingly lucky as 1 of the about 20 hoses the local FLAPS had on the shelf was the 18801 that I needed!
I spent some time joyously connecting all my laborious but now complete pipes.
Starring: non-smashed up oil pan, BNR32 BOV, 1.5" recirc line.
Starring: RB25 turbo, Franken S chassis mounts, JBC x member.
Engine bay has come a ways since 2010 haha!
Top view
One of the pre-start up items I addressed was leaving the oil feed to turbo banjo loose so that I could crank the engine over (with the CAS pulled) to ensure oil was getting to the head and turbo before a real startup. After about 4 crank overs to try to get oil primed and visible at the turbo and still having no oil, I really went for it on the next one which left a generous oil slick under the turbo! Oil to turbo... check!
I spent some time late into the night cleaning up the engine harness a little. I connected the R35 MAF plug on for good and tidied up the coil power which originally had a loop going back into the car for when I had the factory tach setup when the KA was stock. I also re-worked the fan wiring since the fans were relocated once again.
After getting the harness back in, I was able to fire the car up and move it back on forth in the barn to verify that the clutch and trans all worked ok.
Sometime circa 02:00 hours, I managed to break the calibration of my wideband by powering it up with the sensor unplugged by accident. This made from some head scratching the next day until I pulled it from the exhaust to do a fresh air recal.
I added some fuel and pulled 10* of timing out in Nistune so I could rip it around a bit.
Here's a driveway video from the next day!
First impressions:
Smoke after shifts (Need to sort out PCV setup for boost and add catch can). You can see this in the video.
Boost threshold is low which is great.
It rips
It makes the sounds
Also, it rips
Trans shifts nice and smooth
Gold bunny clutch with properly machined release sleeve works great. Feels a bit OEM + but nothing like my RB26 clutch was.
Long awaited LSD chirps both tires
No leaks!!
After her annual bath, I was able to take it for a little cruise around the neighbourhood. It was bittersweet since I came home with a trailing cloud of blue smoke. I hope that a proper catch can and PCV setup will alleviate this. Hoping the cause is residual oil pushed into the exhaust from the pressurized crank case but it could be a lot worse too. Diagnosis to follow on the next trip down. Worst case, I'm begging for my spare block out of my dad's truck to build...
Here's a decent picture to leave on a high note.
'72 2 door KA project | S14 Silvia RB25DET | S14 RB26DETT (sold) | '90 Audi 90Q20V (sold)
Re: Jordan's '72 2 door KA project
Congrats on getting back on the road. Looks great and it makes all the sounds that bring smiles.
Stu
Stu
Stu
1972 4-door 510
2004 Volvo V70R 6spd manual
Factory Five Racing Cobra
1991 Ford F250 4x4 extended cab
2005 Mini Cooper S - death via forklift :(
1972 4-door 510
2004 Volvo V70R 6spd manual
Factory Five Racing Cobra
1991 Ford F250 4x4 extended cab
2005 Mini Cooper S - death via forklift :(