I had some plates made up years ago, being lucky to have a steel stamp set at my work that was close to factory, a hair bigger, but I think it looks close to correct. The factory obviously hand stamped those plates, as you can see the numbers are up and down a hair.
Regardless, a NEW plate just looks good and only a purist would know the difference!
Stu's 1972 4 Door
-
bertvorgon

- Supporter
- Posts: 12017
- Joined: 04 Aug 2003 20:45
- Location: White Rock, B.C. Canada
Re: Stu's 1972 4 Door
- Attachments
-
- IMGP0307 (Large).jpeg (266.56 KiB) Viewed 1285 times
-
- IMG_6544.JPG (124.37 KiB) Viewed 1285 times
"Racing makes heroin addiction look like a vague wish for something salty" - Peter Egan
Keith Law
1973 2 Door Slalom/hill climb/road race / canyon carver /Giant Killer 510
1971 Vintage 13' BOLER trailer
Keith Law
1973 2 Door Slalom/hill climb/road race / canyon carver /Giant Killer 510
1971 Vintage 13' BOLER trailer
Re: Outer C-pillar vent rebuild
Thanks for making me aware of something I missed noticing when I transferred my backs over to the new vents (these repro vents are very nice btw).Stu wrote: ↑03 Nov 2022 21:26 I bought some aftermarket outer c-pillar vents and they do not come with the snorkel thing that keeps water out of the interior. When I removed my old ones from my vents, I could see that at one time, there was a rubber flap that I think was to be sort of a one way valve. What was left was crusty, shrunk, and cracked. I removed the heat staked heads off the retaining posts, cleaned and repainted the metal shims (pushes the fap open) and replaced the flaps with 0.5mm thick rubber I found on Ebay. Little bit of silicone at the seam at the connection between the vent and snorkel when I reassembled. Not sure any of this will really matter but it made me feel better.

Did you cut the staking material away from the posts, and was there enough post material remaining to re-stake them with the soldering iron? Looks like a job for the inside workbench this winter.
Thanks for the good detail you always include in your explanations.
Re: Outer C-pillar vent rebuild
I ground off just enough to use a small screw driver to get in and pry the strip with the posts out. There was just a bit of material left over from the original stake to sort of snap back in place. I then used the soldering iron to re-melt the posts and sort of smushed it around with the housing. It seems like it will hold. There is not much load so I'm willing to risk it.Thanks for making me aware of something I missed noticing when I transferred my backs over to the new vents (these repro vents are very nice btw).
Did you cut the staking material away from the posts, and was there enough post material remaining to re-stake them with the soldering iron? Looks like a job for the inside workbench this winter.
Thanks for the good detail you always include in your explanations.
Stu
1972 4-door 510
2004 Volvo V70R 6spd manual
Factory Five Racing Cobra
1991 Ford F250 4x4 extended cab
2005 Mini Cooper S - death via forklift :(
1972 4-door 510
2004 Volvo V70R 6spd manual
Factory Five Racing Cobra
1991 Ford F250 4x4 extended cab
2005 Mini Cooper S - death via forklift :(
Painting (finally)
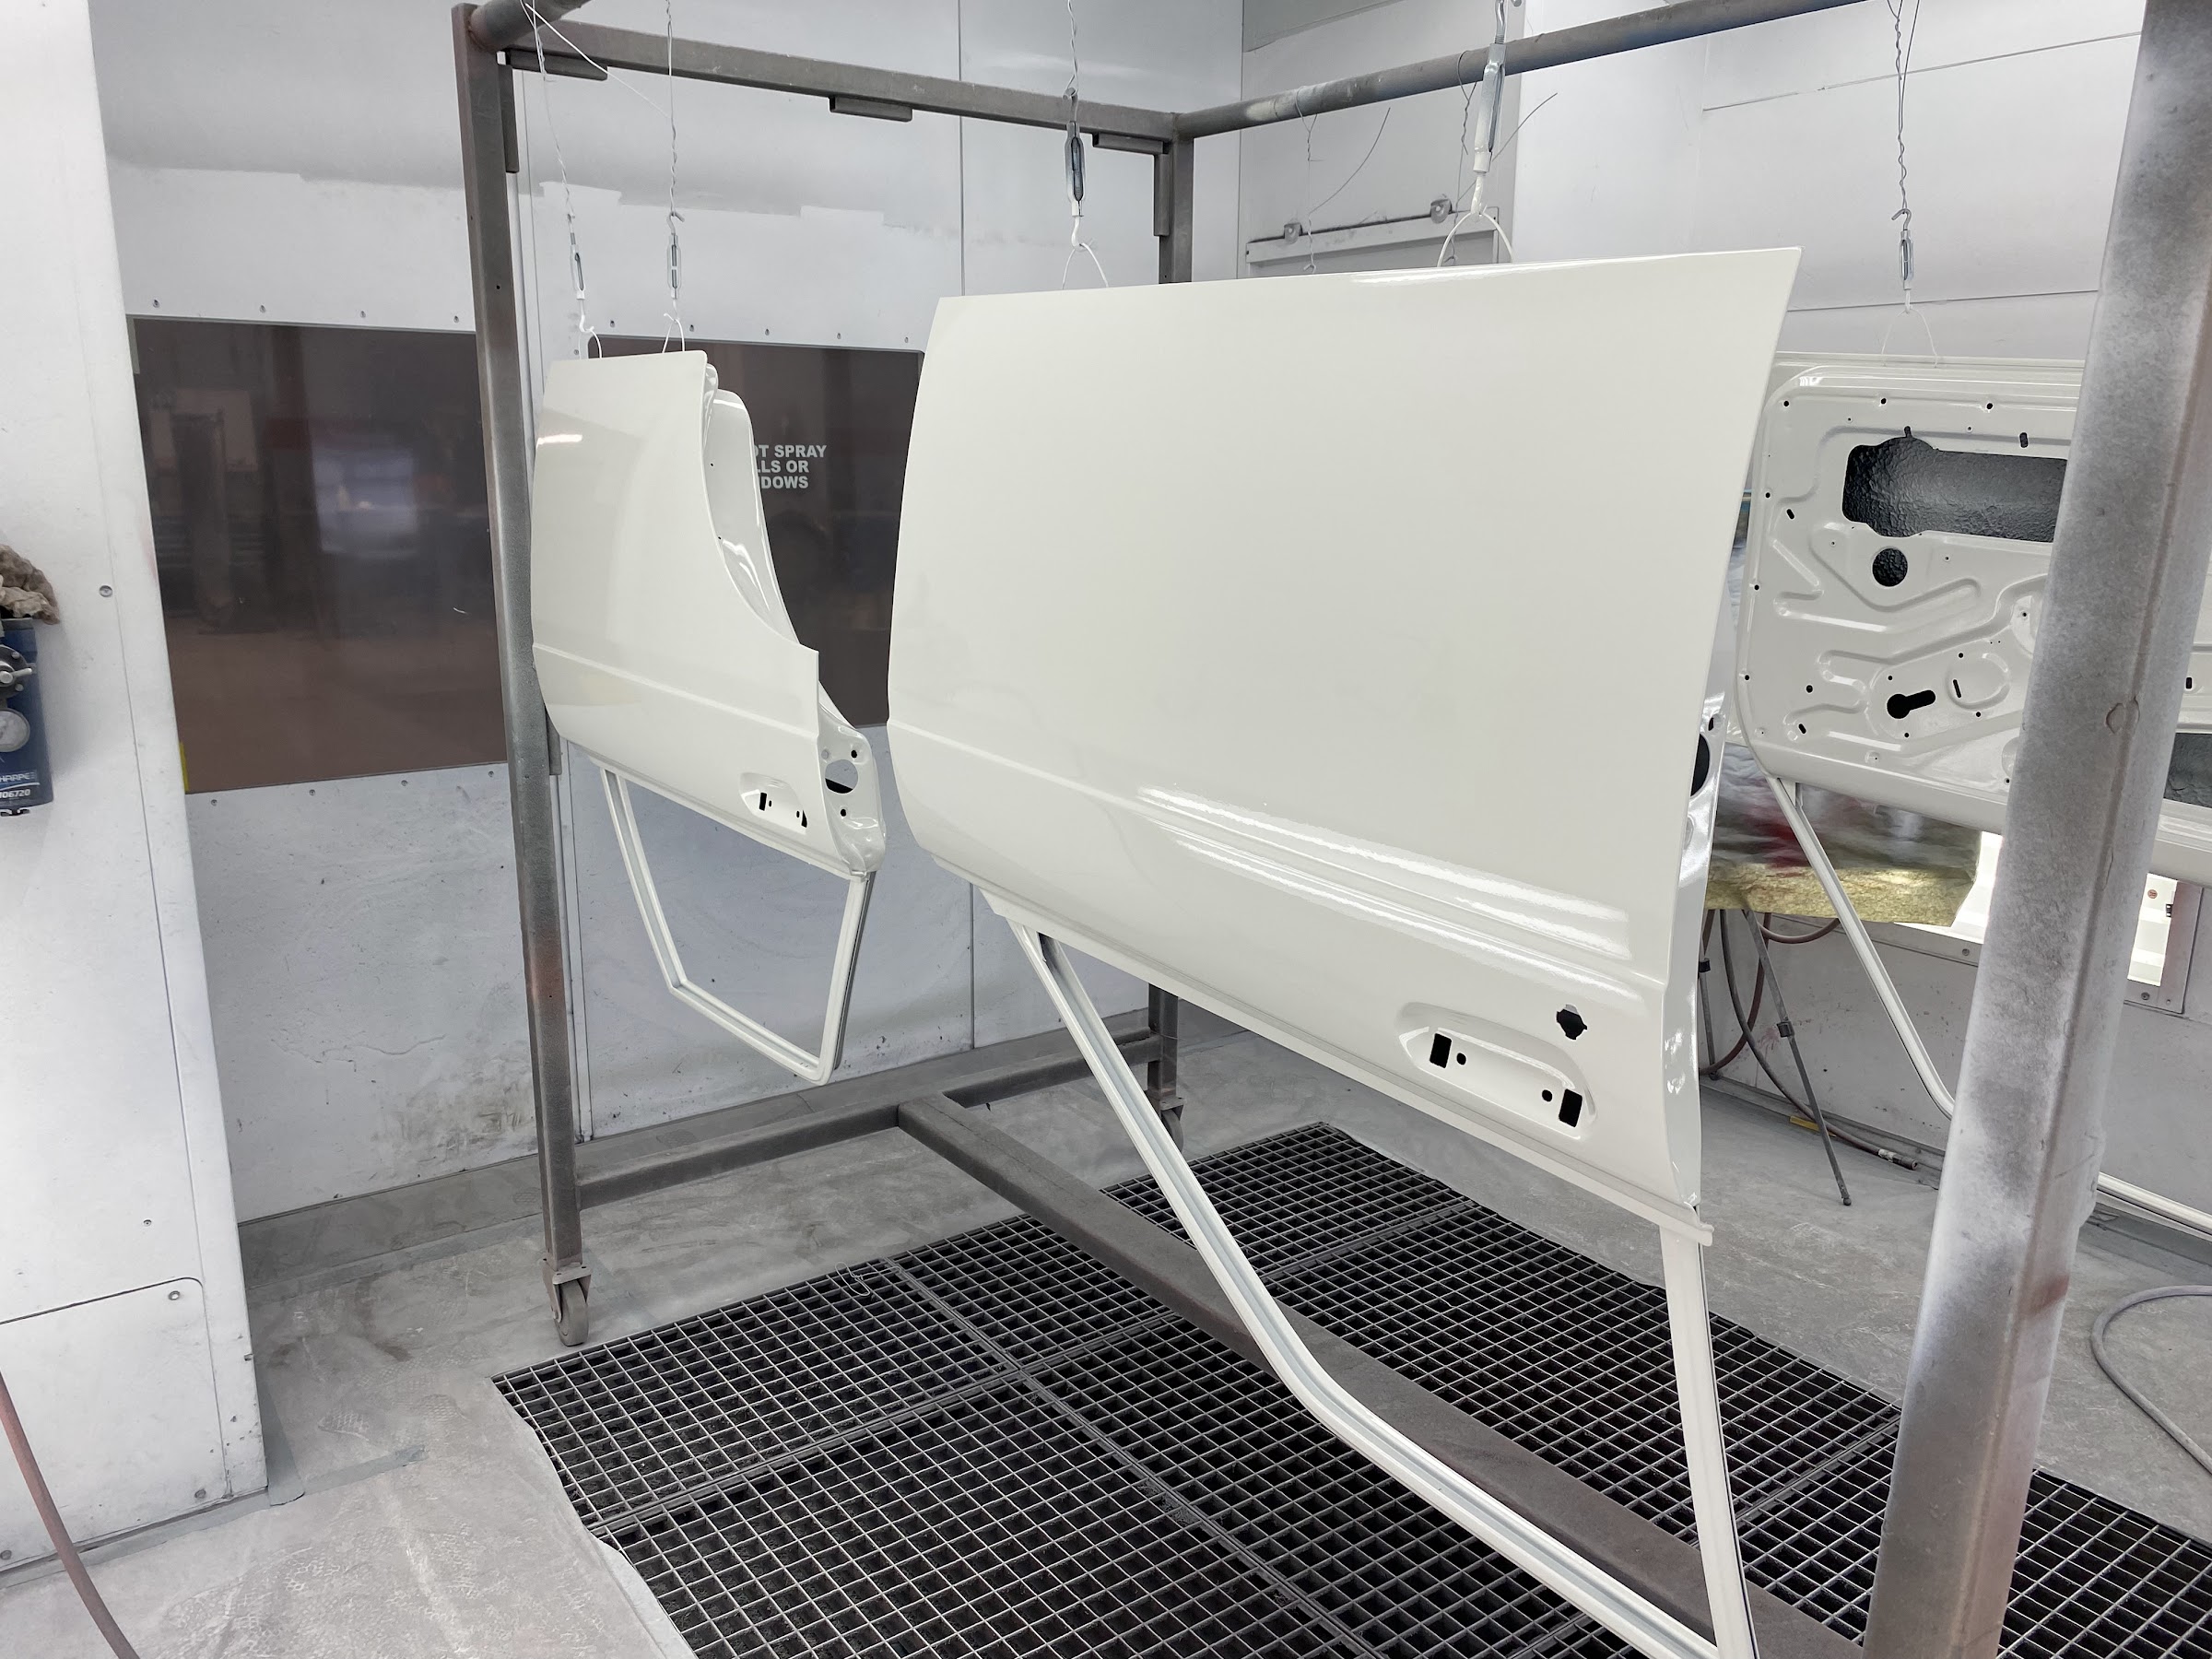
I forced myself to finally just stop fussing with the bodywork and paint the damn car. My instructor at my weekend class let me bring the car in the day before painting to get everything masked, hung up, wiped down, etc. I used about a gallon of Omni MTK single stage Nissan 904 white. Got a couple runs when I first started (I am more used to a BC/CC) but once I got my rhythm, I think it laid down pretty well with minimum orange peel. I don't plan on cutting/polishing except the runs. Glad to be 'done' with this part of the project. Now I have to get this thing back together so I can actually drive this stupid thing.


Stu
1972 4-door 510
2004 Volvo V70R 6spd manual
Factory Five Racing Cobra
1991 Ford F250 4x4 extended cab
2005 Mini Cooper S - death via forklift :(
1972 4-door 510
2004 Volvo V70R 6spd manual
Factory Five Racing Cobra
1991 Ford F250 4x4 extended cab
2005 Mini Cooper S - death via forklift :(
Re: Stu's 1972 4 Door
Excellent, looks great. Congratulations on reaching this milestone with all of you hard work. Nothing looks quite as great as freshly-painted body parts.
Re: Stu's 1972 4 Door
That looks really good! I like the color. Nice job on all the body work and paint, I know it definitely feels good to be done with that part. I'm looking forward to seeing the car come together.
How was it spraying that Lizard Skin? Do you just put it on with one good coat? What kind of spray gun did you use? When you painted over it on the firewall, did you have to prep it, or just sprayed right over it? I'm about to use some myself on a different car, and am curious how your experience was. Thanks
How was it spraying that Lizard Skin? Do you just put it on with one good coat? What kind of spray gun did you use? When you painted over it on the firewall, did you have to prep it, or just sprayed right over it? I'm about to use some myself on a different car, and am curious how your experience was. Thanks
Chris
'71 510 4-Door Sedan
'76 280z
'71 510 4-Door Sedan
'76 280z
Re: Stu's 1972 4 Door
Thanks. It feels great to hit a milestone.
It takes a couple coats and you use a schutz/undercoating gun. It remined me of using a drywall texture gun. I did not do any prep before top coating, just make sure it dries well since it is water based. I waited a week.cwd240z wrote: ↑05 Dec 2022 07:54 How was it spraying that Lizard Skin? Do you just put it on with one good coat? What kind of spray gun did you use? When you painted over it on the firewall, did you have to prep it, or just sprayed right over it? I'm about to use some myself on a different car, and am curious how your experience was. Thanks
Stu
1972 4-door 510
2004 Volvo V70R 6spd manual
Factory Five Racing Cobra
1991 Ford F250 4x4 extended cab
2005 Mini Cooper S - death via forklift :(
1972 4-door 510
2004 Volvo V70R 6spd manual
Factory Five Racing Cobra
1991 Ford F250 4x4 extended cab
2005 Mini Cooper S - death via forklift :(
Rear seat, headliner, and some lighting
Seems a bit early in the reassembly process, but getting an appointment for getting anything done by the local upholstery shop takes months to get in line. I did not want to deal with doing my own headliner, recovering the rear seat to match my front seats, or sew up the wheel well covers so went to https://www.brightautoupholstery.com/


I also got impatient and put the tail lights and license plate lights on. I got some NOS lenses and outer metal pieces a couple of years ago and with new gaskets from Datsport, everything looks pretty good. The license plate light housings were rechromed by SSS Restorers when they did my grille and eyebrows.

I also got impatient and put the tail lights and license plate lights on. I got some NOS lenses and outer metal pieces a couple of years ago and with new gaskets from Datsport, everything looks pretty good. The license plate light housings were rechromed by SSS Restorers when they did my grille and eyebrows.
Stu
1972 4-door 510
2004 Volvo V70R 6spd manual
Factory Five Racing Cobra
1991 Ford F250 4x4 extended cab
2005 Mini Cooper S - death via forklift :(
1972 4-door 510
2004 Volvo V70R 6spd manual
Factory Five Racing Cobra
1991 Ford F250 4x4 extended cab
2005 Mini Cooper S - death via forklift :(
-
RONSLYCHUK
- Supporter
- Posts: 780
- Joined: 12 Sep 2004 19:42
- Location: Abbotsford B.C.
Re: Stu's 1972 4 Door
The shop did a great job on the upholstery and head liner. Your car looks amazing!
Fuel and vapor tank install
I realized that the exhaust tubing I had used to adapt the fuel cap flange to the 2-1/4 Gates fuel hose was really too tight (it is super stiff and has a reinforcing wire in it) and needed to find a better alternative. Tanks Inc (same place I got the in in tank pump from) has an adapter that worked great. FC-2225 fit perfect, so I cut off the old tube and welded the new one on. I welded nuts on the inner flange and modified the outer flange so it sits flat. Closed cell foam gaskets on both sides will hopefully keep the water out of the trunk. A modern vented cap will help the fuel system play well with the fuel injection system.

I wanted to make sure I had the overflow tube and vapor lines hooked up in the stock config so a fuel pump auto cut-off will work well and the car won't smell like fuel all the time. To adapt the vapor line, I used a Murray 84520 5/8 x 5/8 x 1/4 tee in the overflow line.
I'll eventually connect the vapor line that goes up to the engine compartment once I run the fuel lines.
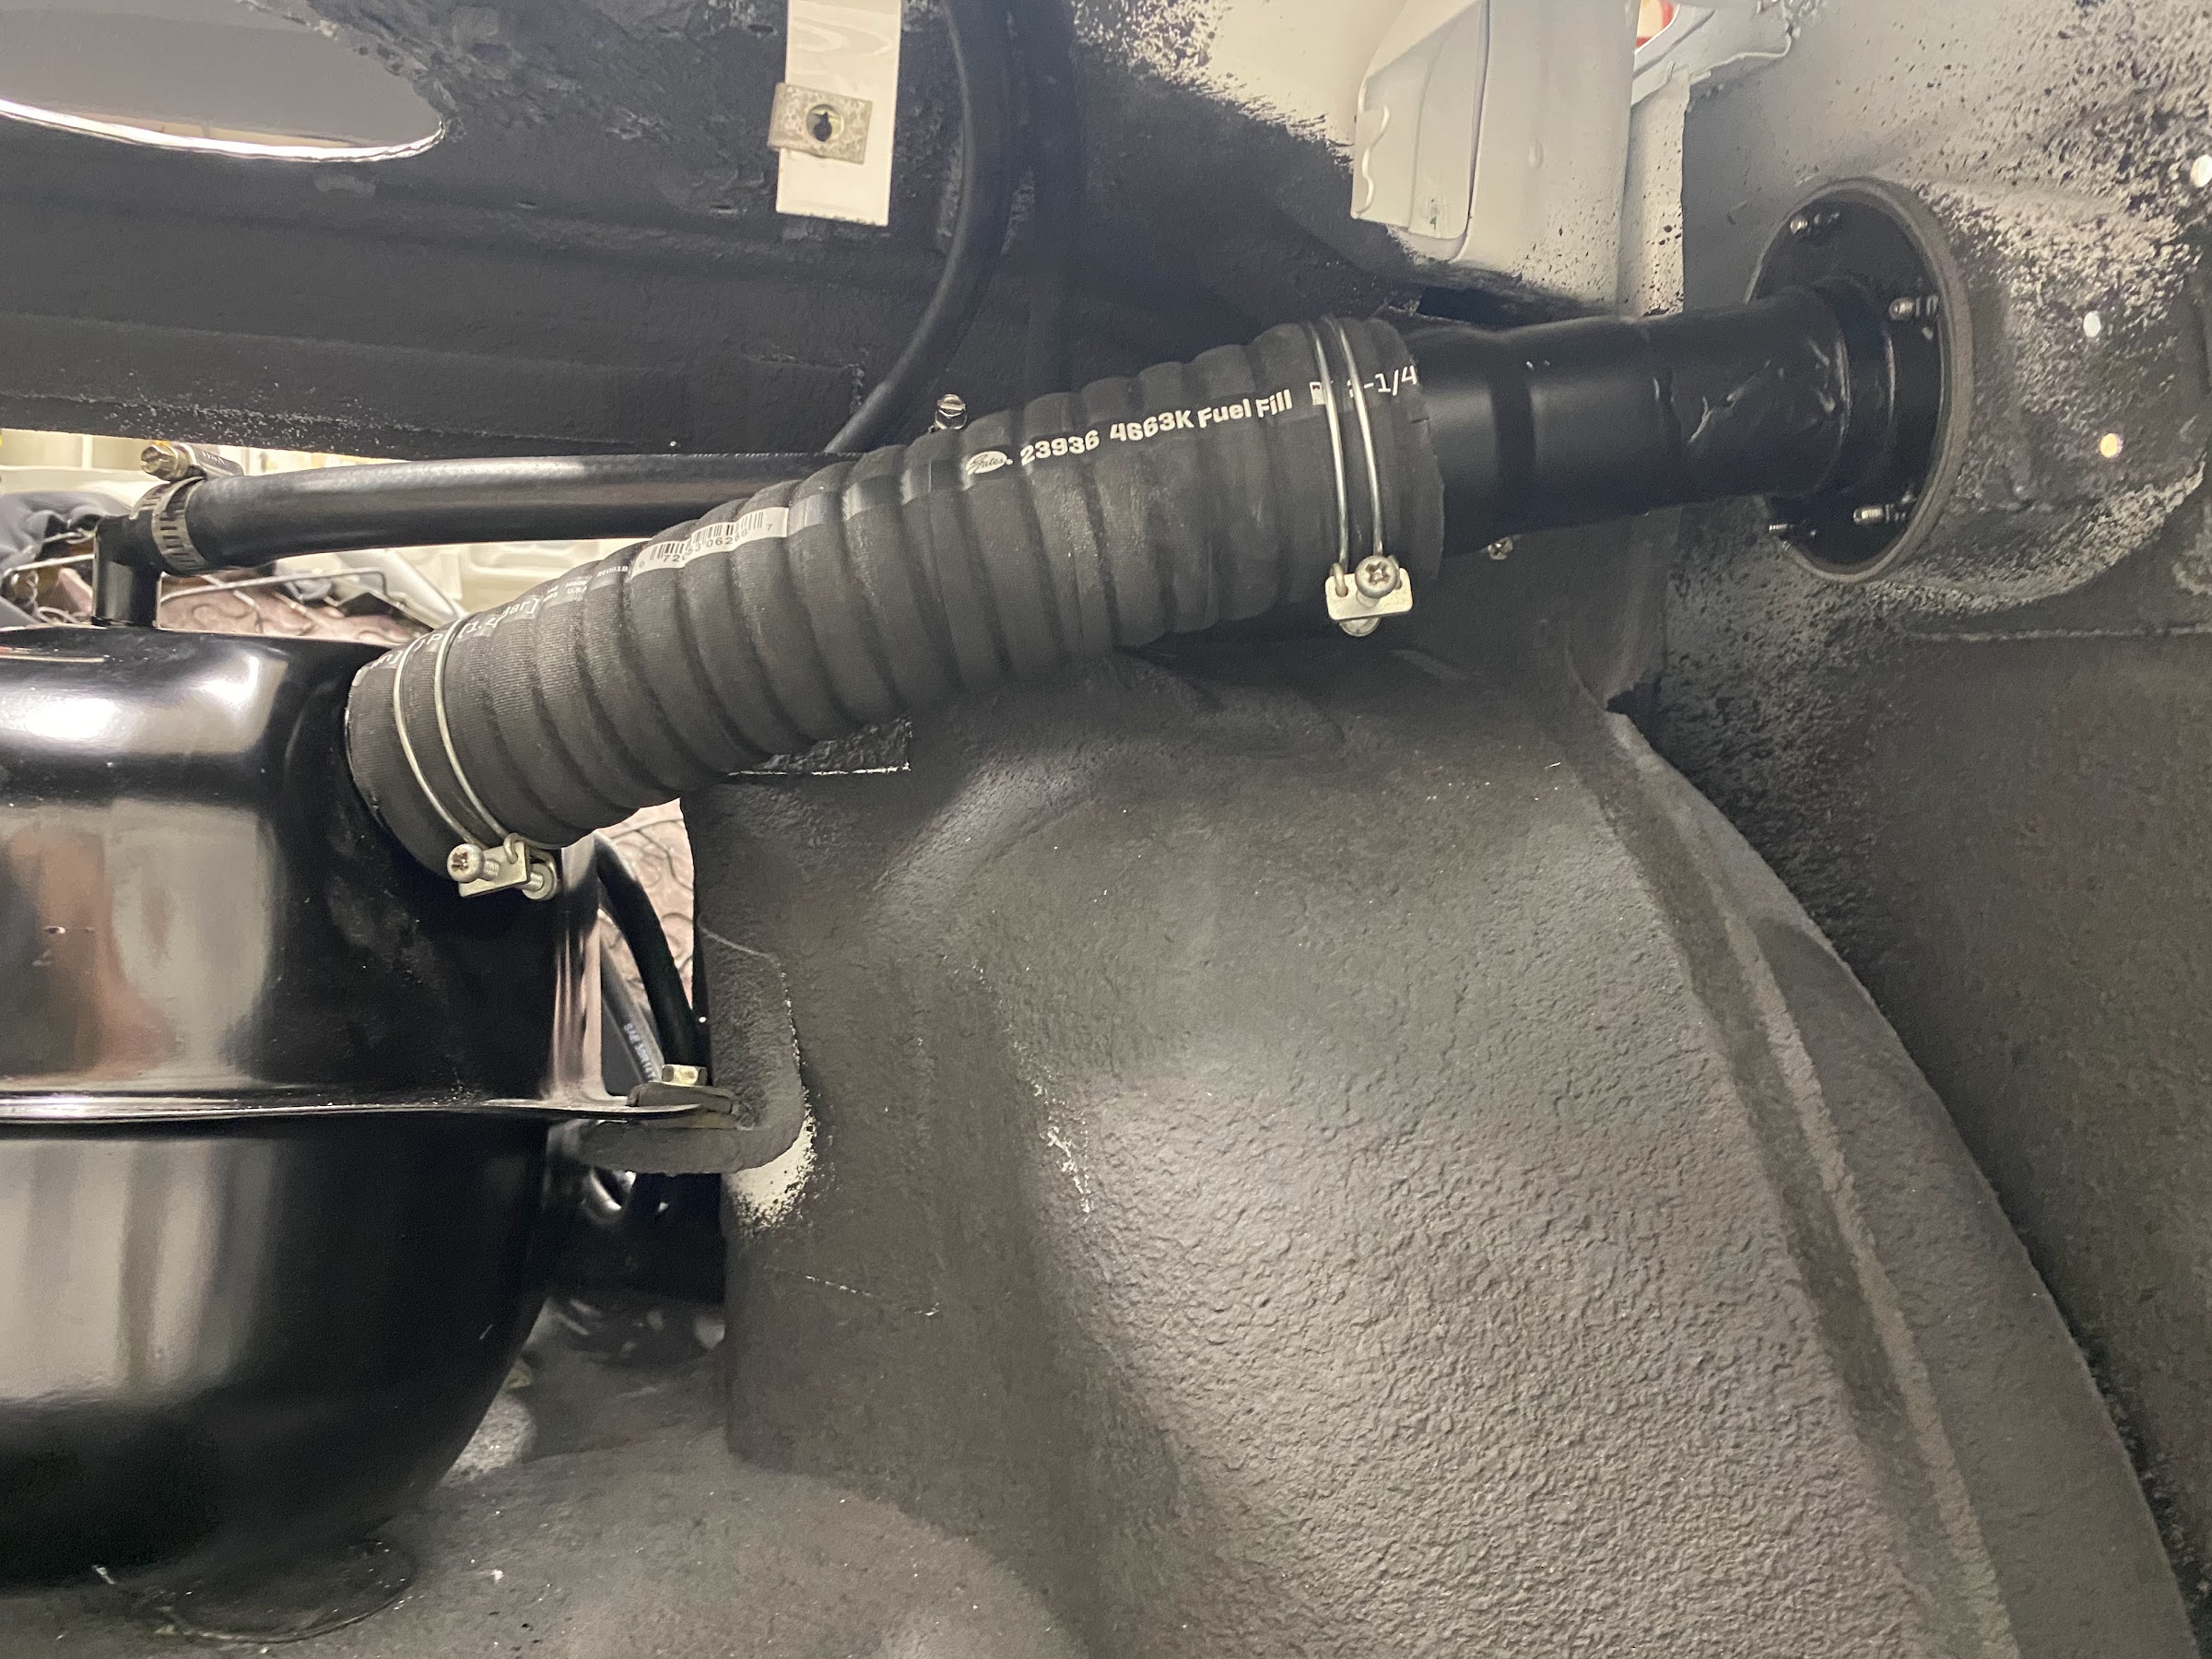
Stu
1972 4-door 510
2004 Volvo V70R 6spd manual
Factory Five Racing Cobra
1991 Ford F250 4x4 extended cab
2005 Mini Cooper S - death via forklift :(
1972 4-door 510
2004 Volvo V70R 6spd manual
Factory Five Racing Cobra
1991 Ford F250 4x4 extended cab
2005 Mini Cooper S - death via forklift :(
-
72ultraorange
- Supporter
- Posts: 179
- Joined: 11 Mar 2021 03:51
- Location: Dallas, TX
Re: Stu's 1972 4 Door
Stu, awesome work - that upholstery looks primo! Trying to keep my build up with you - but months behind  Thanks for sharing! Terrific job!
510 front windshield install; Rope and Soap method
Forever ago when I pulled my front windshield, I ordered a Pilkington windshield, PN 400003132. When I contacted Pilkington, they said "we don't have a classics division any more" and to contact a dealer. Basically, they still made the glass, but don't want to deal with the public directly. I contacted Fesler Auto Glass (Tyler@feslerusa.com) and he arranged for a windshield to be shipped to a Pilkington distributor/warehouse near me (closest one is in Portland, OR). Since it was shipped to a warehouse, I did not pay for 'shipping' but rather a $75 boxing fee. The glass was $325 so the total came to $400. Not as cheap as the Chinese made glass, but it is nice and thick and has the blue tint to match the rest of the original glass in the car.


Also, forever ago I bought both front and rear windshield gaskets (without the trim) from Datsport, PN SWF51F-03. It is well built and looks like it will seal well.

Using a braided nylon cord, lots of soapy water, and help from my son:


The gasket is thicker/taller than stock so it needed to trim about 1/8" from the top edge of the dash to get the screw holes to line up correctly. I'm not sure how I would have installed this with the dash in, so am happy it was out and made my life way easier.
Also, forever ago I bought both front and rear windshield gaskets (without the trim) from Datsport, PN SWF51F-03. It is well built and looks like it will seal well.
Using a braided nylon cord, lots of soapy water, and help from my son:
- wet the glass groove in the gasket
- put the gasket on the glass
- used tape to hold the gasket to the glass (it really likes to slip off)
- wet the rope and put into the outer groove (cord exits/crosses at bottom)
- wet the opening in the car
- set the windshield with gasket into the opening and make sure the large flange is not caught and everything is centered
- slowly pull rope on inside to get inner lip to pull over body flange
- have help pushing on corners when trying to get corner to pull around
The gasket is thicker/taller than stock so it needed to trim about 1/8" from the top edge of the dash to get the screw holes to line up correctly. I'm not sure how I would have installed this with the dash in, so am happy it was out and made my life way easier.
Stu
1972 4-door 510
2004 Volvo V70R 6spd manual
Factory Five Racing Cobra
1991 Ford F250 4x4 extended cab
2005 Mini Cooper S - death via forklift :(
1972 4-door 510
2004 Volvo V70R 6spd manual
Factory Five Racing Cobra
1991 Ford F250 4x4 extended cab
2005 Mini Cooper S - death via forklift :(
Package Tray and Rear Speakers
While I still have the rear windshield not installed, I've been wiring a bunch of stuff in the trunk and thought it would be a good time to remake the package tray. The one that came with my car was pretty warped and it had the wrong sized holes for speakers I was using.
I used 1/4" sanded plywood and covered it with "18 oz automotive carpet" from Amazon. It is has a nice thickness but is not regular loop/pile carpet. I did not want the package tray moving or vibrating, so also added plywood tee nuts and used winged screws to hold it down to the rear sheet metal.
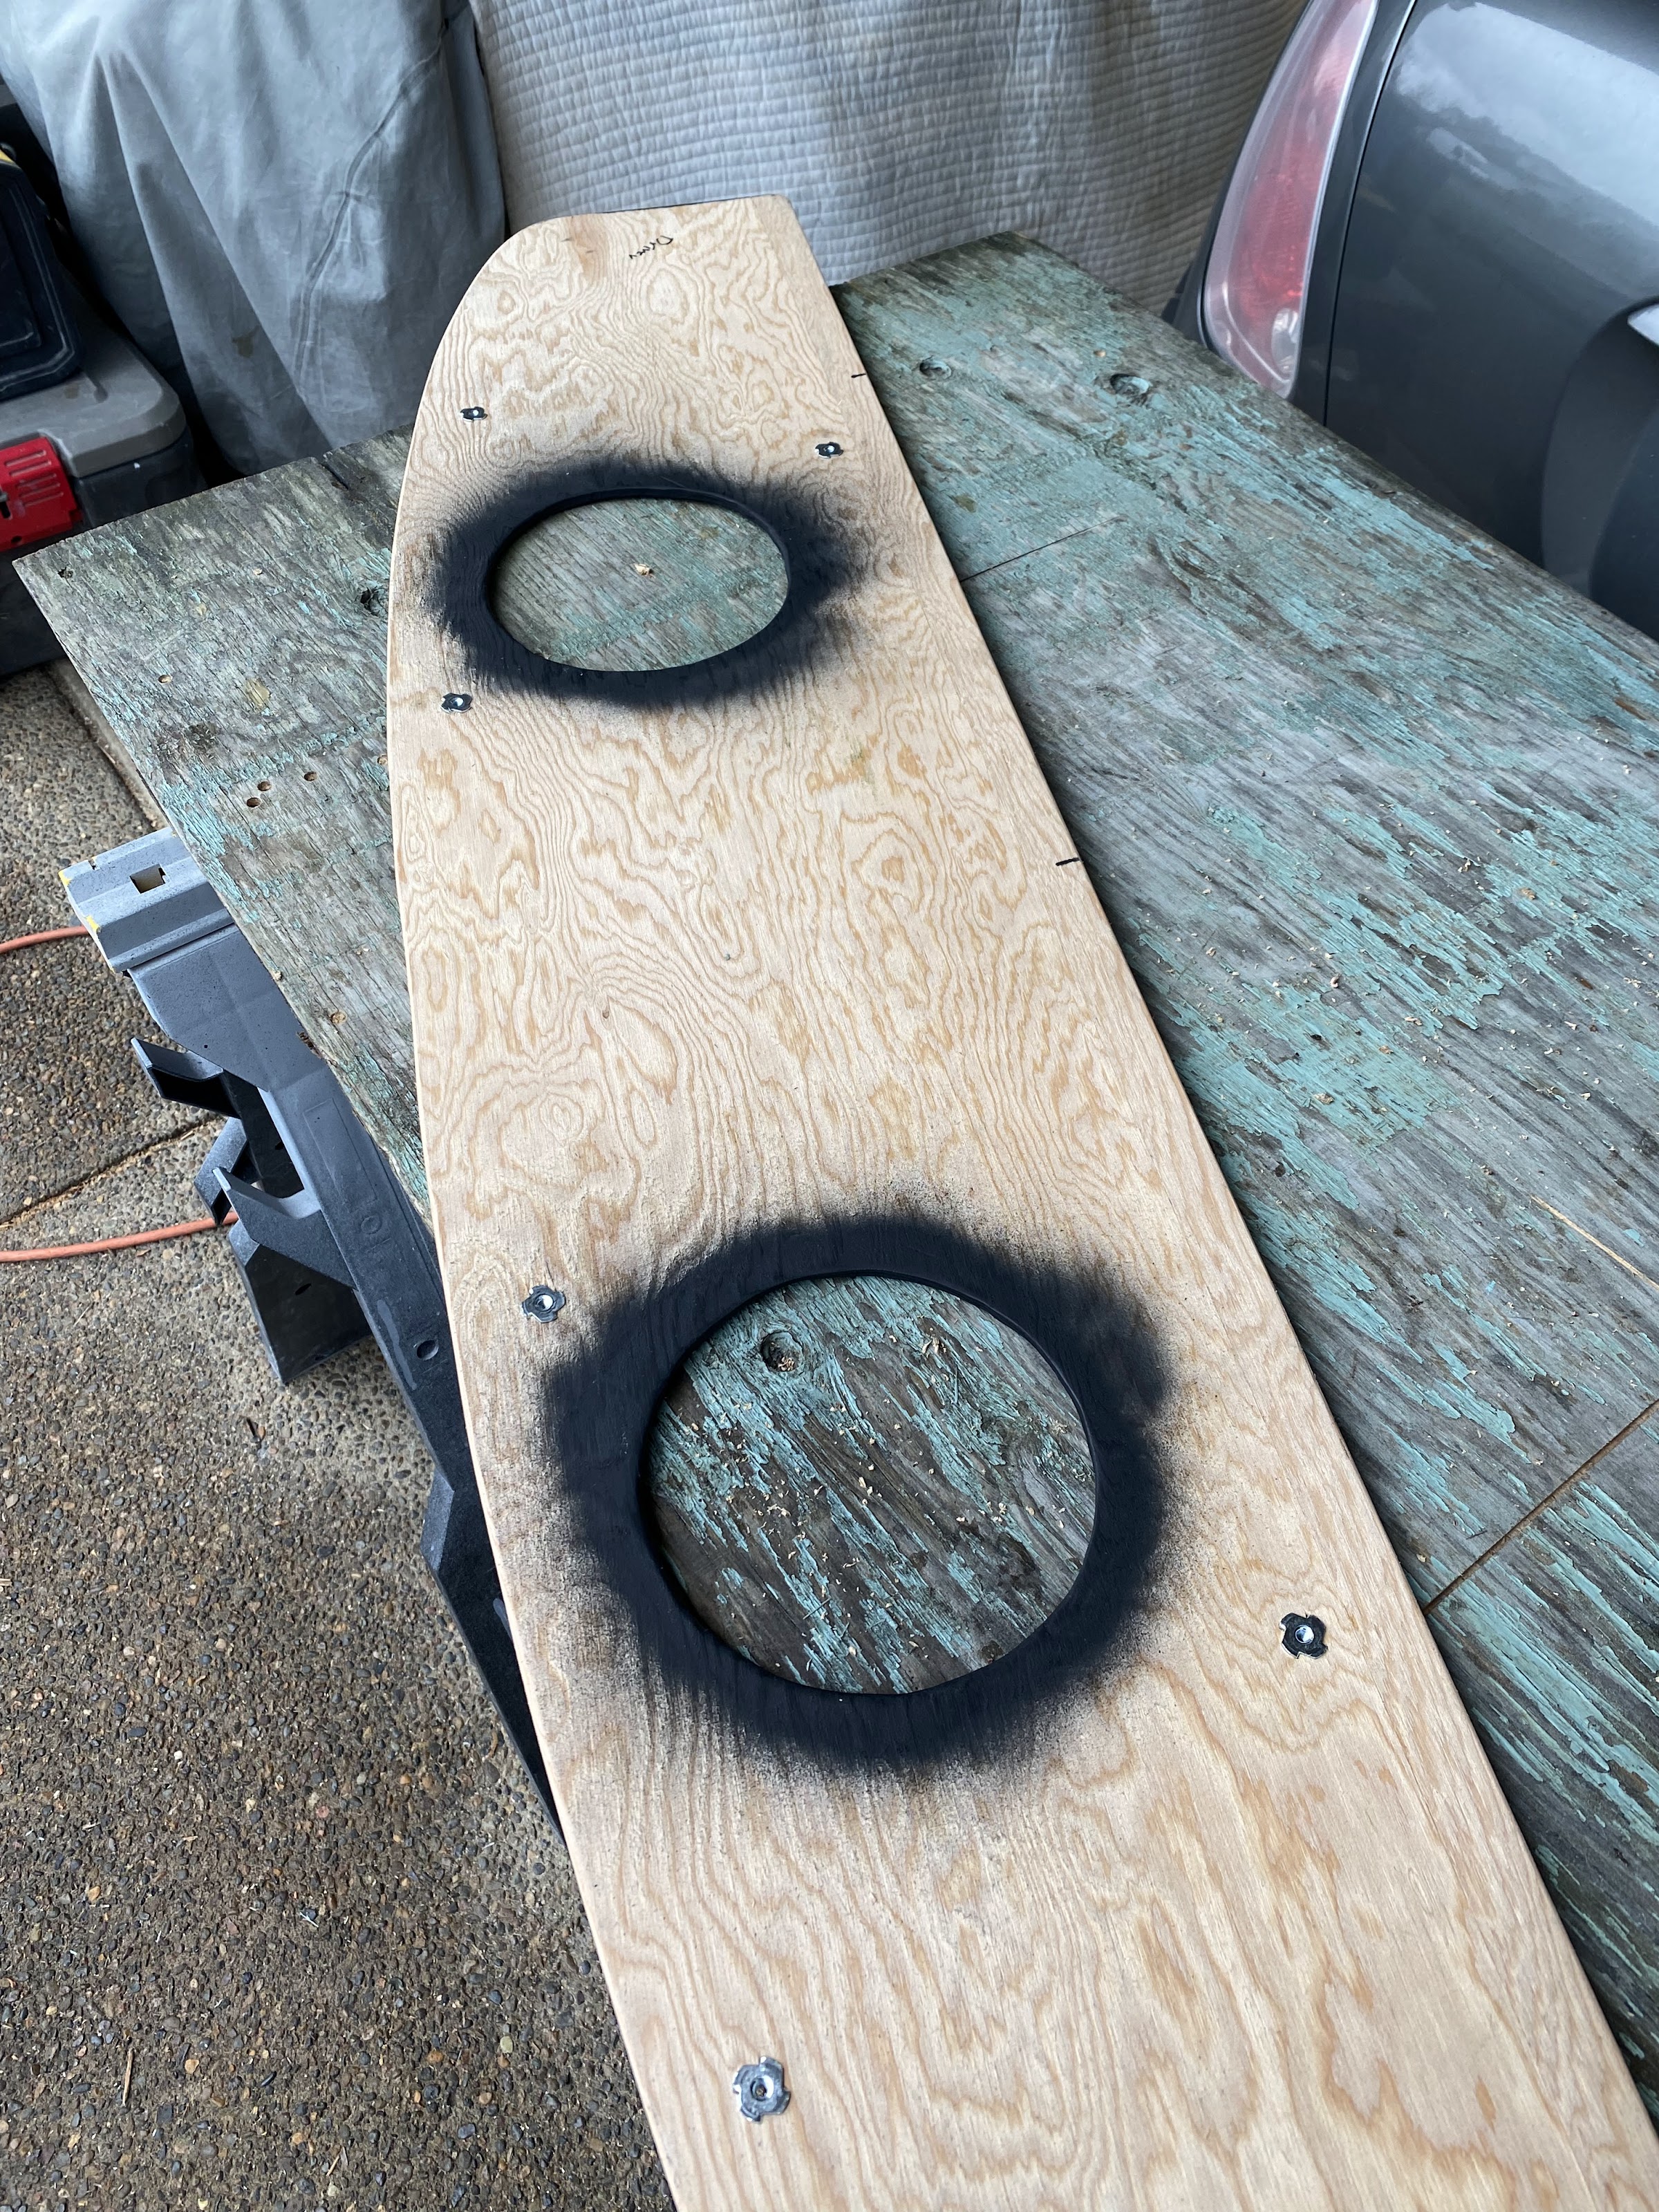


I wanted to only run mid-bass speakers in the rear, ended up getting 7" speakers that normally go into stock installations and they did not have grilles. Because of this, I had to mount the speakers to the underside of the rear sheet metal and put grilles (6.5") that are mounted to the package tray. More work than I wanted but I had the speakers so made it work.


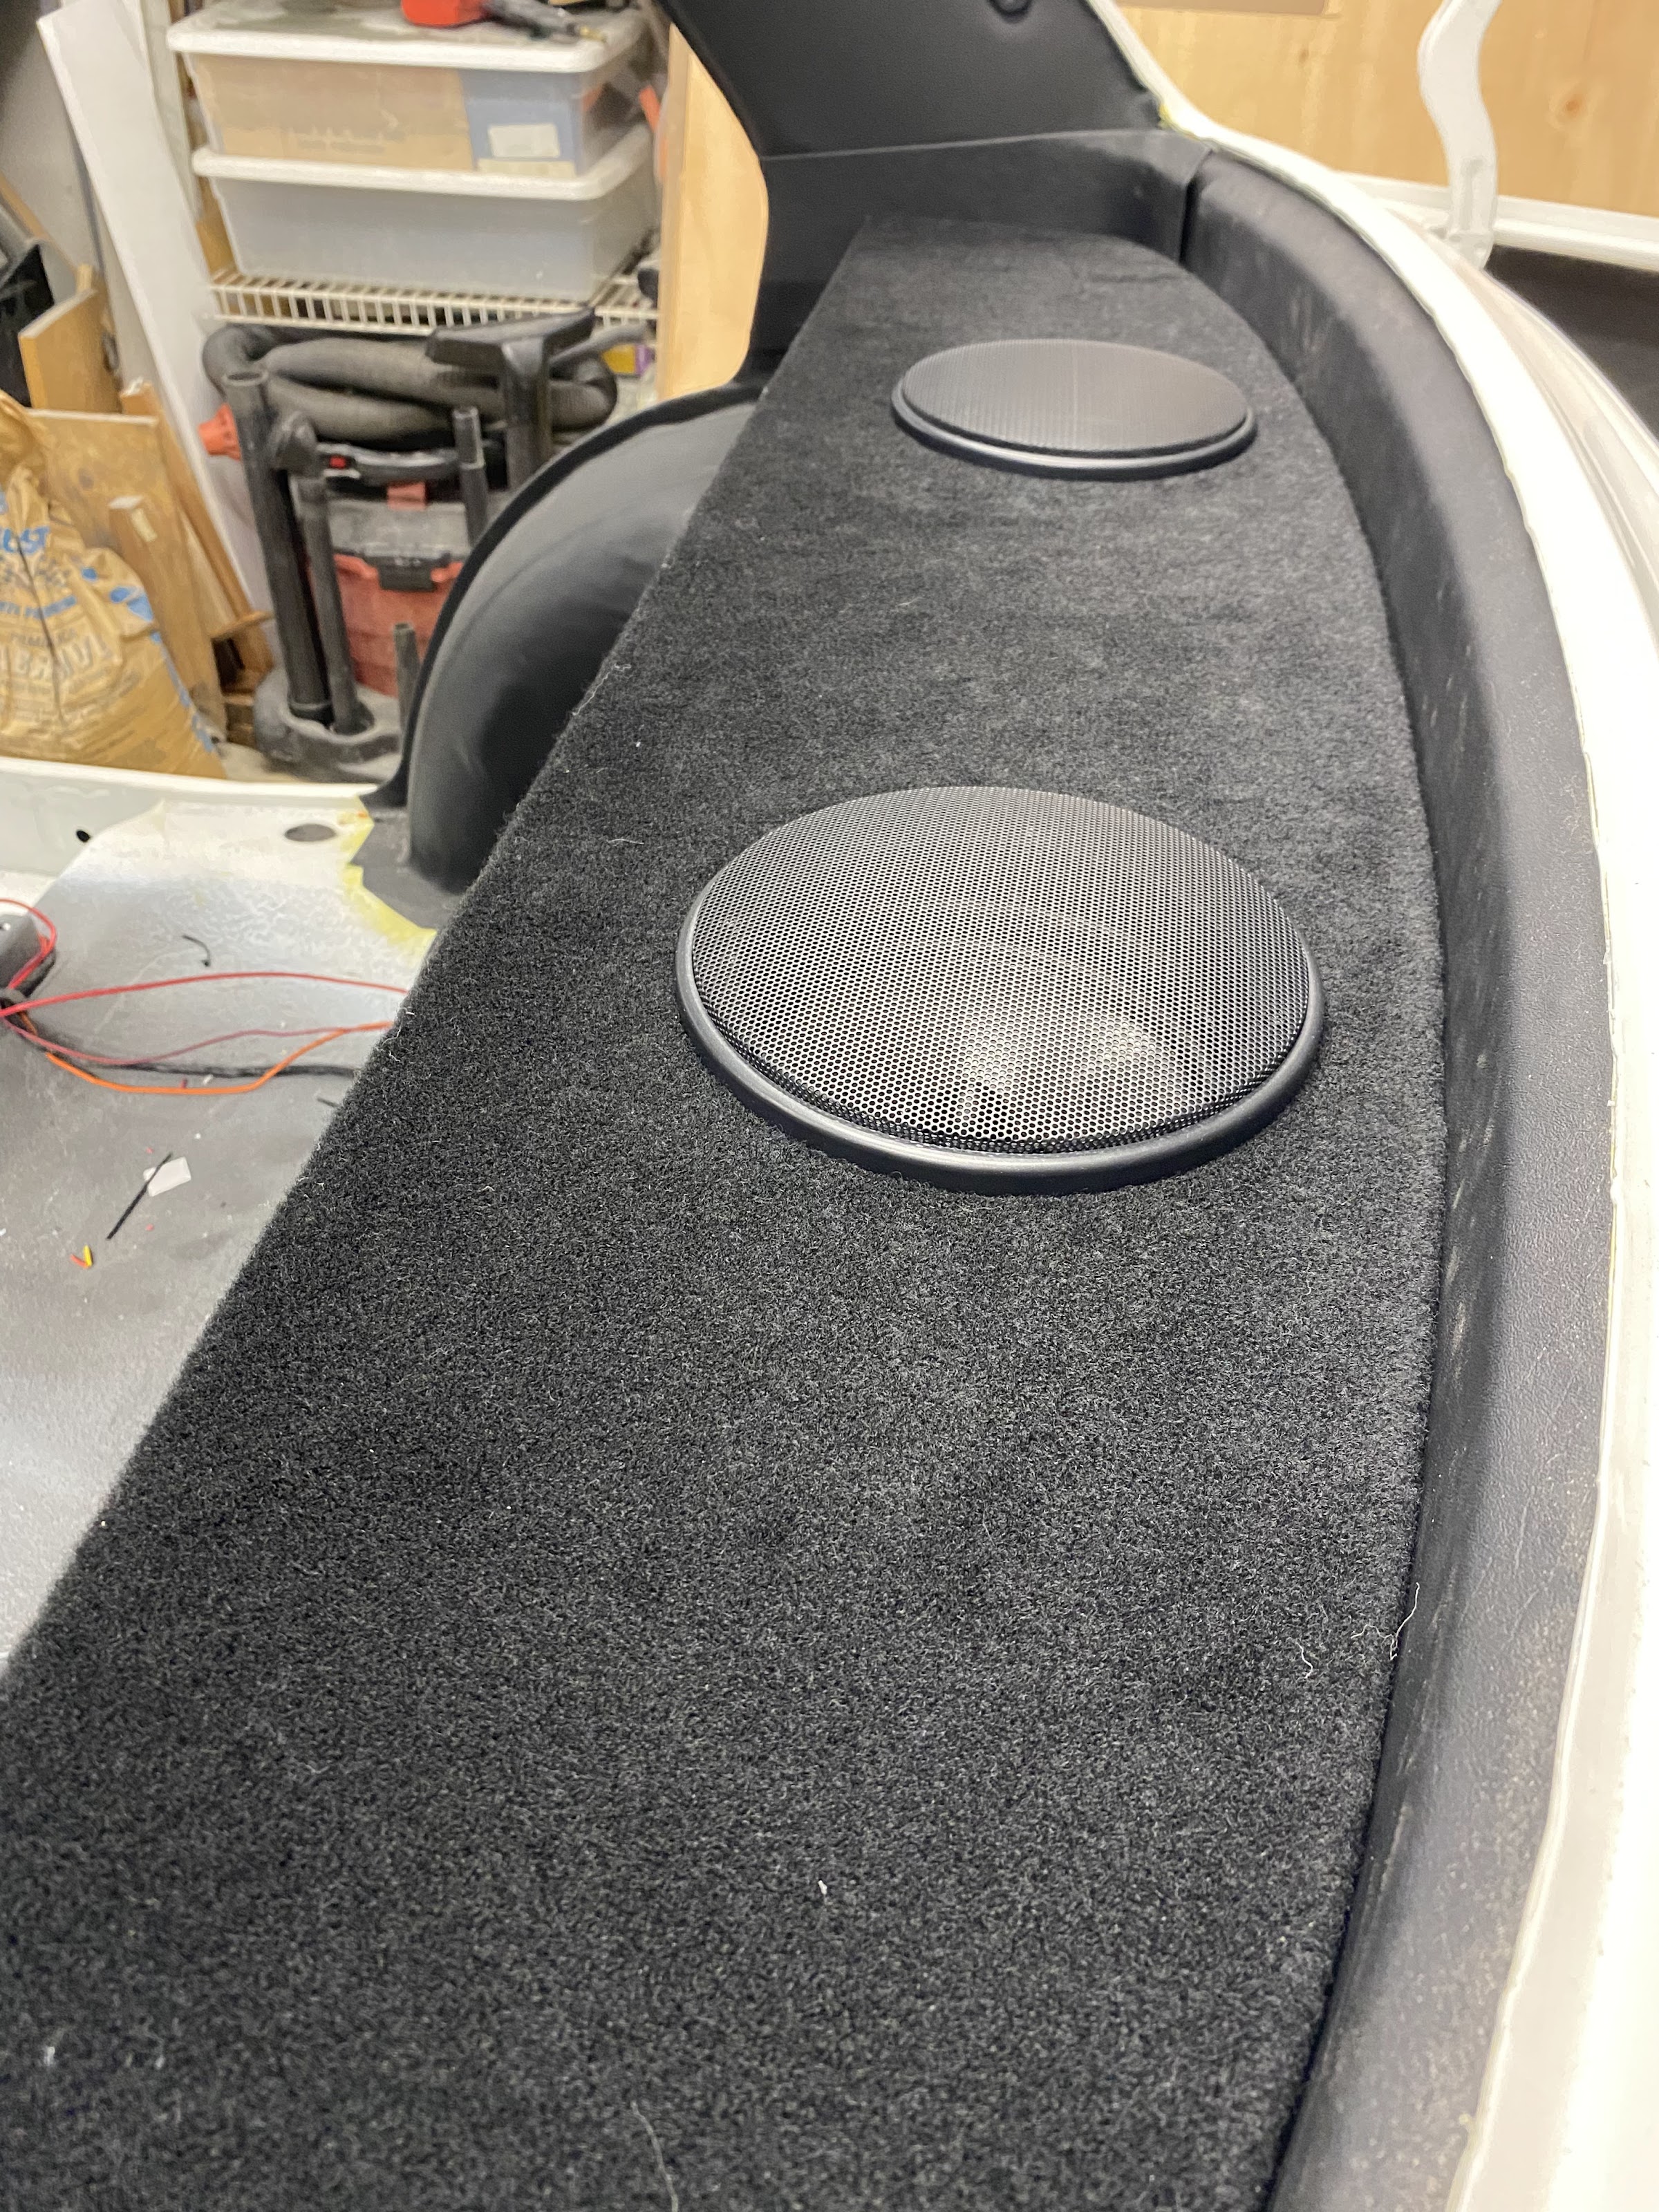
I used 1/4" sanded plywood and covered it with "18 oz automotive carpet" from Amazon. It is has a nice thickness but is not regular loop/pile carpet. I did not want the package tray moving or vibrating, so also added plywood tee nuts and used winged screws to hold it down to the rear sheet metal.
I wanted to only run mid-bass speakers in the rear, ended up getting 7" speakers that normally go into stock installations and they did not have grilles. Because of this, I had to mount the speakers to the underside of the rear sheet metal and put grilles (6.5") that are mounted to the package tray. More work than I wanted but I had the speakers so made it work.
Stu
1972 4-door 510
2004 Volvo V70R 6spd manual
Factory Five Racing Cobra
1991 Ford F250 4x4 extended cab
2005 Mini Cooper S - death via forklift :(
1972 4-door 510
2004 Volvo V70R 6spd manual
Factory Five Racing Cobra
1991 Ford F250 4x4 extended cab
2005 Mini Cooper S - death via forklift :(
-
RONSLYCHUK
- Supporter
- Posts: 780
- Joined: 12 Sep 2004 19:42
- Location: Abbotsford B.C.
Re: Stu's 1972 4 Door
A job well done.